ArtsAutosBooksBusinessEducationEntertainmentFamilyFashionFoodGamesGenderHealthHolidaysHomeHubPagesPersonal FinancePetsPoliticsReligionSportsTechnologyTravel

Cheap chic: How to brighten a drab hallway in 30 minutes
Updated on November 1, 2014
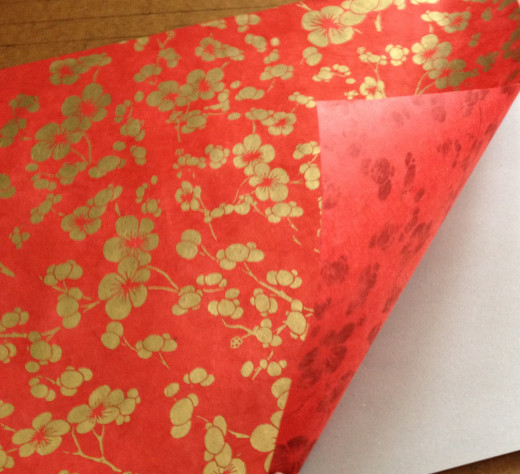
This gorgeous sheet of hand made paper
This gorgeous sheet of hand made paper | Source

What is your home to you?

Is your home more a sanctuary? Or more a place to hang your hat?

See results

30 minutes and a stunning piece of red and gold handmade paper helped to change our mood every time we open the door

Our home is our sanctuary. When my sweetheart and I step across the threshold into our home, we hope to leave behind any stresses and cares.

Home is where we share, love, relax, rejuvenate. For a long time, though, our bleak entry way did nothing to lift our spirits.

From the first day we moved into this apartment, we intended to hang a beautiful piece of original art above the entry hall table. Seven years later, we still haven't found that just-right piece.

One day, while exploring a favorite art supply store, I found a stunning sheet of handmade paper, rich in the golds and reds we love. But what to do with it? Light bulb moment: Display the paper and brighten that dull hallway.

Pretty as this paper is, it's a temporary decorating fix--cheap chic--so it requires no special handling. In twenty minutes I had trimmed and hung it in a plain store-bought frame. That gave me a few more minutes to add a few little touches to make the entry all the more inviting.

By the time I was finished, the clock hadn't hit thirty minutes, and I had completed a mini makeover of our hallway that says "Welcome home!" every time we walk through the door.


Before the makeover: Entering the apartment was not as welcoming as we would like
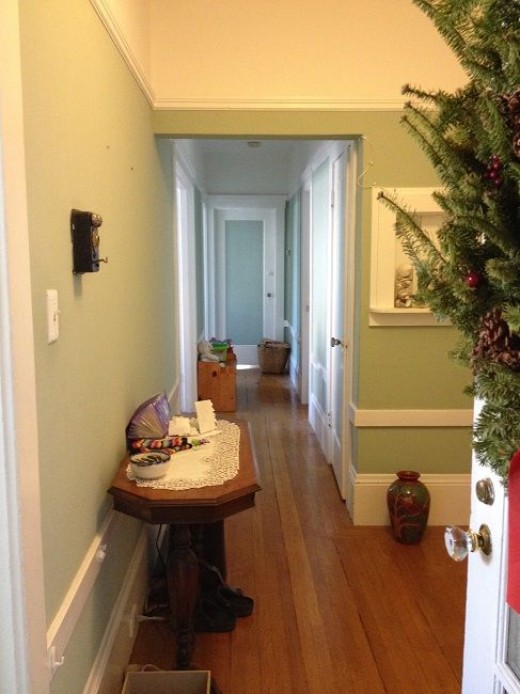
This is what you saw when you opened the front door last Christmas, before I found the art paper.
This is what you saw when you opened the front door last Christmas, before I found the art paper. | Source

In this "before" picture, you see how drab and unwelcoming our entryway was before I stumbled across that piece of handmade paper that inspired me to give it a mini facelift.

On this page, I'll show you just how easy it was to frame the paper and make a few quick changes that made all the difference.

See that large vase on the floor? That played a part in this makeover too. But what to do with the unopened mail that accumulates during the week, and that ugly plastic receipt binder that is most useful if it stays on the table, where we can easily file the receipts as we take them from our pockets each day?

The answers, coming up.

Entry table before I found that lovely bit of paper
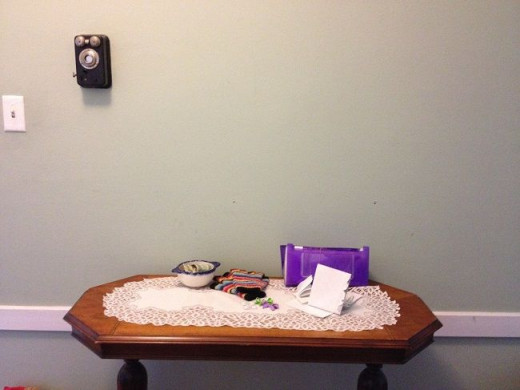
Before: Our plain, cluttered entry table, not at all welcoming
Before: Our plain, cluttered entry table, not at all welcoming | Source

Pretty boring, yes? Cluttered too. While we're waiting for that perfect piece of art to come along--some day--I've hung that beautiful hand-crafted paper. I made a couple of other changes, too. Small ones. Simple ones.

First, though, I had to frame the paper. Here's how.

How to frame art paper in 30 minutes or less
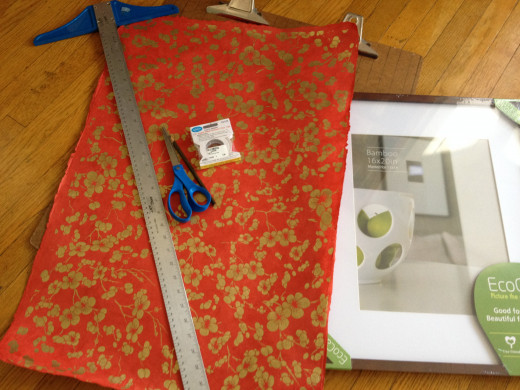
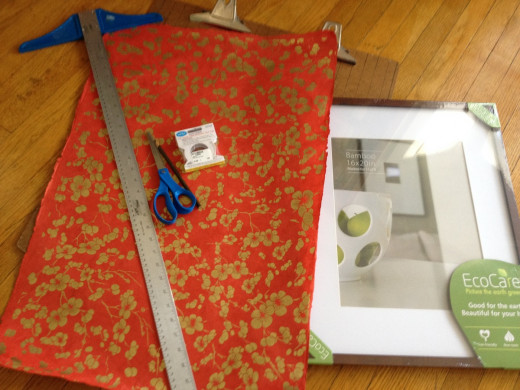
Supplies you will need: Art paper, T-square, sharp paper scissors, pencil, mounting tape, picture frame with glass, protective surface on which to score and cut the paper
Supplies you will need: Art paper, T-square, sharp paper scissors, pencil, mounting tape, picture frame with glass, protective surface on which to score and cut the paper | Source

To do the job quickly, plan ahead and make sure you have all the supplies on hand. The complete list follows, so you can print it off and take it with you.

Since I had no suitable work table, I used the floor, protecting it with a quilt and an artboard from my college days. If you don't have an art board, a piece of Masonite or a sturdy piece of cardboard will help to protect your table or floor.

Beneath my art board, I placed a quilt, which you will see in subsequent pictures, to protect the wood flooring in case my arthritic hands slipped while I was cutting the paper.


Time
20-30 minutes
Difficulty
Easy

Materials and costs

  • One sheet gold and red art paper: $5
  • Frame: $32.
  • Archival tape: On hand and partially used, but the roll cost about $2.50 when I bought it a few years back.

Total cost: $39.50

Tools

  • Soft-leaded pencil
  • T-Square
  • Scissors or Exacto knife
  • Hard surface on which to measure and cut, such as an art board, a piece of Masonite, or sturdy cardboard slab
  • Padded surface on which to work

Instructions, step-by-step

Click thumbnail to view full-size
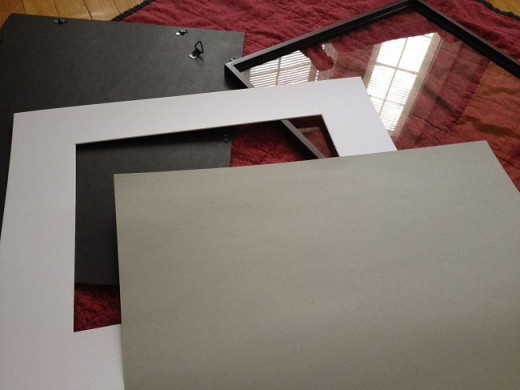
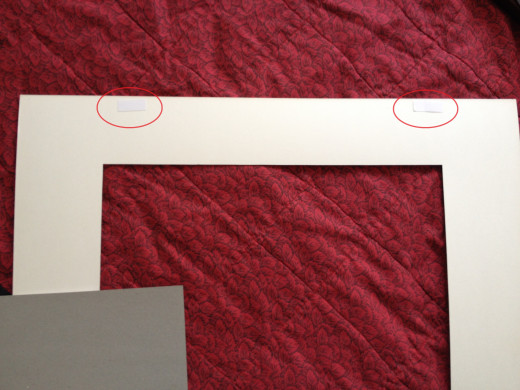
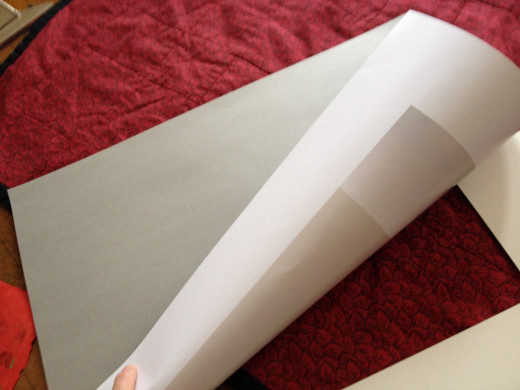
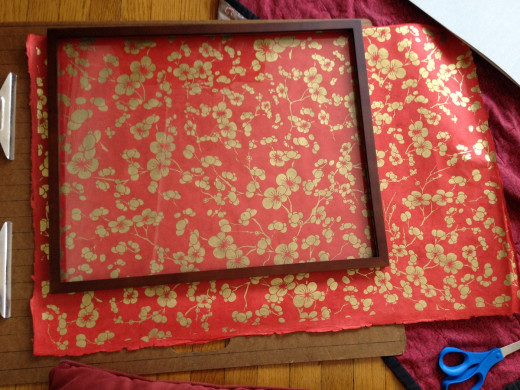
Step 1: Assemble your materials and tools and a soft pad to place under your hard work surface so you don't inadvertently score your table (or in my case, the floor) when you cut the paper. I used a small quilt.Step 2. Carefully disassemble the frame. Save the backing and matting, as you will use them in this project. Step 3. Affix two small pieces of double-sided archival tape to the top of the matting as shown in this photograph. Peel off the top layer to expose the sticky topside of the tape.Step 4. Place the backing, photo side down, on the matting and press against the tape to secure. This is the surface on which you will mount the decorative paper.Step 5. Place the frame and glass over the art paper, design side up, until you've found exactly the portion of the design you want to show when it is hanging on the wall.Step 6. Carefully lift the frame from the paper, leaving only the glass, and sketch a light line around the glass. Then, using the T-square and your paper-cutting shears or an Exacto knife, cut the paper along the sketch lines. Step 7. Repeat the tape procedure in Steps 3 & 4, securing the art paper, design side up, against the backing.Step 8. Place the assembled paper, backing and matting against the glass, reassemble the frame and lock the back into place.Step 9. Hang the framed paper
Step 1: Assemble your materials and tools and a soft pad to place under your hard work surface so you don't inadvertently score your table (or in my case, the floor) when you cut the paper. I used a small quilt.
Step 1: Assemble your materials and tools and a soft pad to place under your hard work surface so you don't inadvertently score your table (or in my case, the floor) when you cut the paper. I used a small quilt. | Source
Step 2. Carefully disassemble the frame. Save the backing and matting, as you will use them in this project.
Step 2. Carefully disassemble the frame. Save the backing and matting, as you will use them in this project. | Source
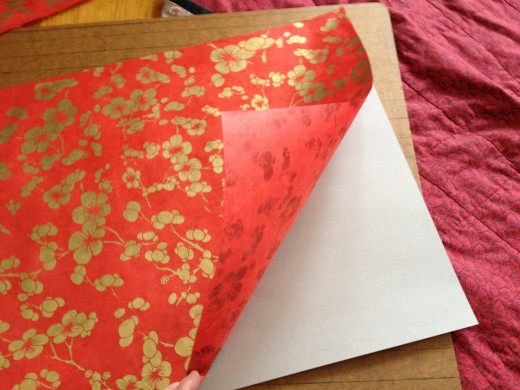
Step 3. Affix two small pieces of double-sided archival tape to the top of the matting as shown in this photograph. Peel off the top layer to expose the sticky topside of the tape.
Step 3. Affix two small pieces of double-sided archival tape to the top of the matting as shown in this photograph. Peel off the top layer to expose the sticky topside of the tape. | Source
Step 4. Place the backing, photo side down, on the matting and press against the tape to secure. This is the surface on which you will mount the decorative paper.
Step 4. Place the backing, photo side down, on the matting and press against the tape to secure. This is the surface on which you will mount the decorative paper. | Source
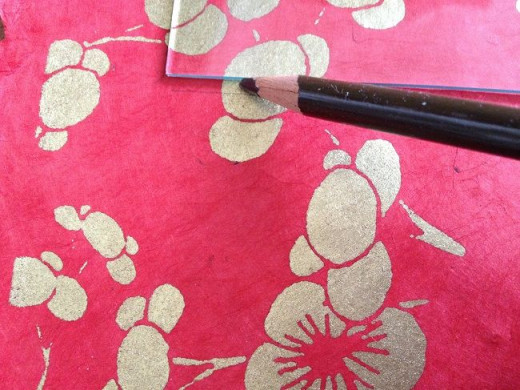
Step 5. Place the frame and glass over the art paper, design side up, until you've found exactly the portion of the design you want to show when it is hanging on the wall.
Step 5. Place the frame and glass over the art paper, design side up, until you've found exactly the portion of the design you want to show when it is hanging on the wall. | Source
Step 6. Carefully lift the frame from the paper, leaving only the glass, and sketch a light line around the glass. Then, using the T-square and your paper-cutting shears or an Exacto knife, cut the paper along the sketch lines.
Step 6. Carefully lift the frame from the paper, leaving only the glass, and sketch a light line around the glass. Then, using the T-square and your paper-cutting shears or an Exacto knife, cut the paper along the sketch lines. | Source
Step 7. Repeat the tape procedure in Steps 3 & 4, securing the art paper, design side up, against the backing.
Step 7. Repeat the tape procedure in Steps 3 & 4, securing the art paper, design side up, against the backing. | Source
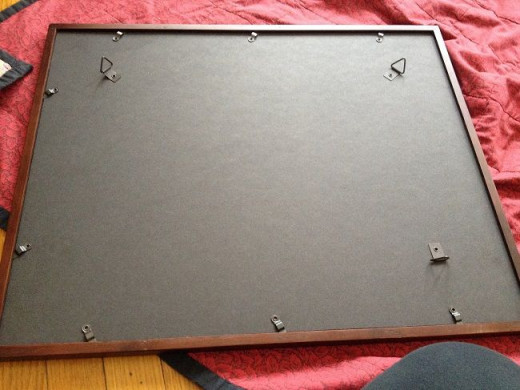
Step 8. Place the assembled paper, backing and matting against the glass, reassemble the frame and lock the back into place.
Step 8. Place the assembled paper, backing and matting against the glass, reassemble the frame and lock the back into place. | Source
Step 9. Hang the framed paper
Step 9. Hang the framed paper | Source

After mini makeover, our hallway is more welcoming and peaceful
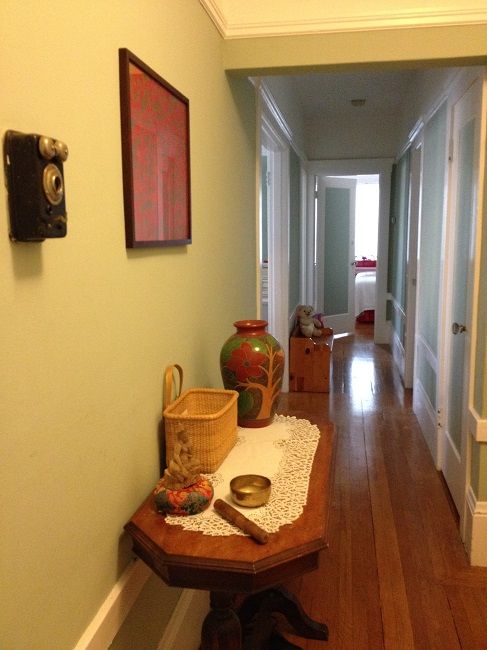
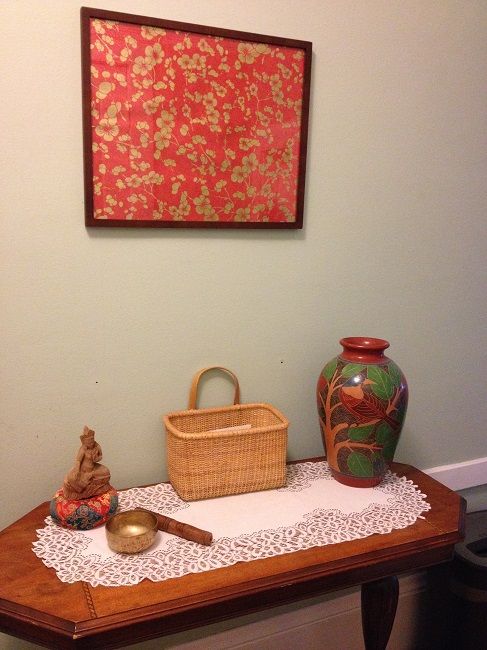
Our hallway after its mini makeover, with the lovely vase now given a place of prominence on the table, and near the framed art paper whose warm reds and golds it echoes
Our hallway after its mini makeover, with the lovely vase now given a place of prominence on the table, and near the framed art paper whose warm reds and golds it echoes | Source

Now I realize my iPhone camera decided to turn the color of the wall from soft sage to this mustardy yellow, so please know I did not repaint the wall. It's just the quirks of the lighting and the camera.

What I did do, besides hang the framed paper, is give that lovely handmade Peruvian vase, with its trees and birds, a showcase spot on the table.

A gift from an old friend, the vase reminds me of her whenever I see it. Now that it's on the table, I enjoy its well-wrought design every time I come in the door. Quite often, I reach out and touch its cool exterior, imagining the artisan who made it, the hands that formed the clay and painted the design. For that moment, I am connected to my friend and to her relatives in a faraway land, who made this vase.

Another item that pleases the eye, adds warmth and texture, and didn't cost me a cent when I did this makeover: The basket, which I found in the back of a closet. It keeps our receipt minder and mail tucked away out of sight but handy.

To open up the other end of the hall, I found a more out-of-the-way home for the basket of blocks. Just that small move makes walking into our bedroom a pleasure once more.

Tara's cushion and the vase both echo the golds and reds of the paper
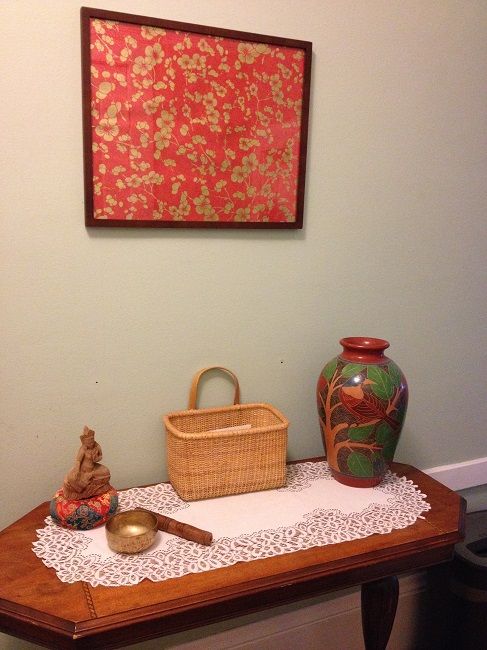
Paper framed and hung, table tidy and welcoming us with handmade symbols of peace and of the beautiful Earth that is our home
Paper framed and hung, table tidy and welcoming us with handmade symbols of peace and of the beautiful Earth that is our home | Source

To deepen the sense that our home is our sanctuary, I placed a small, hand-carved Green Tara, which I've had for many years, on the end of the table nearest the door, along with a Tibetan bell.

Ringing that bell when we enter reminds us to honor ourselves, each other, and the joyful space we create for ourselves here.

With the mail and receipt binder tucked away in the pretty basket, and the bell and Tara to remind us to take a deep breath and relax, coming home is a pleasure. We pause, take a deep breath, and enter sacred space.

Devices such as a Tibetan bell help to train our bodies and minds to relax the moment we open the door

If your home is your retreat, as ours is, consider adopting a few small rituals to mark your exit from the world of strife and your entrance to a peaceful respite.

The mellow sound of a Tibetan bell calms me instantly. You might find this true for you as well.

Take off your shoes when you step inside your home and ring the bell that signals a shift in your thinking and being. Such a simple ritual can ease a troubled spirit and help to heal a wounded heart.


Small changes make a big difference

I learned to make simple, small changes--the kind that make a big difference in comfort and ease--from author Karen Kingston, in her book Clear Your Clutter with Feng Shui.

From her I learned to look at my living space with new eyes, and to think creatively about solutions like this one with the handmade paper.

Not only does Kingston guide us gently through clearing our clutter room by room, she also shows us how to make our living spaces more beautiful, pleasing and conducive to the lifestyle we crave and cherish, whatever that may be for each of us.

It's a small book and an easy read. Yet its guidelines can be truly transforming for someone living with mounds of unsightly clutter, or anyone just trying to clear their space a little more.

working

This website uses cookies

As a user in the EEA, your approval is needed on a few things. To provide a better website experience, hubpages.com uses cookies (and other similar technologies) and may collect, process, and share personal data. Please choose which areas of our service you consent to our doing so.

For more information on managing or withdrawing consents and how we handle data, visit our Privacy Policy at: https://corp.maven.io/privacy-policy

Show Details
Necessary
HubPages Device IDThis is used to identify particular browsers or devices when the access the service, and is used for security reasons.
LoginThis is necessary to sign in to the HubPages Service.
Google RecaptchaThis is used to prevent bots and spam. (Privacy Policy)
AkismetThis is used to detect comment spam. (Privacy Policy)
HubPages Google AnalyticsThis is used to provide data on traffic to our website, all personally identifyable data is anonymized. (Privacy Policy)
HubPages Traffic PixelThis is used to collect data on traffic to articles and other pages on our site. Unless you are signed in to a HubPages account, all personally identifiable information is anonymized.
Amazon Web ServicesThis is a cloud services platform that we used to host our service. (Privacy Policy)
CloudflareThis is a cloud CDN service that we use to efficiently deliver files required for our service to operate such as javascript, cascading style sheets, images, and videos. (Privacy Policy)
Google Hosted LibrariesJavascript software libraries such as jQuery are loaded at endpoints on the googleapis.com or gstatic.com domains, for performance and efficiency reasons. (Privacy Policy)
Features
Google Custom SearchThis is feature allows you to search the site. (Privacy Policy)
Google MapsSome articles have Google Maps embedded in them. (Privacy Policy)
Google ChartsThis is used to display charts and graphs on articles and the author center. (Privacy Policy)
Google AdSense Host APIThis service allows you to sign up for or associate a Google AdSense account with HubPages, so that you can earn money from ads on your articles. No data is shared unless you engage with this feature. (Privacy Policy)
Google YouTubeSome articles have YouTube videos embedded in them. (Privacy Policy)
VimeoSome articles have Vimeo videos embedded in them. (Privacy Policy)
PaypalThis is used for a registered author who enrolls in the HubPages Earnings program and requests to be paid via PayPal. No data is shared with Paypal unless you engage with this feature. (Privacy Policy)
Facebook LoginYou can use this to streamline signing up for, or signing in to your Hubpages account. No data is shared with Facebook unless you engage with this feature. (Privacy Policy)
MavenThis supports the Maven widget and search functionality. (Privacy Policy)
Marketing
Google AdSenseThis is an ad network. (Privacy Policy)
Google DoubleClickGoogle provides ad serving technology and runs an ad network. (Privacy Policy)
Index ExchangeThis is an ad network. (Privacy Policy)
SovrnThis is an ad network. (Privacy Policy)
Facebook AdsThis is an ad network. (Privacy Policy)
Amazon Unified Ad MarketplaceThis is an ad network. (Privacy Policy)
AppNexusThis is an ad network. (Privacy Policy)
OpenxThis is an ad network. (Privacy Policy)
Rubicon ProjectThis is an ad network. (Privacy Policy)
TripleLiftThis is an ad network. (Privacy Policy)
Say MediaWe partner with Say Media to deliver ad campaigns on our sites. (Privacy Policy)
Remarketing PixelsWe may use remarketing pixels from advertising networks such as Google AdWords, Bing Ads, and Facebook in order to advertise the HubPages Service to people that have visited our sites.
Conversion Tracking PixelsWe may use conversion tracking pixels from advertising networks such as Google AdWords, Bing Ads, and Facebook in order to identify when an advertisement has successfully resulted in the desired action, such as signing up for the HubPages Service or publishing an article on the HubPages Service.
Statistics
Author Google AnalyticsThis is used to provide traffic data and reports to the authors of articles on the HubPages Service. (Privacy Policy)
ComscoreComScore is a media measurement and analytics company providing marketing data and analytics to enterprises, media and advertising agencies, and publishers. Non-consent will result in ComScore only processing obfuscated personal data. (Privacy Policy)
Amazon Tracking PixelSome articles display amazon products as part of the Amazon Affiliate program, this pixel provides traffic statistics for those products (Privacy Policy)
ClickscoThis is a data management platform studying reader behavior (Privacy Policy)