How to Build a Shed - Our Experience

Building Our Backyard Storage Shed
We were running out of storage space in our small carport tool shed and decided to build a simple 7 ft x 8 ft storage shed in the backyard. Though my husband is an electrician, we opted to build a storage shed without electricity which made the task much easier (and cheaper). No building permits were required because the zoning in Honolulu county allows you to forgo the permit if the structure is no larger than 10 ft x 10 ft.
We built this shed on a "pay as you go" basis, meaning we worked on it when money and time allowed. We've always done DIY jobs and have accumulated a lot of tools and knowledge over the years. Still, there is always something new to learn on most projects. Check your local building codes, take advantage of online DIY resources, and get to know the most knowledgeable of the staff at your local home improvement store if needed.
We don't claim to be experts in this building process; the purpose of this lens is to share our experience. You should do whatever works for you and what is allowed in your area. Good luck, always work safely during construction and wear your safety goggles!
(Photo credit Pam Irie)

Build a Shed With Accurate Measurements
Measure twice. Cut once. Use a good carpenters square as a guide to make accurate cuts. Note the big X on the board.....we mark an X on the section of the board that will NOT be used in the project.
This marking comes in especially handy when the cut pieces are close in size. It can also indicate a section of board which may be a little too warped or knotted to use.
(Photo credit Pam Irie)
Building Lingo and Terms
Learn the meaning of words like header, footer, toenailing, roof pitch, etc. It will help you to understand the basics of building and when you're constructing something, these are good things to know. :)


The Form for the Concrete Slab Foundation
To create the form for pouring the cement slab, we used 2x4s held up by steel spikes driven into the ground. It took a total of 17 batches in a small concrete mixer to make the concrete slab foundation 3 1/2" thick. Of course, we don't have to worry about freezing temperatures here in Hawaii, so our foundation doesn't need to be as thick as it would if we were building in some parts of the mainland.
Our major points of concern before we began mixing the cement was to make sure the form was square, the ground was tamped level and our wire mesh was in position.
There are some great how-to diy books on working with cement available if you've never worked with it before.
(Photo credit Pam Irie)
From the Builder's Bible....
MEASURE TWICE - CUT ONCE!
Tools and Equipment You May Need to Build a Shed
Tamper with Ash Handle
5 Cubic Feet Wheelbarrow Portable Cement Concrete Mixer
4 piece Concrete Trowel Set
30-Feet Measuring Tape with Magnetic End
DEWALT 18-Volt Drill/Driver Kit
Bostitch Framing Nailer
Porter Cable Pancake Compressor with 13-Piece Accessory Kit
DEWALT 12-Inch Compound Miter Saw
Stanley Xtreme Box Beam Level
Caulking Gun

Framing the Walls of Our Shed
Constructing one of the side wall frames for the shed. The pneumatic nail gun really makes the job go quickly.
Note: we built the frame to accommodate the dimensions of the odd-sized windows we got at the local Habitat for Humanity ReStore.
(Photo credit Pam Irie)

Positioning the Shed Walls
This is a two-man (or one man and one woman as in our case) job. It also helps to have some extra 2x4s around to serve as temporary supports while the walls are being placed into position.
(Photo credit Pam Irie)

Securing the Shed Walls
To secure the walls to the foundation, we used large bolts that had been previously placed in the cement when it was leveled out, but still wet enough to manuever. The bolts' postitions were marked on the bottom 2x4s base plates and cooresponding holes were drilled into the wood.The framing was then lifted over the bolts, (that was fun - NOT!) and each section of the bottom plate was secured into place by a large washer and nut.
Remember to lay a strip of roof waterproof vapor barrier between the plywood and concrete before setting the wood down over the bolt. It helps to protect the wood from excess moisture (and we do get a lot of winter rain here.)
(Photo credit Pam Irie)

Connecting the Shed Walls
All four walls are up and nailed together. We decided to build our own door (actually double doors) so a 4 ft wide opening was framed into the front wall. A 4 ft opening will make it easier to get bulkier equipment in and out of the storage shed.
(Photo credit Pam Irie)

Building the Truss
The truss was built and put into place one beam at a time. To build the truss, we had to figure out the height and pitch of the roof desired and then designed the truss around it.
truss: A rigid framework, as of wooden beams or metal bars, designed to support a structure, such as a roof.
(Photo credit Pam Irie)

Roof On and Shed Windows Installed
5/8 " plywood was nailed to the truss to form the shed's roof. The plywood was topped with roofing felt to help protect the wood until we pick our metal roofing.
The louvered windows are secured in the framed openings.
Back wall and one side of shed has T-111 exterior siding already up. There will be no insulation (none needed) so that saves additional time and money.
(Photo credit Pam Irie)

Exterior Walls of Shed
The T-111 siding is on. After this, the double doors were built, but I forgot to take pictures of that step. Sorry.....
(Photo credit Pam Irie)

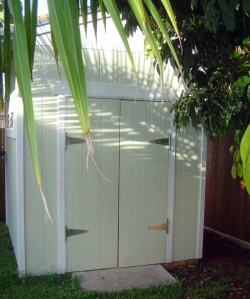
Finishing the Shed
The double doors are hung! Also, if you look closely on the one side wall, you can see the windows have been framed out with 1x4s with butt corners (no fancy miter corners needed). :)
The exterior was then primed, caulked and painted. (see intro photo for finished look)
(Photo credit Pam Irie)
Storage Hardware - to help keep a shed organized.

Heavy Duty Hardware
The heavy duty galvanized door hinges were also purchased at the local Habitat for Humanity ReStore for $1 each. We needed this very strong hardware to support the weight of the double doors to the shed. Hardware like this can be really expensive, so we were thrilled to get it so cheaply.
(Photo credit Pam Irie)

Storage Inside Shed
Not hanging drywall or putting in insulation allows us more storage space inside the shed. We custom built extra deep shelves on the back wall of the shed. There is also a good amount of storage space available in the rafters overhead.
Note: the faded red portable cement mixer parked in the rear. It's saved us a lot of money over the years.
(Photo credit Pam Irie)

Keep Cost of Supplies Low
We were already saving a ton of money by building the shed ourselves, but there were other things we did to keep to our tight budget.
1. We purchased the two brand new louvered windows at our local Habitat for Humanity ReStore for a very economical price. In fact, we designed the side wall framing around the dimensions of these windows.
2. Some major hardware pieces were also purchased at the ReStore.
3. Because we do a lot of diy projects, we often have leftover materials. We always scrounge through these items first before purchasing new.


")


