How-To Hints for DIY Home Staging


How-To Hints for DIY Home Staging
Thinking of selling your home? To set yourself apart from and position your residence above your competition, your property cannot look like an unmade bed. Learn how-to hints for DIY home staging from a professional in the business..
When you put your home on the market, your goal is to sell it quickly and for as close to the asking price as possible!
With very few exceptions, the reality is that buyers are generally unable to visualize what their furnishings would look like in your home, which is why staging your property is so important.
When a house is for sale, you want to accent any and all architectural features, a room's size, the function of each room, square footage, or a beautiful view. To do that successfully, it is critical that these attributes be easily visible, not obscured by too many personal items, too much furniture, or taste-specific paint colors, wallpaper and wallpaper borders, collections or accessories .
The process is called "staging" for a reason: you are setting the stage, directing the buyer's attention where you want it to go.
Learn several easy do-it-yourself tricks in this lens to stage your own home for sale, which will help it to sell more quickly, netting you more money, allowing you to move on to your next adventure!
Work From the Outside In
Staging starts curbside, so be sure to:
- Sweep up.
- Mow the lawn.
- Trim the shrubs.
- Put away toys, bikes, unneeded tools or lawn furniture.
- Touch up exterior paint.
- Wash the windows.
- Replace or freshen up dated house numbers, exterior lighting, front door hardware, mailbox.
- Paint or refinish front door and garage doors.
- Repair sidewalks, steps, porch or stoop.
Goal #1: Get Buyers Out of The Car and Into Your Home! - They cannot buy your property if they never get in to see it...
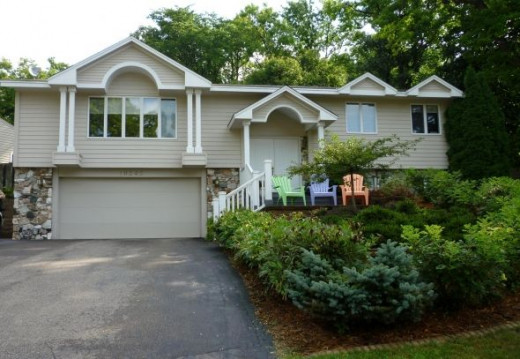
The house shown in this picture looks pretty good, EXCEPT for the three plastic, pastel Adirondack lawn chairs on the front stairway landing. They immediately distract the buyer by drawing all attention to them, preventing the buyer from looking at the home's very nice exterior and attractive landscaping.
The chairs are too taste-specific for broad market appeal and are better suited for a back-yard application. They distract the eye from seeing the front door with its interesting barrel-vault detail.
Image:KateHon
The Focus is Now on the Great Detail of the Property's Facade
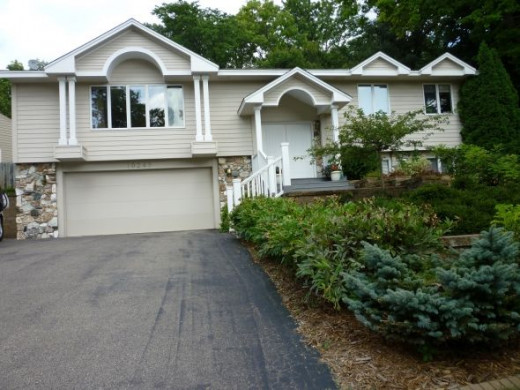
By simply removing the chairs, the entire front facade comes into focus. The double-column detail framing the picture window is seen first, and the prospective buyer's eye moves naturally to the right, finding the sheltered front door entry. Mission accomplished at $0 cost.
Image:KateHon

Make a Good First Impression!
Once the buyer steps inside your front door, keep him interested by making a good first impression:
- Get everything and keep everything squeaky clean.
- Clean or replace dated, broken or dirty tile, carpeting, or other flooring as your budget allows.
- Paint dingy walls, ugly woodwork or drab ceilings.
- Manage pet and cooking odors - have an unbiased friend give your home a sniff test to be sure there's nothing fishy going on.
Goal #2 - You Only Have One Chance to Make a Good First Impression... - ...and this rug does NOT do it!
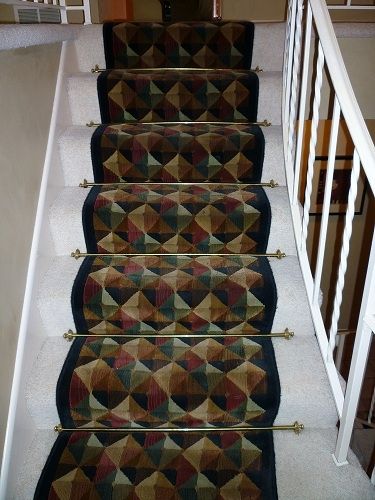
Upon entering the home, a common Midwestern split-entry design, you are faced with a decision to either go up a half-flight of stairs to the LR, DR, kitchen and BRs, or down a half-flight to the lower-level family room and two additional BRs. The runner covering the carpeting on the stairs was wool and so thick it made it difficult to walk on, not to mention ugly to look at.
I loosened the runner on one location to determine the condition of the carpet underneath and discovered that the protected carpeting was a completely different color than the exposed carpet, forcing us to either get all new carpeting or keep a runner of some kind on the stairs.
The realtor told me the homeowner did not want to replace the carpet, which ran continuously throughout the stairs and upper-level living area, but he would be willing to replacing the runner on the stairs.
We had a total working budget available of $300, so I had to do some smart shopping...
Image:KateHon
The Greek Key Design in the New Runner Invites You Upstairs to See More! - Less contrast between the carpet and the runner offers a more sophisticated look
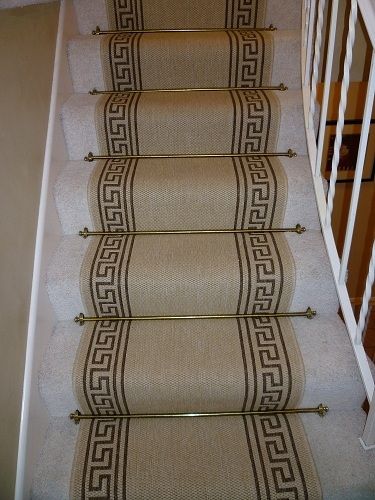
I found a faux-sisal runner at Lowe's, available by the yard. It cost around $100 to cover the upper and lower staircases. The homeowner removed the old runner and installed the new one in just a couple of hours.
The Greek key design is classic and never goes out of style. It works equally well with virtually all home styles.
The new runner is much thinner than the old one, making it easier to navigate up and down the stairs. The lighter color of the runner makes the stairwell much brighter, a big advantage, since the foyer has no window to provide natural light.
Image:KateHon
Do you have staging questions? Need some advice? Jot down what you need and I will do my best to answer quickly and concisely.
Help Buyers Visualize Themselves Living in Your Space
Every room needs to be inviting, drawing buyers in:
- Arrange furniture to promote easy conversation.
- Center furniture around a natural focal point, such as a large window or fireplace.
- Take advantage of a large room to pull furniture away from the walls, providing everything room to breathe.
- Each conversation area needs at least three sources of lighting.
- Divide large rooms into multiple seating areas or multiple uses.
- Keep room-to-room walkways at least three feet wide.
Goal #3 - Make Rooms Comfortable and Approachable - This large room is austere, with awkwardly-placed furniture and out-of-scale accessories
The living room is at the top of the foyer stairs and is large and long. When I arrived to stage this property, I found the room looking like this. Because of the poorly-placed furniture, too-small accessories and dated window treatments, my initial response was that the room was cold and off-putting. Yuck.
All the furniture was situated at the far end of the room, giving it the feel of a bowling alley or long runway.
There is also a very large roll-top desk in the room, not shown, which could not be moved, due do its extreme weight. I needed to arrange the room so the desk felt like a part of the whole room, not an island unto itself.
Almost all of the artwork and accessories were too small, in the wrong place, or non-existent; everything needed to be changed, moved or added to.
However, I rather liked all the furniture and knew I could make the room sing.
Image:KateHon
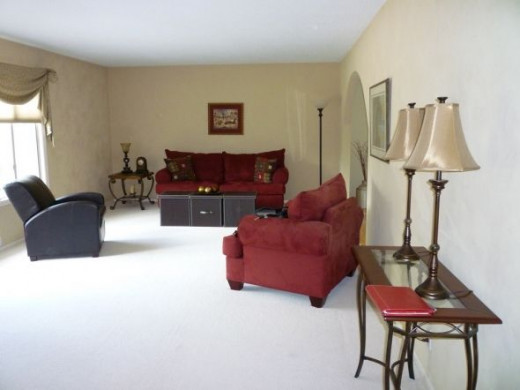
Accentuate the Positives - Now the living room has a focal point and the furniture is arranged to promote cozy conversations

I spent $52 to update this room:
$20 on a pair of grommet-top dupioni-silk drapery panels
$32 on the two down-filled pillows on the sofa
I found the drapery panels and the pillows at HomeGoods.
I centered the furniture on the large picture window, drawing the buyer's attention to the pretty view, while simultaneously showcasing the spacious size of the living room. I added the pillows to the sofa, as a means of marrying all various colors found in the room's furnishings and providing an interesting punch of color.
I brought the potted tree up from an unused lower-level bedroom to fill the corner behind the sofa and infuse a bit of nature into the room.
I hung the drapery panels on the existing rod which previously held the swag-and-jabot treatment. The silk content and the simple grommets of the panels give a more updated and upscale look to the room.
I swapped the location of the two chairs, putting the smaller-scaled leather chair near the opening to the dining room. This allowed me to place the end table, formerly located on one side of the sofa, next to the leather chair.
I moved the sofa table from the front of the living room to behind the sofa. I traded the pair of buffet lamps from the living room for a pair of lamps from the bedroom. I put one lamp on the table behind the sofa and the other on the side table next to the leather chair.
I put the floor lamp, which was in the room's far corner, behind the large red chair, now located next to the picture window. Now I had the requisite three sources of lighting the room demanded. Everyone seated in the room would have enough light to read by, if they desired to do so.
I brought in the large, dark-framed cityscape from another room and hung in on the wall behind the sofa to repeat the dark tones found in the three leather cubes, used as a coffee table, and the dark leather chair. The picture's large scale provided the proper balance for all the furniture.
I brought just a few accessories from other parts of the house into the living room to fill the voids on the sofa table, end table and coffee table. When staging a home, less is more!
Image:KateHon
Get Your Kitchen Looking the Best It Can!
Update your kitchen as much as budget allows:
- Install new cabinet hardware.
- Put in a new kitchen sink or faucet.
- Freshen and neutralize your kitchen walls with paint.
- Update appliances, if necessary.
- Redo kitchen flooring, if old or outdated.
- Replace kitchen countertops, if damaged, dated or worn.
- Clean your wood cabinets with a mild soap and water solution, then condition with lemon oil.
- Clear off your countertops, to present as much open counter space as possible.
Goal #4 - Kitchens SELL Houses - Make sure yours is up to par
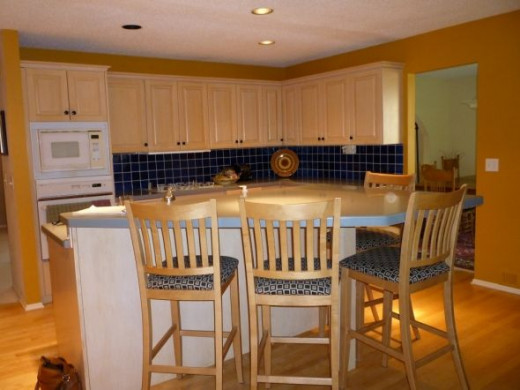
The kitchen in this home was remodeled in the late 1990s and it features natural maple cabinets, navy blue 4"X4" backsplash tile and cabinet hardware, and light blue Corian countertops. The appliances date from the remodel.
The good points of this kitchen are the smart layout of the room, the plentiful maple cabinets and raised island with seating for eating, homework and easy interaction with guests while cooking.
The less than ideal features of this kitchen include the dark blue cabinet hardware and backsplash tile, the older appliances, the mustard-colored walls, and especially the light blue Corian countertops.
Blue is a very taste-specific color, which greatly narrows the market of buyers.
My goal was to bring attention to the great cabinets and design of the room and detract the buyer from the less-than-ideal older appliances and blue elements of the room.
Make the Most of What You Have - Decide what is most important
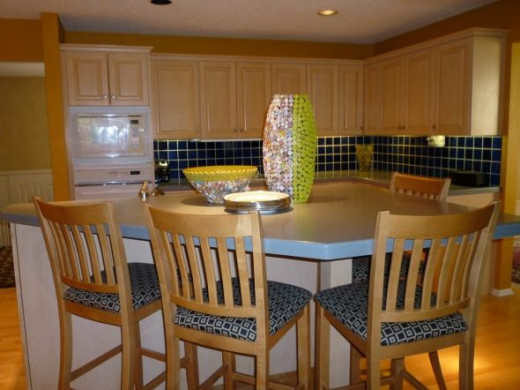
Since I only had a total budget of $300 to work with on this stage and I had already spent half of it on the foyer runners and living room accessories, I had to decide the best way to showcase the kitchen for the least amount of money.
I could not afford new countertops, appliances or backsplash tile, but I COULD afford to get new cabinet hardware and perhaps a few accessories for the kitchen island.
All the cabinets doors and drawers already had dark blue knobs, which drew the buyer's eye right to them and then on to the navy blue backsplash tile. I decided to replace the dark knobs with brushed nickel knobs, in order to keep the buyer's eye moving around the room, stopping only where I wanted it to with strategically-placed accessories.
I found new knobs at a local big-box hardware store in contractor-sized bulk quantity boxes of 25. Each box was priced at $15 and I needed two boxes, for a total expenditure of $30.
The realtor with whom I was working offered the use of some of her personal accessories, so we did not have to spend anything on extra doo-dads.
After we were done changing out the cabinet hardware and placing the accessories, the kitchen felt much fresher and more up to date.
I always encourage sellers to stow away daily-use small appliances and kitchen utensils before showings and open houses. Your goal is to present your kitchen in the best light, and showing off acres of bare countertops goes a long way to achieving that goal. Keep a box handy to allow for quick storage of your everyday items.
The kitchen, above, had hard-wired under-cabinet lighting, a great feature for any kitchen. An easy way to include under-cabinet lighting in your kitchen is to use battery-operated under-cabinet lights. They are quick to install, requiring only a screwdriver and some batteries. Additional task lighting is always welcome when reading recipes and during food prep.
Image:KateHon
Battery-Operated Under-Cabinet Lighting Ideas

Cabinet Hardware Options
The Master Bedroom Should be Fit for a King
It is easy to make your master bedroom ready for royalty:
- Wash your sheets frequently! Nothing is worse than stinky bedding!
- Edit your bedside reading material and accessories. Limit it to a clock and one book or magazine. Period.
- Keep your dresser surfaces clear.
- Remove excess furniture to make the room look larger.
- Pre-pack out-of-season clothing and hang remaining clothes on a single style of hangers.
- Clear off the closet floor and store those items in another location.
Goal #5 - The Master Bedroom Should Appeal and be a Retreat From the World - This bedroom does neither
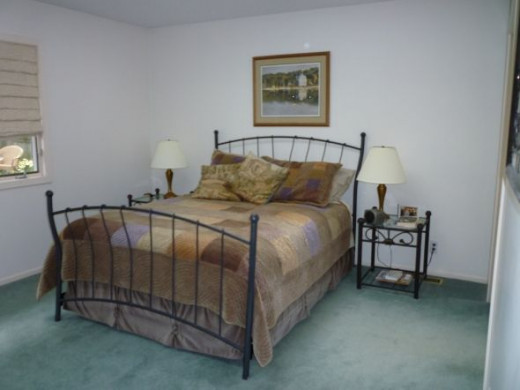
This home was owned by a single man and it showed most clearly in the master bedroom.
The carpet was dingy and worn and the room smelled BAD, like dirty bed sheets. Yuck.
Since there was little money left in the budget, I had to get creative.
Image:KateHon
How to Make a Pretty Bed for Under $10!
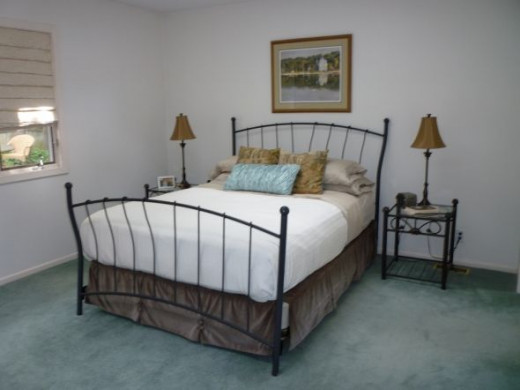
The first thing I did was to take off the velvet patchwork quilt and velvet pillow shams. That lightened and brightened the room enormously! Underneath the quilt I found a white cotton blanket, which I tucked in neatly, creating a sleek silhouette.
I purchased the large aqua kidney pillow at Homegoods for only $9.99 and it became the focal point of the bed.
I had already brought the buffet lamps into the bedroom from the living room and they were the perfect scale for the bed. Their slim size and exaggerated height really complemented the bedframe. Be careful to use lamps of the correct size for your bed or headboard. Spend an hour looking at vignettes in furniture stores for an idea of the right scale and size to use - it helps!
Once the bed was remade, the accent pillow added, the lamps placed and the bedside table's accessories were edited, the room looked great! Even the worn carpet looked better and less objectionable.
Image:KateHon
Simple, Elegant Bedding, Sheets and Bedframe Options


Bottom line when selling a home? Keep it clean! Edit ruthlessly! Put your home's best foot forward!
Which Part of This Stage Do You Think Made the Biggest Difference? - You must have an opinion! It matters! Vote now!!

Was there one area or room that made the biggest impression on you? Share your reasons why after voting!
Light Up Your Life - Read more and do more with better light
If you love to read, do needlework or the New York Times crossword puzzle, you need a quality reading light. Check out this classic, timeless pharmacy light and add it to your must-have lighting list. Get a pair of them to really light up your life!
Once you decide to sell your home, it becomes a product to market in the best manner possible:
Look at your home through the buyer's eyes.
Take an afternoon and go to various open houses for ideas of what to do and what not to do.
Look at properties online for even more valuable input.
Pre-pack personal belongings - it will save time later.
Consider each room's purpose and be sure to clearly present that purpose.
Contact me if you have ANY questions! I am here to help you!
Did you stage it or leave it as it was? How was the process for you? I would love to hear about your experiences!


")

