How to Insulate a Loft and Save Money

Did you know?
-
About 25% of a house's heat is lost through a badly insulated loft

It's estimated that a saving of at least £180 ($295) can be made per year by insulating a loft properly. These figures may seem unbelievable and could be the reason why some folks don't get round to insulating their lofts correctly. Badly insulated buildings contribute nearly half of all CO2 emissions. Heat generated inside a building escapes not only through the roof, but also through doors, windows and walls; and obviously wherever there is a draft, heat also escapes - and quickly.
The thermal image to the right is worth a thousand words and shows the reality of many houses. In this particular case, however, the roof appears to be fairly well insulated, showing a cool blue color, which is a good thing.
Please Note: Some of the methods and some of the products described in this hub relate to how things are done in the UK but there will obviously be some cross-overs with other countries.
Why have you been putting off insulating your loft?
Benefits of Insulation
With roughly 25% of a house's heat lost through a badly insulated loft, this amounts to a great deal of lost energy and money, not to mention comfort over time. In fact, because of this dollar drain, it doesn't take long to recoup the cost of paying out to install some insulation.
In some cases, the break even point can happen in as little as 18 months, depending on the circumstances of the building beforehand. A couple of years or more, however, is probably more likely for most situations. Because loft insulation is effective for at least 40 years (due to today's better manufacturing techniques), it's clear that insulating a loft really is cost effective
An average loft will cost somewhere between £200 - £300 ($327 - $490) to insulate, if the simpler method of putting insulation across the loft floor is opted for (as per this hub).
Other benefits include a lower carbon footprint, by as much as a tonne of CO2 emissions a year! This is certainly worth thinking about, as nearly a half of all CO2 emissions come from buildings. Also, a home will quickly become comfortable to live in, being warmer in winter and cooler in the summer.
And it's worth remembering that having a properly insulated loft potentially makes a property more valuable and interesting to prospective buyers.
Warm or Cold Lofts
Insulating a loft space can be done in two basic ways.
The loft can either be insulated at floor level, which makes for a Cold Loft, or beneath the roof, which makes a Warm Loft.
Both of these methods have their benefits, though theoretically a Warm Loft creates better insulation gains and is a sounder method considering the structural integrity of the whole house. The problem of a Cold Loft is the need to insulate any pipes that cross above the level of the insulation - before any insulation is in place, heat rises up into the loft space and stops any potential freezing of pipes during cold spells. This heat is cut off if insulation is laid across the floor.
There are a number of insulation techniques for creating a Warm Loft, and deciding on a Warm Loft or not depends on whether the loft is intended to be a habitable space or not. Insulating beneath the eaves will take longer to do and be more expensive. In some cases, it might even need major restructuring work that can only be done by dismantling the actual roof!
Laying insulation along the floor, on the other hand, is usually quite straight forward, and is the subject of this hub.
Types of Insulation Used Between Joists
There are two different types of insulation that are usually used between joists:
- Blanket (used for this article) - available in rolls of foil-backed felt, rock, glass or mineral fibre and is probably the most common form of insulation. This is easy to install, and in some cases is also non-irritant being made of recycled glass or in some cases even sheep wool. The rolls can be very bulky to get up through loft hatches and manoeuvre about the place. Blanket insulation often comes perforated so that it can be separated out into strips that will fit between the joists. If not, it can be rolled out as one large blanket.
- Loose fill - made from a variety of granular and lightweight materials e.g. cork granules, mineral wool, cellulose fibre and even recycled newspaper, which is a greener type of loose-fill insulation. Fits easily between irregularly spaced joists and is ideal if there are many obstructions making the laying down of blanket insulation difficult.

Boards or No Boards
Anyone wanting a Warm Loft will most certainly want a proper floor. However, in the case of a Cold Loft, storage boards may be required. In fact, there may be boards already in place above old insulation,
Boarding a loft from scratch, while keeping insulation requirements in mind, can be done in a number of ways, depending on the availability and price of products. These are the more usual methods.
- A primary layer of 100mm insulation that goes between the joists, or loose insulation filling, followed by pre-insulated boards that are fixed to the joists. This is an expensive method, as pre-insulated boards come at a price.
Or:
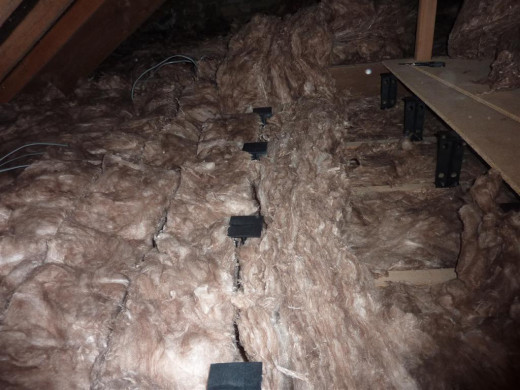
- A primary layer of 100mm insulation that goes between the joists, or loose filling, followed by 170mm or 200mm insulation that goes at a 90 degree angle to the first layer. Normal loft boards are fixed to loft legs, which have been screwed onto the joists before the top layer goes down. The photo above illustrates loft legs being put in place, with the primary layer of blanket insulation already between the joists.
Tools and Safety
- Large pair of scissors
- Sealed face mask
- Protective clothing
- Knee pads
- Spare crawl/walk boards
- Extra light source
Working in a loft space can be somewhat hazardous and it's best to take all the necessary precautions.
If there's old insulation to be moved or removed, there's no knowing what kinds of particles are being released - modern insulation is manufactured with glass fibers over a specific size, but not so the older types. Though not hazardous like asbestos, keeping these air-born particles out of the lungs is sensible and a decent facemask is a good idea. Not just a simple paper one, but one which seals around the mouth with a proper valve to breathe through.Surprisingly comfortable and definitely helps with a feeling of health safety.
Some insulation is an irritant to the skin, and with these it is advisable to were gloves as well as clothes with elasticated wrists and ankles. Personally I didn't bother with clothes that had elasticated openings, and found that my arms started to itch very slightly - this was surprising as the particular insulation that I used claimed to be non-irritant.
Depending on the architecture of the loft, insulating requires a lot of kneeling and trousers with built-in knee pads (such as a pair of decorator's or worker's trousers) will help against the inevitable ache that comes from putting knees on hard surfaces for extended periods of time.I wouldn't recommend strap on chunky knee-pads however for confined spaces.
It's tempting to just step along the joists while laying the insulation, but a couple of spare boards that can be easily moved around across the joists are highly recommended. It's all too easy to put a foot wrong and down through the ceiling!
This is also why an extra source of light is probably a good idea. Rigging the loft up with an extra clip-on lamp that can be moved around will make the job a lot easier. It's likely that a single bulb in the loft won't be sufficient to light up the darker corners. Again, depends on the design of your loft.
When it comes to cutting the insulation all that is needed are is a large pair of scissors.
Old filthy insulation - with an old piece of slate on it...

What to do with the old insulation
Unforeseen things always crop up on any DIY project.
If the new insulation is going over old thin insulation, there isn't much point in removing the old unless it's damp for whatever reason. Removing it will kick up a lot of filth and create a lot of waste to get rid of.
Blackened insulation is an indicator that there's some kind of draft. Possibly from a small crack next to an electrical wire, or any other kind of micro aperture. As the air circulates, the insulation is acting as a filter, and over time, that amounts to a lot of dust accumulating. In fact, adding up all these small holes gives some idea of how much heat is being lost through small apertures! Look for these and fill them if you can - e.g. wire going down to ceiling below, etc.
So if you don't need to get rid of the insulation, leave it be and roll over it. Make sure the worst debris is off it though. The photo above shows the state of my old insulation, which I left in place.
I removed a section that had had a rat's nest in it, as it included rat droppings and other filth. Didn't fancy having that above our heads as we slept!
Laying the Insulation
- Wherever there are electrical wires, lay these on top of the insulation if possible.
- Do not insulate beneath the water tank
- Insulate any pipework that will no longer have the benefit of rising heat from below
Divide the insulation into smaller sections along the perforations
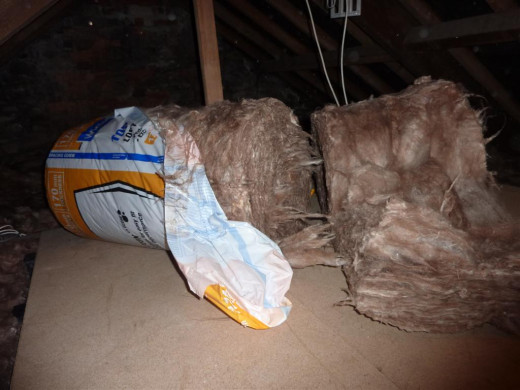

Laying the first layer between the joists
Rip open one of the 100mm rolls. Generally the direction in which the insulation unwraps is the same in which it will uncurl. Because the first layer is going between the joists, it'll be necessary to separate out a single run. This is best done while the roll is still rolled up with the plastic still partly on (see photo to the right)- trying to separate out a strip after it's unrolled can be done, but will be more messy and more difficult to work with.
It's always best to lay the insulation from the outer edge of the loft to the inner. Make sure that the insulation does not actually touch the eaves of the roof, as air circulation is required to carry moisture away. If it's possible to fold over a short length of insulation after completing a run, it's probably better to do that than cutting it.
If a board is used to stand or crawl on, be very careful to ensure that the edges of the board actually rest on a joist, or that no weight is put on a section of board which is over-hanging a joist.
At this stage, it's necessary to fasten the loft legs to the joists (see below) if the loft is being boarded. If not, the second layer of insulation can be rolled out.
Laying the second layer across the joists
Get your 170mm or 200mm roll into place, so that it will unroll at 90o to the joists and first layer. Make sure you can tell which way the packaging opens, so that the insulation unravels in the right direction. This will save rotating the roll. Again start at the edges of the loft first, and make sure each length sits tightly against its neighbor. A last run might overlap on either side, but that doesn't matter at all.
Laying the second layer is where it can get a little more tricky to see where you're putting your feet, as any crawl board will have to be removed. So take care!
Second layer being unrolled across unboarded area

Loft legs surrounded by a sea of insulation
Fixing the loft legs
For this part of the work you will need
- power drill
- measuring tape
- pencil
The sequence of steps should be as follows:
- Measure the width of the boards
- Measure out along the joists the exact points for each width
- Each loft leg will sit exactly underneath the edge of a board and the one next to it
- If there is no neighbor, bring each leg in slightly so that the leg doesn't show beneath the edge
- Screw the loft legs in
- Put the boards in place and screw into the legs
You're done!

The Loft Hatch
A cold and uninsulated loft hatch can undo a lot of work if the loft has now been done, but the hatch hasn't. There are various possibilities, from either installing a modern hatch, to covering with polysterene panels or bubble insulation. The latter is probably the easiest, as it can be stapled to the hatch and is also easy to cut around the ladder fittings (see photo).
Also, using draft excluding strips that block the small gap between the hatch and the hatch frame are a good idea, if the loft hatch is of the old variety and doesn't fit perfectly into the frame.
How to roll non-irritant insulation in an incredibly clean loft!
A finished section, insulated and re-boarded and ready to be loaded with pointless junk!

Other Resources
- Foil behind radiators saves you money and keeps you warm
If you're considering putting foil behind your radiators, consider no further! It really is worth it. This guide will step you through the process. Keep warm! - Warm Loft techniques for Roofers


")

