How To Lay A Floating Tile Floor

How To Lay A Floating Tile Floor: Use the SnapStone Porcelain Floating Tile Floor System
Do you want a new porcelain tile floor without the hassle of first taking up old tile, vinyl or hardwood flooring? The SnapStone porcelain interlocking floating tile floor system is the answer.
There are almost endless pattern layout possibilities, with eleven colors available in 12" X 12" and 6" X 6" tile sizes, five colors of their recently added 18" x 18" tiles, and their newest product, a neutral 12" x 24" 'subway' tile. SnapStone can even be installed over radiant heating for toasty-warm toes.
Almost anyone can set a SnapStone floor and do it quickly, because floor prep is minimal. Unlike traditional tile floors, SnapStone floors do not require a thinset mortar base, so it is very possible to lay and grout a SnapStone floor in a single day, depending on the room's size.
This product is perfect for DIYers, as well as in situations requiring a fast turnaround, and/or where demolition of an existing hard-surface floor (tile or otherwise) is just not feasible or desirable.
After reading this article you will know exactly in which situations SnapStone can best be used, how to properly prep your floors before beginning to lay the SnapStone flooring, you'll learn the correct tile layout, how to cut tiles to fit into corners, next to walls and around toilets, easy grouting tips, cleanup advice and how to get your newly tiled room ready to show off to the world.
Have You Ever Laid A Tile Floor? - Floating or otherwise?

What experience do you have laying a tile floor?
Where To Best Use A SnapStone Floating Porcelain Tile Floor
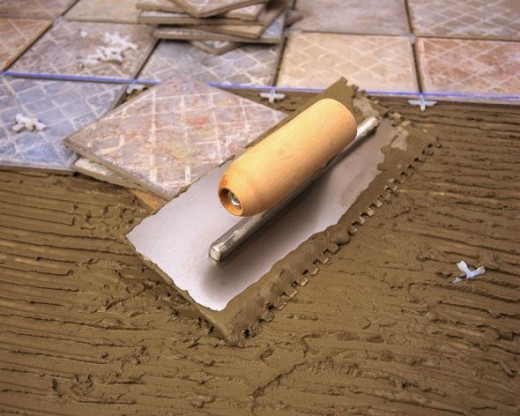
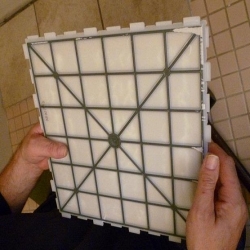
You can lay a SnapStone floor directly over any existing ceramic, wood, vinyl or concrete floor without using adhesive or mortar, unlike the picture, above, which offers a vivid image of the traditional method of laying tile. The fact that SnapStone is a floating floor makes it perfect for redoing old, dated floors or going over concrete surfaces.
SnapStone cannot go over wall-to-wall carpeting, but once the carpet has been removed, SnapStone can be installed over 5/8" or greater plywood subfloor.
It is a good idea to check the level of the floor on which you are planning to put your SnapStone floor. According to SnapStone's technical specifications, the tolerance guidelines for level are 1/4" in 10 feet OR 1/8" in 6 feet.
Image
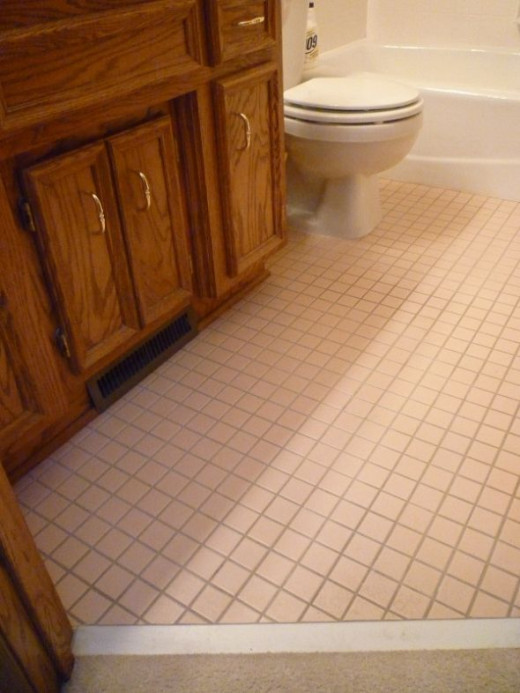
Prospective SnapStone Project - Hall Bath, Before - The 1991 mauve-y pink 2" X 2" tile HAD to go - or at least be covered up
The floor was in perfect condition, with no loose or missing tiles. Check the floor you plan on doing to make sure everything is tight and secure.
Our client, an older single woman, owns a three-bedroom, three-bathroom townhome where this ugly-floored bathroom is located. We were originally hired to repaint the lower-level bathroom, and the job grew (as so many of our jobs do) to include several other areas in the home, including this hallway bath floor and the even larger master bath floor, which has more of the same terrible pink tile.
The only caveat we were given was that our client did not want to do a complete demolition of either tile floor - too much noise, too much mess, too much time and too much money.
These is where using SnapStone is the perfect solution.
Image:KateHon
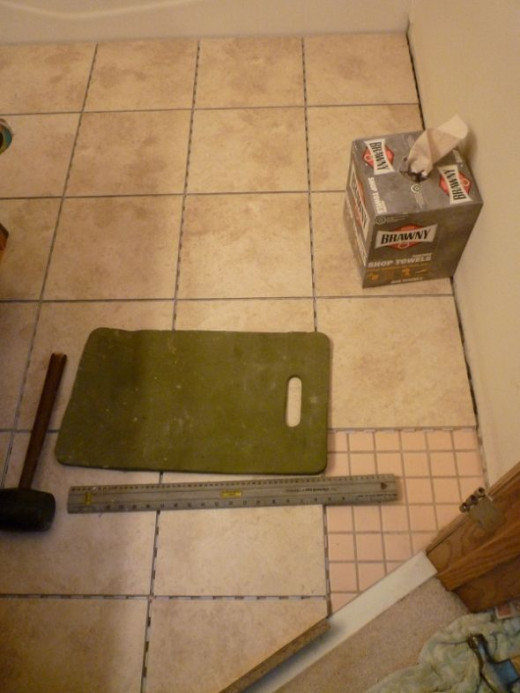
Some Tools Needed During The Process of Laying A SnapStone Floating Tile Floor
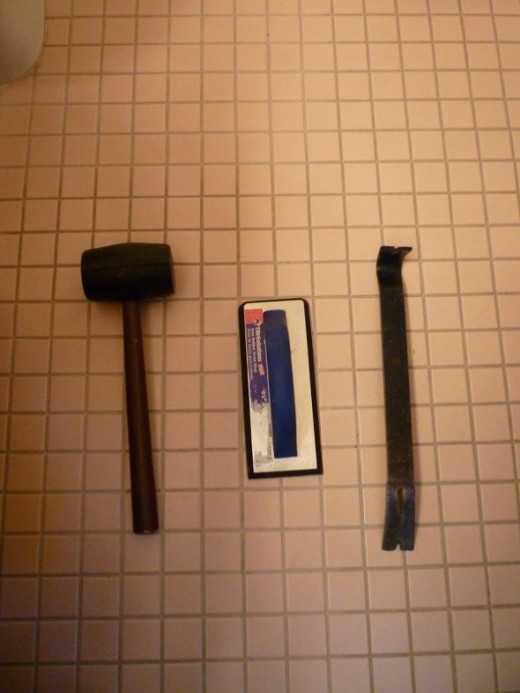
From left to right, these tools include:
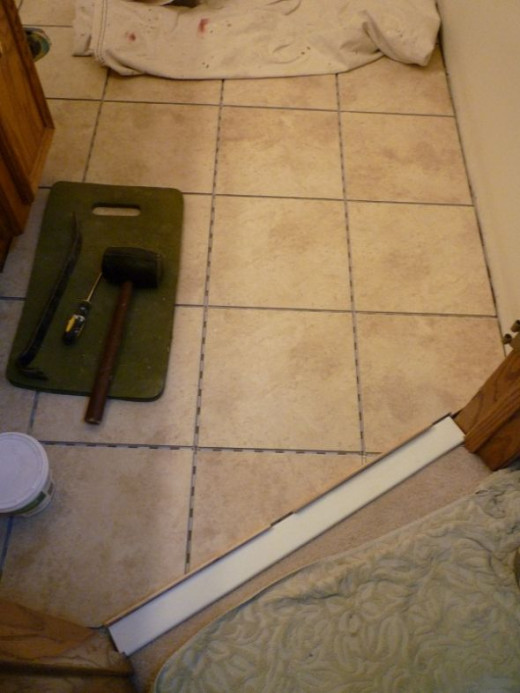
Rubber Mallet - Used to tap the tiles together
Grout Float - You will use the grout float and SnapStone's pre-mixed, color-coordinated flexible grout to fill in the joints between each tile.
Wonder Bar - This combination nail puller/pry bar is critical in helping to remove your room's base trim, shoe molding (if any), and door casing.
Image:KateHon
Remove The Base Trim, Shoe Molding and Door Casing
Ease a broad knife (we use a 3" model) behind the molding to create a small gap between it and the wall. Once you have an opening, insert your pry bar into the space and start to gently pull the trim loose, being very careful not to crack or break the wood molding. The older your home's trim, the more brittle it is likely to be, so go slow and easy during the removal process to keep it intact. The last thing you want is to have to buy, cut, stain (or paint) and finish new trim.
Image:KateHon
Take The Room's Door Off By Tapping Out The Hinge Pins
Taking off a door is not hard, but it is a lot easier to do with two people - one to tap out the hinge pins and one to hold the door. I usually do the holding, my husband does the tapping.
Put the business end of the screwdriver under a hinge pin and use the hammer to tap up on the bottom of the driver's handle to raise the pin until you can remove it. Repeat on the other two pins, ease the door off the now-empty hinges and remove the door from the room.
It is very likely that you will have to trim the bottom of your door after installing your SnapStone floating tile floor, but more on that process later...
Image:KateHon
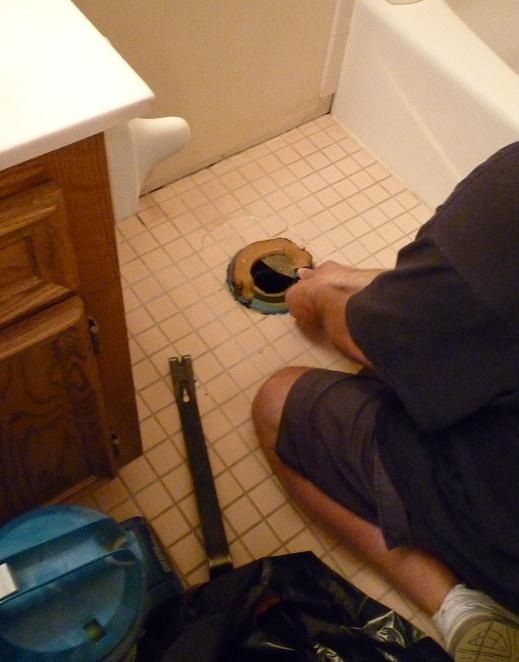
Remove The Toilet
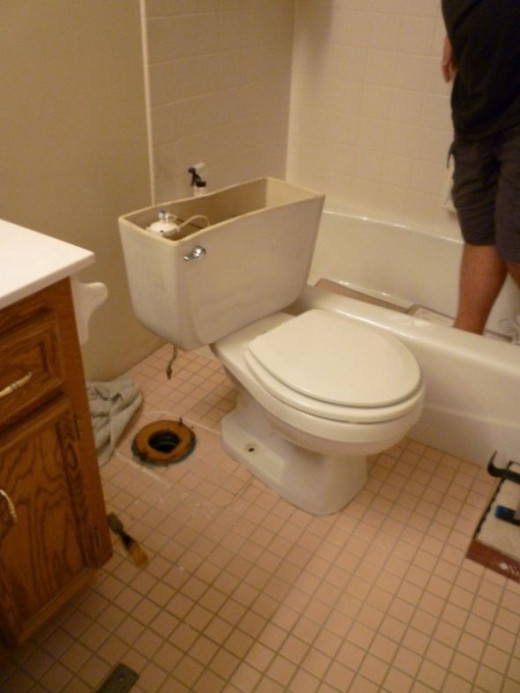
Before you take out the toilet, shut off the valve behind the toilet that controls its water supply, flush the toilet a couple of times to empty the tank, then bail out the remaining water from the tank and the toilet bowl.
Keep an old towel handy to catch water that may drip from the supply line. Our toilet had a stationary water supply line that would be too short once the SnapStone floating floor was installed, so we knew we had to purchase a new flexible supply line when it was time to re-install the toilet.
Use a sharp blade to cut the caulk around the bottom of the stool, remove the covers from the bolts securing the toilet to the floor and unscrew the nuts from the bolts. Put the nuts where you will be able to find them when it is time to put the toilet back in place.
Wiggle the toilet loose, lift it off the bolts and....
Image:KateHon
Store The Toilet In A Safe Place Until Your New Floating Tile Floor Is Installed
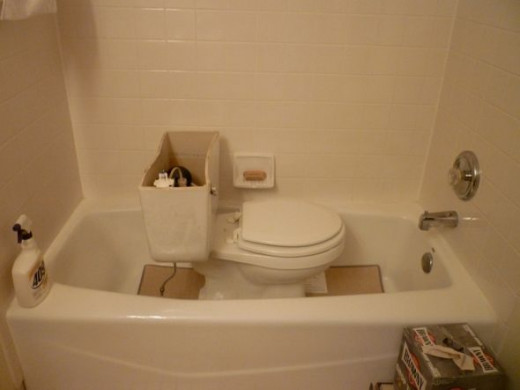
We lifted the toilet into the adjacent tub, after protecting the tub's bottom with a couple of old carpet samples. Towels, rugs or thick layers of newspapers would work equally well.
Image:KateHon
Scrape Off The Old Caulk And Check Your Bolts
Depending on how hard your caulk is, use a hammer and a broad knife or chisel to get up the old caulk. You need as even a surface as possible on which to lay the SnapStone tiles.
Notice the rusty bolts on either side of the wax ring. Evidently moisture had seeped through and corroded the bolts until they were almost eaten through. If your bolts are in a similar condition, you will need to replace them with new ones. It is possible to get new bolts with your wax ring replacement.
Once you have checked your bolts and the old caulk has been taken up...
Image:KateHon
Remove The Old Wax Ring
The wax ring is super sticky and your hands and the broad knife will likely get all smeared up and gooey, but you can easily wash both of them.
Just focus on how fabulous your new floating tile floor is going to look and by performing this task you are one step closer to achieving your goal.
Image:KateHon
Only One More Bit Of Prep Remains Before Starting To Lay Your SnapStone Floating Floor

Give your room a good sweep or vacuum it.
How To Start Setting Your SnapStone Floating Tile Floor
If you've had any experience in laying tile in the traditional, thinset mortar method, you will probably disagree with how I'm about to tell you to begin laying your floating tile floor.
However, these instructions come directly from SnapStone, and I figure they know their product and how to get the most from it.
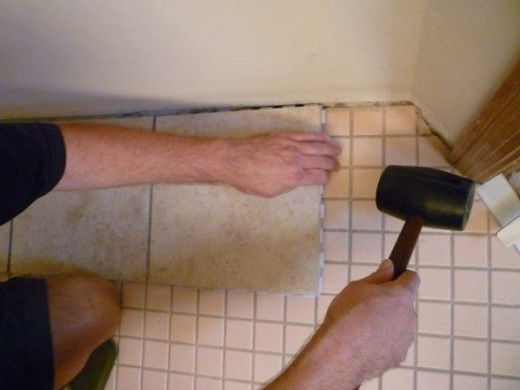
That being said, the easiest way to start laying a SnapStone floor is to start along a straight wall.
In our case, it was the wall opposite the toilet and sink. We put down the first tile in the corner, next to the tub, then used the rubber mallet to tap the second tile into the first.
Easy does it; it does not take much of a tap to get the tiles to click together. Sometimes it is easier to get the tiles together if you elevate one end very slightly.
Image:KateHon
Continue Setting Full SnapStone Tiles Until You Have To Start Cutting Them To Size
It took about fifteen minutes to get to this point. The floor looks better already!
Image:KateHon
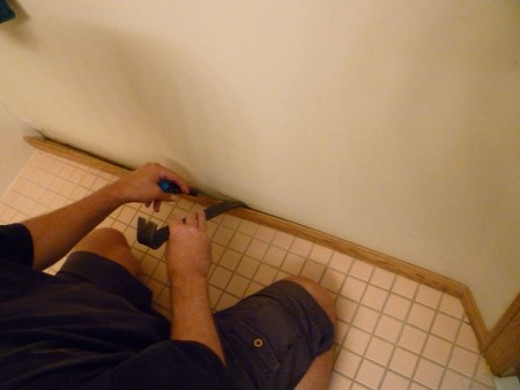
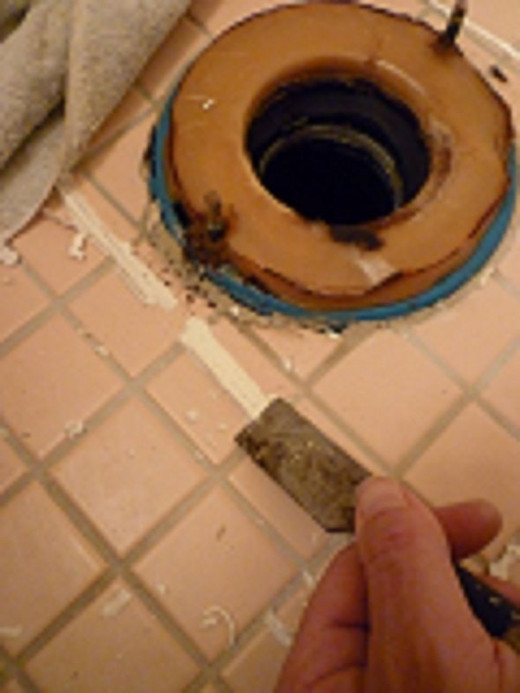
How To Measure Tiles To Fit
Each SnapStone tile is contained within an interlocking plastic tray, which connects to the next tile, leaving a perfect 1/4" grout line every time. In each box of SnapStone tiles, each square is separated by a piece of paper, exactly the size of the plastic tray.
My husband used these papers to cut templates for each custom-cut tile, transferring the markings to the tile before cutting it with the wet saw. Using the templates worked perfectly.
When it came to measuring the tiles that were to go around the toilet's waste pipe, it became clear that the hole would be in the middle of one tile. Since it was impossible to cut such a hole in the tile, my husband traced the waste pipe's location on the template, transferred it to the tile's surface, then cut the tile in half.
Once the tile was a more manageable size, he proceeded to cut closely-spaced straight cuts from the cut inward to the pencil mark, all the way around the semi-circular curve, creating little slivers of tile that could easily be broken off, revealing the half-moon opening.
With both halves of the tile cut, he placed them around the drain pipe and snapped them into place. The toilet base would completely cover the fact that the tile had been cut, leaving no one the wiser, except all of you reading this article.
Image:KateHon
Set The Threshold In Place Before Cutting The Tile To Fit - Next time we will do just that
Once we got to the point of setting in the threshold, we realized the new threshold was just a smidge wider than the old one, so it had to be notched to accommodate the door stop.
I am not quite sure why we did not set the threshold in place before cutting the tile to fit up to it; I think it was because my husband was so focused on getting all the tile in.
It was not the end of the world, nor did it really affect the finished product.
Update, as of March 8, 2013 - We removed the white Corian threshold, installed above, and replaced it with another Corian threshold, this one in an ivory color.
We did this because the homeowner had new carpeting installed, which butted right up to the existing white Corian threshold. Also, we installed more of the same SnapStone tile installed in her foyer, kitchen and laundry room, using a cream Corian threshold in the foyer, where it butted up to the carpet.
The hall bath tile can be seen from the foyer, so we felt all the thresholds needed to be the same for visual continuity.
Even though the white threshold had been put down with tile adhesive, it came up cleanly with a couple of good pulls with the Wonder Bar, with no damage to the bathroom SnapStone tile.
Image:KateHon
The Threshold Will Need To Be Set With A Tile Or Construction Adhesive
We measured and cut the new Corian threshold to fit the opening, notching it to fit where needed.
The threshold is the only item in the project that has to be set with adhesive. Using a threshold offers a clean, finished look to the project.
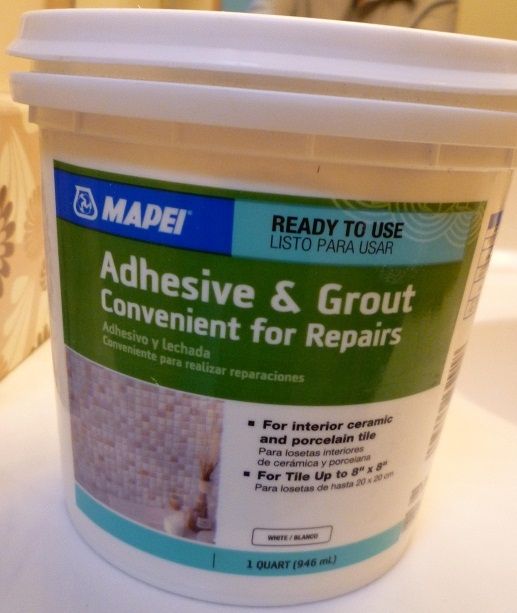
We happened to have this partial quart of pre-mixed tile adhesive and grout already on hand, so we back-buttered the threshold and set it in place, keeping the grout line evenly spaced next to the tile by using a couple of paint stir sticks as spacers.
You can also use construction adhesive, such as PL400 and PL Premium, to attach your threshold.
It is recommended to allow the adhesive to dry for several hours, during which time it is important not to touch it or move it.
Note: Back-buttering is nothing more than putting adhesive on the object being stuck, in this case the threshold.
Image:KateHon
What To Use If Your New SnapStone Floor Is Too High Above Your Adjoining Carpet
When I first looked at the pink-tiled floor and considered using the SnapStone floating tile system, I was somewhat concerned that there would be too great a transition between the bathroom floor and the carpeted floor adjacent to it. I did not want any opportunity for my client or her guests to stumble, trip, or fall as a result of the height difference between the two floorings.
My husband researched the subject and found this fabulous solution, Carpet Shims, which solves the problem completely!
The product is available in different widths and heights, to accommodate virtually any situation. It can be used on an existing carpeted floor or put in place before new carpet is laid.
For existing carpeted floors, simply loosen the carpet around the door or opening, install the carpet shims per instructions, leaving a 1/4" gap between the carpet shim and the hard-surface or tile floor. Nail carpet tack strip to the edge of the carpet shim and re-attach your carpet to the tack strip, tucking the raw carpet edge into the 1/4" gap.
The picture, above, shows the doorway carpet shim and the side extension shims, which completely eliminates any transition issues between the two floorings.
As it turned out, we did not need the carpet shims, but I am so thankful my husband found them, for we may need them in the future!
What Is Your Opinion So Far Of The SnapStone Porcelain Floating Tile Floor ?
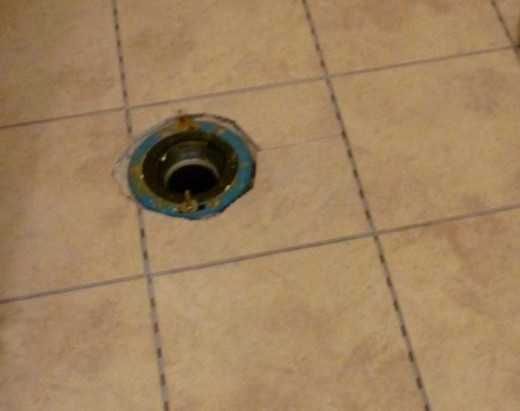
Image:KateHon
After reading what is required to lay a SnapStone floating porcelain tile floor system, do you think this is a DIY project you could handle?
How To Grout Your SnapStone Floating Tile Floor
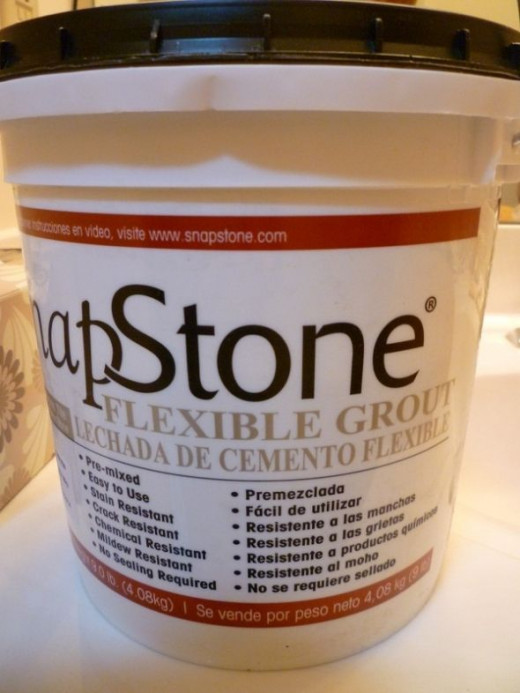
One container of SnapStone's proprietary, color-coordinated flexible grout covers 50-60 square feet, so we estimated we would need two, possibly three containers to do both the hall bath and the master bath grouting.
As it turned out, after we grouted both bathrooms, we still have a strong half of the second bucket of grout remaining.
We covered the leftover grout with a couple layers of SaranWrap, minimizing the amount of air contacting the surface, in order to keep the remaining grout from drying out.
Image:KateHon
Click on Each Image for the Process of Grouting A SnapStone Floating Porcelain Tile Floor - All images by KateHon
Click thumbnail to view full-size


Trim Down The Door Bottom, Then Re-Hang It
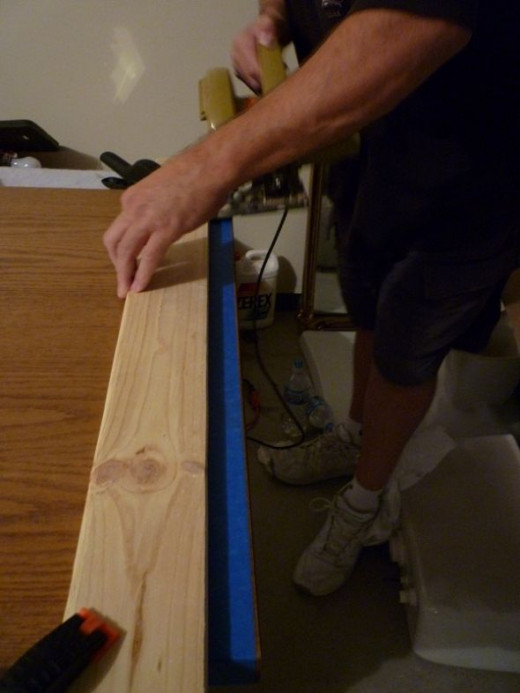
After using the Krud Kutter to clean the tiles, we re-installed all the base trim and shoe molding, nailing it back into place with finishing nails, countersinking the nail heads and filling the nail holes with color putty to match the stain color.
We had to cut down the bottom of the door casing to fit the higher floor. We also had to trim about 1/16" to 1/8" across the bottom of the door. The easiest way to do this is to tape off the door bottom with blue painter's tape. This will reduce the amount of splintering that can occur during cutting.
Hold a circular saw up to the bottom of the door and make a pencil mark on your blue tape as to where the saw's protective arm hits the door. Using a straightedge, draw a line across the door and clamp a guide board (a 1"X4" works great) to the door, taking care to protect the finish by inserting toweling or several layers of newspapers between the door and the clamps.
Trim off the excess wood from the bottom of the door, remove the tape, touch up any light areas on the cut edge with a stain pen to match the wood color, then rehang the door.
Image:KateHon
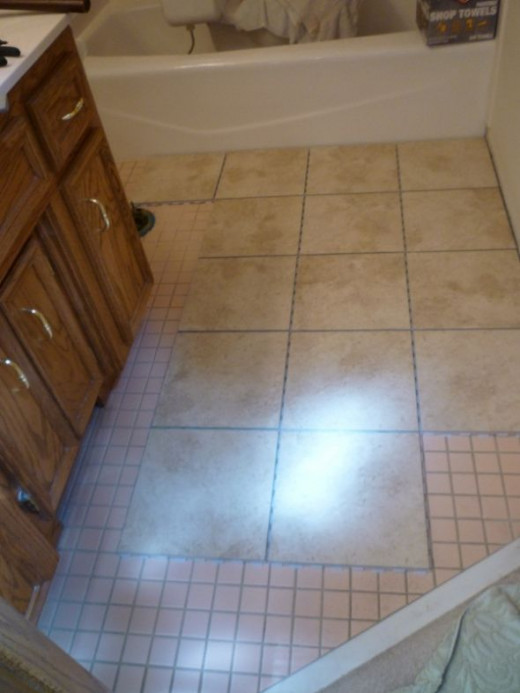
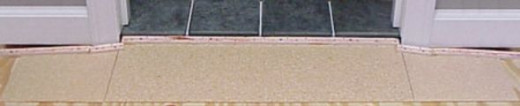
The Finished SnapStone Porcelain Floating Tile Floor Revealed
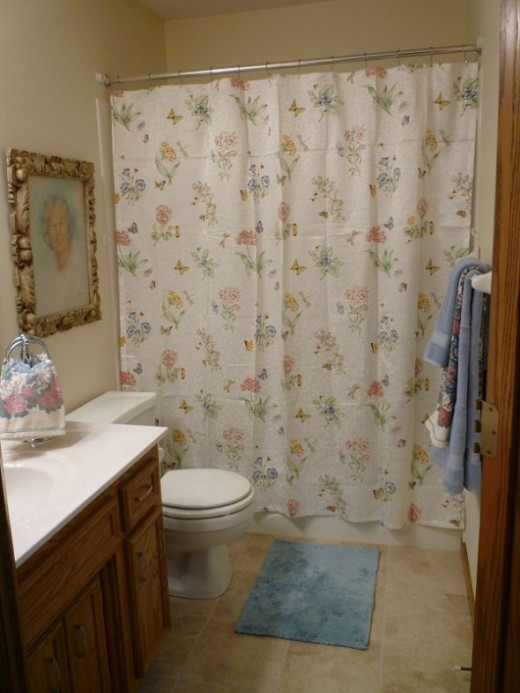
Now the focus is no longer on the ugly pink floor, but on the entire beautiful room! The homeowner has a room to be proud of and that guests will love to use.
It took about two days to do the job, much less than it would have taken using the traditional means of laying tile, with much less mess.
Image:KateHon
The Cost Of Installing A SnapStone Floating Porcelain Tile Floor As A DIY Project?
Tile - Five boxes @ $22.49 = $112.45
Grout - 1 bucket @ 59.99
Threshold - $15
Extended wax ring - $4.25
Flexible water line - $4.50
Total for Materials - $196.19, before sales tax
Labor for hiring us (or someone in your area) to do the work - $410
Total for materials and labor = $606.19
Where To Buy SnapStone Floating Porcelain Tile Floor Products

If you live in the Upper Midwest, you can purchase SnapStone products at any Menards store, a regional home improvement store.
If you live elsewhere, SnapStone is available online at Menards, Lowe's, Home Depot, and by special order through your local Do It Best hardware store.
Now That You Know How To Lay A Floating Tile Floor, Would You Undertake It As A DIY Project?


")

