How to paper your walls for free (almost)

Decorate the walls in your home for almost $0
Renovating on a tight budget?
We have just added two rooms to our cabin, and the cost was more than we expected.
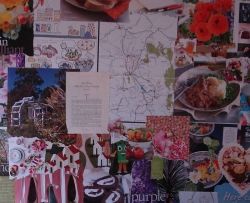
To decorate the walls in the living room, I used an age old technique called collage. I have been saving pictures from magazines for art journalling and had a small storage box full of lovely colour.
Read how I transformed the new room into a talking point, and it cost me almost no dollars at all.
Historical method in early Australia:
newspaper wall lining
It turns out that in colonial times in outback areas of Australia, and as late as the early 1900s, newspaper was pasted onto the inside of old slab hut walls for insulation and for 'wallpaper'.
Read more about slab huts - on Wikipedia
The interior might have a coating of plaster made from a variety of available ingredients: mud, clay, cow-dung. The inside face of the slabs might be whitewashed, or have newspaper pasted over them.
What you need: - to paper your walls with collaged pictures
- Lots of old magazines
- Old books for different types of pages
- Glue
- Artist's paintbrush (a cheap one ½ ")
- Clear sealer
- Scissors
- Step ladder
Tear out your pictures - from your collected magazines and books
- Cut some edges straight for the sides of the wall near doors or corners.
- Tear most pages from the books or magazines, tearing around the parts you don't want in the finished design.
- Choose pictures with words for a fun feature on the the wall
- Many colours can be very exciting, but the rest of the room needs to be quieter
- Choose colours that are the same for a co-ordinated scheme
- Find some small pictures so that odd spots can be quickly filled
- If the room is for a child, then select pictures that are appropriate
Tear the pictures for a nice edge - it's more interesting

Practice tearing down the pages, and across, to see which way is easier, before you use your 'nice' pages.
Various glue products
are available
You can use white wood glue diluted with water 50/50, but the glue may discolour over time.
There are glues that art journallers use which are archivally sound and will not discolour. One of these is gel medium, and I like the matte finish. It also comes in gloss.
I apply it to the wall with an inexpensive artist's brush (½ ") in the approximate shape of my torn picture and then brush over the picture with my gel soaked brush. This seals the edges and coats the image.
You need matte gel medium - get yours from Amazon

Choose the first image - to paste onto the wall

I chose the map of the region around the lake where our cabin is as my starting picture, and began to add pictures and pages around it.
Work across the wall at eye level, and then add images above and below until the wall is almost covered.
Take care to overlap - the images/pages

Keep adding your pictures at different levels so that you don't have 'rows' appearing.
Fill in the gaps - where you need to

There will be odd shapes and places where the images meet, but don't completely touch each other.
Cover these with smaller images in any shape that you like.
Check the wall for lifting edges
then seal the wall
Stand to one side and shine a light onto the wall so that you can see if there are any edges that are not stuck down. Reseal these with gel medium.
Once the edges are all stuck down, seal the wall with a clear sealer coat. While it's not essential to seal the wall, it will help to protect it, and your work will last much longer.
You can get spray cans which may be easier to apply, but be sure that you read the label to get one which does not dry with a 'yellowish' tinge. The ones that say crystal clear will dry clear.
Seal with clear coat - from Amazon
Finish with fire resistant spray (Optional) - from Amazon

The wall is so interesting - and colourful

Everyone who has seen it is intrigued by the writing, the fun quotes and the look
And the cost of my fun walls?
Almost $0
A few dollars for gel medium and sealer coat for a priceless unique wall treatment.

")


