The Lazy Gardener's Quick and Easy Instant Landscaping


Banish the Backbreaking Labor of Soil Prep
I tend to be a quick results type of person and this was no different when I decided I’d delve into the world of gardening.
Being rather small in stature and not willing to hire a larger more athletic person to dig up nearly a half an acre of land, I realized I had to find an easy way to get the quick results I desired.
Typical gardening requires backbreaking intensive labor to prepare a garden spot. Everything I read on the subject led me to believe I must dig up all the area and till the soil before I even began. A daunting task for anyone, I was quickly discouraged. I wanted a beautiful garden and I wanted it now!
I’d spent months looking at garden plans and scanning the catalogs for the most alluring plants, but when I get a project in my head, I have to do it yesterday. As any gardener worth their weight will tell you patience is needed to build the perfect sustainable garden.
Now my tactics will raise the ire of traditional gardeners and I’m afraid that the green movement would have my head for some of my practices. I don’t pretend to be the perfect gardener and follow the strict rules of the green movement but what I managed to do, and I’ll show you how to do it to, was create a beautiful garden in a short amount of time.
Ok….now hold onto your overalls…I did not dig up a single inch of my garden space in preparation. I followed some really simple steps and my back remains intact. In this hub I will tell you exactly how to create the perfect garden in a week without the back breaking labor of digging and tilling.

My Secret Garden Prep
The first thing I did was get out a trusty weed eater…not a fancy one just a lightweight string version. I used it to knock down the grass in the area that I wanted to create my garden. The next thing I did was to head down to the local super store and purchase several rolls of landscape fabric. Now here’s where I break the rules…..I simply laid the landscape fabric over the area where I knocked the grass down with the weed eater. Sure there were many areas where some grass made little tents in my landscape fabric. No problem, rocks are readily available to fix that problem and to hold down the landscape fabric.
So now I have a large black area with various sizes of rocks strewn about. Not exactly aesthetically pleasing at this point…but hang in there this will quickly change. The next step was to cover the entire area with mulch. Sounds crazy doesn’t it. No gardener would put mulch down before they planted anything. Being that it was spring when I caught the bug to build my garden, it tends to be a little windy, so it was evident that my rock plan was really not going to hold down my landscape fabric, but the mulch did the job and added a little visual interest to my empty garden area. At this point my weekend was about to end and so I decided to just let my empty garden evolve until I could work on it the next weekend.
It took very little time for the remaining grass to break down and if you’re lucky enough to get a good rain the effect is even quicker. An amazing thing happens when you cover grass with a dark fabric and weigh it down with mulch. It not only breaks down the grass it brings out the wonderful earth tilling hordes of worms. Everyone knows worms are quite the little earth movers and a gardener’s best friend.
So no digging and in 4 days I am ready to start planting. By this time I was visited by a few neighbors, all scoffing at my methods. The words “Oh honey that won’t work” and “You’re just going to waste your money and end up having to dig up everything” only made me more determined to prove the neighborhood nay sayers wrong. (I’m a rather stubborn person and telling me something won’t work only makes it certain that I will make it work)

Choosing the Perfect Plants
During those four long days of waiting while my soil prepared via the mixture of mother nature, landscape fabric and mulch, I was able to sit down comfortably and plan my garden.
The first thing any "budding" landscaper/gardener should do is visit their local library. Your local library is a mecca for new gardeners. There I found large beautiful books just filled with the most beautiful gardens. I browsed through many of these free gems and borrowed some ideas from the world's master gardeners.
One thing I learned, through a bit of trial and error, was to stick with tried and true plants for the basis of your garden and add a few of the more exotic plants for effect.
There are many great catalogs and websites out there that offer a plethora of plants. It’s easy to get caught up in finding exotic beauties….but much like the pursuit of any ‘exotic beauty’ there’s a price to pay. They are high maintenance and prefer warm perfect conditions to thrive.
Stay tuned for an upcoming Hub about choosing the best plants.

Garden Plans from Amazon

Getting Your Hands Dirty
My soil is prepped, my plants have been chosen and now I am more than ready to get my hands dirty. After selecting just the right plants for my soil type and weather conditions, the first thing I do is to set them around the garden and determine exactly where I want them to go. I select the highest plants for the back of the garden and begin to sort the others by size.
If you are doing a round garden place the tallest plants in the center of the garden and begin working your way down in size. Remember that if you are a novice gardener, choose plants that are hardy. Here’s a good way to get some ideas of hardy plants in your climate. Drive through any restaurant and check out the landscaping. Nothing says hardy like a plant that can be maintained among the exhaust fumes of a McDonald’s drive through.
Once you have your plants selected and have laid them out in your garden plot you’re at the point where some digging will be required. At this point I’m so excited about the finished product that a little digging doesn’t phaze me in the least.
Keep in mind that because you’ve knocked down the grass with a weedeater, covered it with landscape fabric and then mulch, it will be easier to dig. It won’t be as loose as tilled soil, but you didn’t put the backbreaking labor into tilling.
At this point you will want to simply set aside the plant you wish to plant and move the mulch away from the planting location. Use a knife or garden scissors to cut an “X” in the landscape fabric and peel it back away from where you will be digging your hole. Use a sturdy shovel to dig a hole just a little larger than the container of the plant. Loosen the soil at the bottom of the whole so that the plant roots can grow down into it. Take the plant out of its container and loosen the roots a little.
Place the plant into the hole and use the excess soil from digging your hole to fill in around the plant. Depending upon the temperature, you can wait and water everything after you’ve planted all the plants or if it is a hot dry day you may want to water each plant as you plant it. Pull the landscape fabric over the planting area as close to the plant stem as possible and use the mulch you moved to create your hole to place around the area.
Continue this process until you’ve planted all the plants and then water the entire garden again. You’ll want to water thoroughly for the next three days to ensure the plants get enough moisture to take hold of their new surroundings.
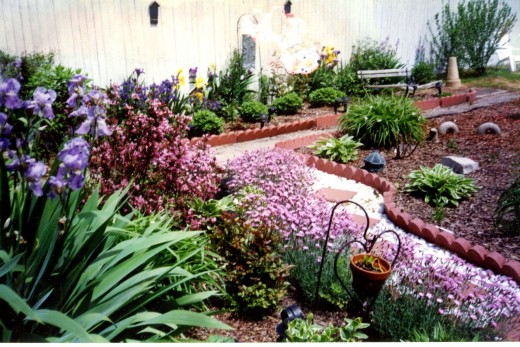
The Final product
Your final product is a beautiful garden with a fraction of the effort most gardeners and landscapers exert. You didn’t have to call a landscaper in to prep the soil, you didn’t have to rent a rototiller and find someone strong enough to operate it, it didn’t take months to create and now you have a garden that you designed and planted yourself. Give yourself a pat on the back…I know I did!
Things I learned by trial and error.
I created several smaller gardens…and small to me was a 10 x 10 to 10 x 20 and eventually ended up with a garden that covered 2 city lots, don’t ask me the dimensions I just kept adding until I ran out of room. Each garden provided a learning opportunity and allowed me to tweak the process. Here are a few things I learned by trial and error.
- · Old carpet remnants, sheets of plywood and heavy tarps will destroy grass even faster and for some reason the worms seem to be seduced by carpet in paticular. Ever notice what the ground looks like after you’ve set up a tent for the kiddies to camp out? Yep that’s the same process I’m using.
- · No matter what you use to prepare your area, water it down often. This weighs it down and makes it more effective. Note though that you might want to stop watering a day or two before you dig just to avoid rolling around in the mud too much.
- Use a piece of tarp or plastic to lay the soil removed from the hole. This came to me after I noticed I had a lot of soil left over from the holes I’d dug and it was mixing in with the mulch. It
Other Great Hubs for Gardeners
- The Gardener's Trifecta
Find out the three plants that are the secret to a low maintenance and colorful garden throughout the garden season. - Heed the garden catalogs, for they hold the key.
Learn how to use garden catalogs, websites and tags at nurseries to determine which plants will work best for your zone and soil type. - Year Round Colour for Your Ever Flowering Garden
- Garden Designs that I Like and Want to Share
- The Butterfly Gardener by Miriam Rothschild and Clive Farrell reviewed
- Types of Roses for the Home Garden
Learn about the six major types of roses suitable for the home garden. Each offers unique attributes for a beautiful backyard garden filled with roses. - Planting A Fairy Garden
Many Pagans connect with and honor Fairies as part of their spiritual tradition. Here are some tips and suggestions for planting your own fairy garden and hosting the Fey Folk in your own backyard.
Easiest Garden Ever
Would you consider using this method on your next garden?
Find Quality Plants and Information
- Burpee Seeds and Plants - Home Garden, Vegetable Seeds, Annual Flowers at Burpee.com
Seeds, plants and gardening supplies for home gardens - Large, exclusive selection: Heirloom and organic seeds and plants. Vegetable, flower, herb, fruit, perennials, annuals - Burpee.com. - Oakes Daylilies - ANGEL RODGERS
Wide range of daylilies. Quality plants from the traditional to the exotic and colors galore - Garden Plants at Spring Hill: Shrubs, Shade Plants, Bamboo Plants, Perennials, Lilac, Online Plants,
Spring Hill Nursery: plant catalog and online plants since 1849. Garden Plants, Shrubs, Bamboo Plants, Shade Plants, Perennials, Ground Cover and more!


