Using a Jointer

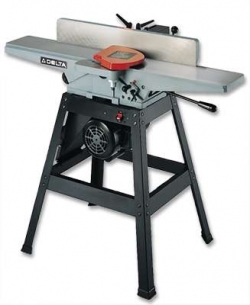
Stationary power tools are prized not only for their speed, but for their accuracy. But some power tools are not so obvious. Of all stationary woodworking machines, the jointer is the most widely misunderstood. I know because of the recurring questions from friends. It's not immediately obvious how the jointer should be used, and this uncertainty leads to all kinds of avoidable frustration.
Jointers are made to create flat surfaces and square edges on solid wood. It's not primarily about making rough wood smooth, although this does happen incidentally.
Four Stages
Solid wood is always in varying states of wonkiness, and getting rid of the twists, cups and warps in preparation for building happens in four distinct stages; the first two are performed on the jointer.
- Mill one of the board faces (not an edge) flat.
- Mill an adjoining edge at precisely 90° to the face you milled in Step 1.
- Bring the board down to final thickness on the thickness planer.
- Trim the board to final width on a tablesaw, cutting off the unmilled edge.
All this sounds easy enough in theory, except for the hidden snags waiting to trip you up. Even if you do understand the four essentials involved in creating square boards, you 'll probably still have problems unless you recognize the pitfalls and how to avoid them.
Initial Decision
First of all, it matters which face you start with on the jointer. This initial decision is key. The choice of side has more to do with the board's shape than grain direction. Whenever you're jointing, begin with a concave side placed face down because this shape affords two contact points for the wood, supporting the board without letting it wiggle. Look down the end of the board before you start, identify the most stable surface, then slide that one over the jointer bed. Avoid jointing convex surfaces. They invariably get more curved with each new pass as they rock up and down.
Cross cutting rough wood to length before jointing is another helpful step. An inch or two longer than final part size is ideal. The shorter the board. the less warp, cup or twist needs to be removed to make the whole thing flat, square and true. Why joint off enough wood to true up a straight, 6'-long plank when all you need are three 24" straight project parts? Shorter is always better as far as jointing goes.

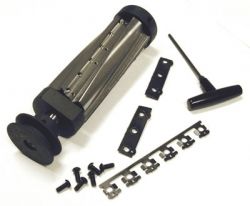
Cutterhead
Remember that the leading end of a board gets thinner than the trailing edge as you complete multiple jointing passes. Normally, a slightly wedge-shaped board doesn't matter much, since you'll be trimming the wood to a final and consistent width later on the tablesaw. If your board is just barely wide enough for a specific job, be sure to joint as little as possible while creating square edges.
Most jointers cut wood with two or three knives anchored on a rotating metal cylinder called a cutterhead. This cylinder spins, propelling the edges of the knives into the wood, removing small bites thousands of times a minute.
Installing new or resharpened jointer knives in the cutterhead is probably the most challenging machine-related task you'll face in the workshop because the knives usually have no built-in method to ensure they all extend outward from the cutterhead by exactly the same amount. If any part of one knife sticks out more than the others, it'll create gouged, rough cuts. Small, portable jointers sometimes have blades vv:ith grooves or special holders that regulate blade position, but the heavy, cast-iron jointers typically do things the old-fashioned way, using nothing but a set of bolts, a steel anchor block and, sometimes, some adjustment screws.
It's entirely up to you to position the tips of all blades exactly the same distance from the centre of the cutterhead along their entire lengths.
Jointer Knife Installation
Unplug your jointer, then snug up the anchoring bolts on one new knife so you can still slide it around with your finger, with enough friction present to keep the blade where it's put. (3) Next, grab a 3/ 4"-wide x 12"long piece of softwood scrap and place it on one side of the jointer bed, over the blade but with the blade not touching the wood. Mark the lower edge of this wood where it contacts the edge of the jointer bed using a pencil, then rotate the cutterhead by hand until the tip of the blade contacts the wood. lifts it up a bit, then pushes it forward. Mark the same edge of the wood again to show where it stops. Push, pull and adjust both ends of each knife so the wood is lifted and moved forward by the same amount by the arc of the knives. Lock all anchor bolts tightly, then raise the in feed table back into position, exactly in line with the topmost arc of the knives. If you've done the job right, your jointer will make a smooth, even sound as each of the fresh blades cuts exactly the same amount.
Hand Pressure
Hand pressure is another obscure jointer issue. Applying more or less pressure to one particular part of the board does create a slightly deeper depth of cut in that place. Thus, it's important to apply consistent pressure with your hands or pushsticks. Even with your jointer fence set perfectly square, you need to apply balanced hand pressure to the wood to get square edges and the kind of results that jointers were meant to deliver.


 To Install Hardiplank And The Like")


