How to Build a Driveway Gate
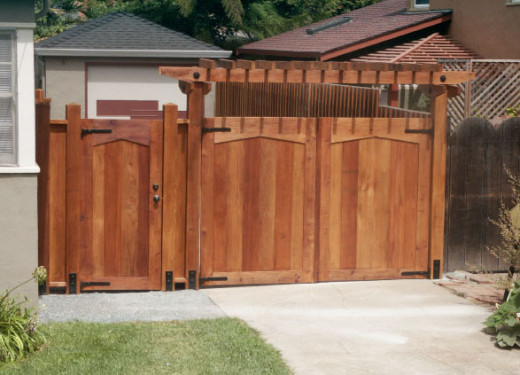
All you need to construct a custom made driveway gate is some wood, a few tools and a plan. It is not nearly as difficult as fence builders would lead you to believe. Building your own gate will save you a lot of money and give you a satisfying sense of accomplishment every time you enter your driveway.

Choosing a Design For a Driveway Gate
A driveway gate should reflect the personality of the owner. It can be a simple with a straight across slat design or extravagant with an ornate structure. Most do-it-yourself builders of driveway gates choose something in between. If you are good with wood, measurements and math, you can create your own design and figure out how to piece it together. If you want to skip the design phase, there are many driveway gate plans available for purchase for $20 or less at hardware and lumber stores. They encourage you to buy them so you will also buy the wood and supplies from them. The advantage of having a pre-designed plan is that you know it has been tested and they tell you which supplies you need to buy.
Measuring the Space for the Driveway Gate
Start by measuring the area where you will build the driveway gate. Not every driveway gate design fits in every space. You will need to know the distance between the gate posts and the height of the gate space. If you are building the driveway gate on existing gate posts, the height of the gate must correspond to the height of the existing posts.
Preparing to Build the Driveway Gate
You will need the following supplies to build the driveway gate:
- Lumber (buy surfaced treated stock)
- Handsaw and Circular Saw
- Tape Measure
- Drill with Drill Bits
- Hammer with Nails
- Screwdrivers with Screws
- Wrenches and Bolts
- Hinges
- Latch and Security Bolt
The amounts of each item you will need depends on the design you choose.
Cut Wood for the Driveway Gate
Cut all the wood for your driveway gate before you begin construction. This way you will know if you have enough wood and can see that all the pieces fit properly. A driveway gate is like a big jigsaw puzzle. If any piece does not fit, the project is a failure. Double check all measurements and marks before cutting the wood. Keep in mind that if you have a driveway gate design that calls for a curved top, all the gate slats will be different lengths and you will need to made curved cuts. This is not difficult but you will need to pay attention.
Building the Driveway Gate
Build the driveway gate from the outside in. The outside frame must be strong and secure to hold everything together. For this reason, the outside frame is built with thicker wood than the rest of the driveway gate. The frame wood is usually 1 1/2 inches or 2 inches thick. Slits must also be cut into the top and bottom frame pieces so the slats slide in nicely. Use both screws and bolts to secure the outer frame of the driveway gate together. Fasten the top, bottom and short side. Leave the wide side of the frame open for now.
Fill In the Frame of the Driveway Gate
Add the middle support frame pieces if your design calls for them. Be sure to cut slits into the tops and bottoms of them as well. Carefully slide the driveway gate slats into place. Do this from smallest to largest. If you measured and cut correctly, everything should fit into place effortlessly. When all the slats are in place, screw and bolt the final piece of outer frame to the driveway gate.
Brace the Driveway Gate
If your driveway gate design calls for brace pieces, add them now. These lie across the slats to provide more support for the structure. Some designs tell you to position them horizontally while others say to place them diagonally. Braces are seen primarily on larger driveway gates without middle supports. Smaller gates and gates with middle supports do not need them. The driveway gate is now complete and waiting to be hung.
Hang the Driveway Gate
Lay both sides of the driveway gate on the ground and position them like they will be when they are hung. Be sure to allow for a gap between the doors. This is usually 1/2 inch. Run two long pieces of lumber across both sides. Place one at the top end of the frame and the other at the bottom end. Use clamps to secure the lumber to the driveway gate. This will hold both sides of the gate in position as you mount them. Get a bunch of people to help you lift the driveway gate into place. Sit the gate on wood pieces that are the same thickness as your desired clearance. This is usually 2 inches but can be more if you need more space.
Add the Hinges and Latch
Attach the hinges to the posts and the driveway gate. This requires your strongest bolts since this is where all the stress of holding up the gates is located. Since the gate is now perfectly lined up, install the latch between the doors. If you would like, also attach a security bolt to one side of the driveway gate and extend it into a drilled hole in the ground. This keeps one side of the gate securely closed when you only want to open one side. Make sure the catching portion of the latch is on the same side of the gate as the security bolt. Once everything is in place, remove the attached wood and boards underneath. The driveway gate is now hung in perfect position.
Decorate and Protect the Driveway Gate
If you purchased finished wood to build your driveway gate, there is no need to do anything else to it. However, if the wood is unfinished or you want it to be another color, you can paint or varnish it. It is best to wait until the driveway gate is complete to do this since the paint or varnish could be damaged during construction.
© 2015 Discover the World


