Bearded Iris - Photos and Tips For Growing Beautiful Irises


Growing Your Own Bearded Irises
While there are many different kinds of irises out there, one of the most popular are the tall bearded irises. They are my own favorite type of iris flower as well. Here I share some of my best tips for growing these beautiful flowers. I learned to grow them myself after being given some iris rhizomes from my Great Aunt who grew a beautiful garden full of them.
These types of irises are great for general garden use, and can grown by beginners even. They are so gorgeous it will look like even a beginner has a green thumb! Hybridists have had a great deal of success in growing many different varieties. It is to the point there is almost something for everyone when it comes to these beauties.
If you look in catalogues, there are literally hundreds of varieties. There are members of garden clubs and likely even some neighbors that share after dividing their irises. When they are happy, they seem to multiply like crazy.
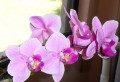
Peach or Orange Colored Bearded Iris
Click thumbnail to view full-size


The Best Site for Irises.
Irises seem to be hardy even in the colder climates. The rhizome and its abilities to store its food, and protect it, helps to make them tough plants. I have seen this to be the case when they were thrown into a planter that wasn't meant to be a permanent place. Winter came and went and to our surprise, they were growing as well as ever, healthy as could be.
Consider that bearded irises don't like wet feet. If they sit in water or wet soil for long, they don't like that. They need to have plenty of water, but that drains off. People have built planters to accommodate this need. If you plant them five inches above the surrounding soil, that is perfect.
They loved to be planted anywhere from July to early fall. They will bloom the following spring, or you should. They love to have lots of sunshine to create the beautiful flowers. If you get very hot summers though, some shade is alright too. They do need their water in such cases.


Tips For Planting Bearded Irises - The Best Methods
You want to plant the iris rhizomes in singles, and that is how they usually come. If you were to get a big clump though or something, you will want to gently separate these out. One of the unique things about these iris rhizomes is how you plant them. They aren't almost like any other flower I have planted. My Aunt taught me that you want them almost on top of the soil! I didn't believe her, but then looked at her garden and saw the rhizomes sticking out in some places.
When you dig the hole, you want to still have a little "hill" in the hole. Set the rhizome on top of the little hill and let its roots dangle down the side. You are really only burying the roots around the rhizome, and filling in that area around the rhizome. You want its roots to have free reign to grow in the surrounding soil. If you just barely plant it on flat soil, the roots will have to work their way down, which they will probably eventually do. It is just more ideal the first way I described, and worth the extra minute when planting if you can do it that way.
Fill in the area where the roots are with soil, and barely cover the top of the iris rhizome. It might seem strange the first time, but it really works.
Some plant several of one kind together, which looks nice in the garden. You will want to space them about 8 inches apart which gives them room to grow and multiply.
Black and Brown Bearded Iris flowers
Click thumbnail to view full-size


Yellow and Purple Bearded Iris Bloom

Dividing Bearded Irises After Crowding Begins
Due to the nature of how irises grow, they will eventually get over crowded with their multiple rhizomes or root systems. The best time to divide and transplant your iris rhizomes is a full two weeks after they are completely done flowering. You basically are going to dig out the old clump, and pry it apart.
At this point, you may observe some diseased or shriveled parts, and those are best discarded. The rhizomes that look plump and healthy, with the most growth on them are the ones you want to transplant or share with others.
The side of the rhizome where the latest blooming stalk just bloomed, won't bloom again the next year. It is the portion where you see new little shoots coming in that will bloom the next go around. Keep this mind when you are placing them in their new spaces. If you were to do a circular planting, face these green portions outward, the ones with the new shoots.
Some trim the leaves down to about seven inches or so. Some use fertilizer at the point of dividing and transplanting. The rhizomes can be drawing on the nutrients until the next bloom time.
Different shades of purples and lavenders in bearded Iris flowers


Panting Bearded Iris - Poll
Have you ever planted your own bearded irises?
Different Bearded Iris Flowers
Click thumbnail to view full-size


Related

Iris Flowers - Growing, Facts and History

Stunning Tall Bearded Irises - a Hobby Gardener's Guide to Growing Iris and Selling on Ebay

How to Attract Hummingbirds in Your Yard by Planting Canna Lily Lilies in Your Garden

9 Plants That Grow on Walls in Cracks and Crevices

My Victorian Garden: Growing Heirloom Bearded Iris