- HubPages»
- Gender and Relationships»
- Weddings & Wedding Planning»
- Invitations for Weddings
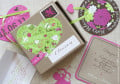
How to Make a Box Invitation and Party Favor Box


Invitation boxes, are become very popular especially for weddings. Invitation boxes can be very expensive. So here is a how to on creating your own boxes. Invitation boxes let you be creative and add a special twist .
I recommend you come up with a theme, or a color scheme before you start to purchase your materials. Choosing box material will depend on many factors, are you going to mail it? how much material are you going to enclose inside? If you are choosing to mail it as is, then you need to use chipboard, or something stronger. In this demonstration I am using heavy cardstock.
What you will need
- Invitations supplies
- cardstock or chipboard
- decorative items (in this demostration I used light weight clay shells, quilling paper, seam binding ribbon, glitter, craft cardstock paper)
- craft knife or paper cutter
- bone folder
- ruler
- glue stick and multipurpose glue ( ex Elmer's)


How to make the box
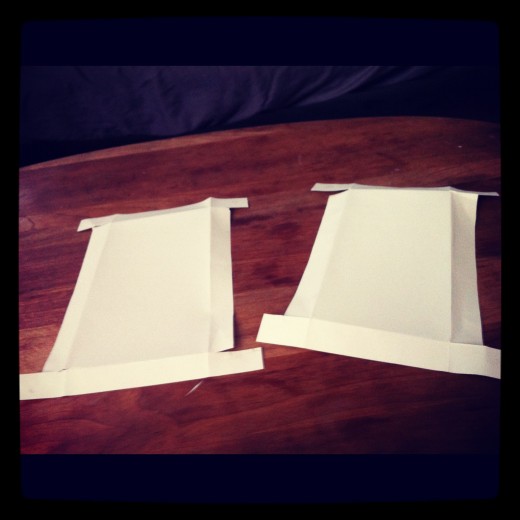
- I created my own template for a box. It will fit on a 8 1/2x 11 sheet of cardstock or chipboard. The box is 5x9 once made. You can download the template Paper Box Template
- To make the top of the box follow the lines that say top and for the bottom of the box follow the lines that say bottom.
- use a craft knife and a ruler to make any cuts so all the lines are strait. You can also use a a blade paper cutter if you are comfortable with it.
- When making folds I recommend using, a ruler and a bone folder to make the cleanliest folds. It can take some practice to get the hang of making a perfect box so try it on some card stock first before trying it on chipboard.
- After cutting and folding the box top and bottom, you are ready to assemble. If you want to decorate the box with paper or add a box lining then I recommend that you add it before assembling the box. Glue stick or photo mounting adhesive are good choices on applying paper or fabric to the box pattern
- Using the glue stick, glue each tab inside the box so all outer edges are clean.
- Now it is time for you to be creative, add any embellishments, I like to have my invite secured inside the box so I create a pocket or banner to keep in place but lets the guest remove it when need.
- If you are using them as a favor box, you can place a cookie or chocolate, or any tiny gift item inside. I have even used them for dinner parties and place menu in them, or instructions for party games that would be played that evening

Ocean Theme Box
- I used a scalloped edge scissors to cut the card stock
- I made clay shells using a candy mold and light weight air dry clay
- I quilled the rolled paper to make the decoration under the seashell and the waves at the bottom of the box.
- I used seam binding ribbon with a clay seashell attached on the outside of the box.