- HubPages»
- Gender and Relationships»
- Weddings & Wedding Planning»
- Decorations for Weddings
How to Make Your Own Cute Wedding Cake Toppers in 10 Simple Steps

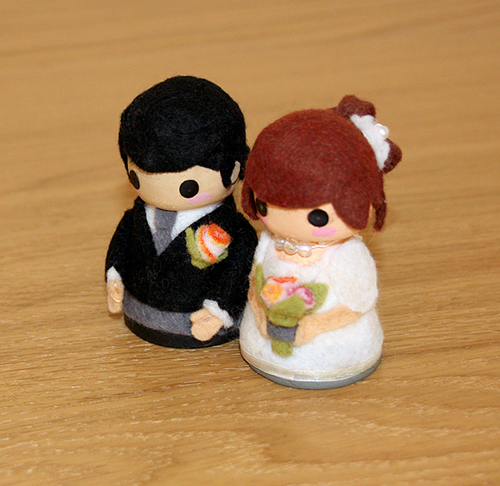
This hub will guide you through the steps necessary to craft your own wedding cake toppers. Small touches like these really add to the personal style and theme of your wedding.
The example here is based on Japanese momiji dolls. They are cute and go especially well with Asian themed weddings; but you can also use this guide to create other styles.
You Will Need:
- Wooden doll base (found at most craft stores in various shapes)
- Coloured felt (choose colours corresponding to your outfits, hair, skin etc)
- Fabric glue
- Acrylic paints
- Some sharp scissors
- Two rubber bands
- Needle and coloured thread
- Ribbon, beads, small decorative items
Optional:
- 4 black sequins for the eyes
- Loose wool stuffing
Planning your Design
Before you begin, make a rough sketch on paper of how you want your dolls to look. Use the bride and groom's wedding outfits as a guide and try to simplify them into doll form. The accessories you choose can really help to enhance certain features here, so a trip to your local craft store can help you come up with ideas.
For example, beads could be used for a necklace, or buttons, lace could be used for a shrug, maybe even a mini veil at the back of the brides head.
Once you have planned your basic design, it's time to begin making it.

Step 1: Shaping the hair
Select 2 pieces of felt that are the closest match to the hair colour for each doll. Cut them into circles large enough to completely cover the head with some felt to spare, and then wet them. Squeeze out any excess water and press the felt tightly over the heads, stretching it slightly, and attach with rubber bands round the neck so that they are stretched over the shape of the head with as few wrinkles as possible.
This step might seem a little strange, but the point of this exercise is that the felt should dry in this shape. Leave the felt in this way overnight, or for a few hours at least.
Tip: For very long hairstyles, the felt should be cut into a larger circle so that there is more felt hanging down the sides.
Step 2: Priming the bases
Begin by painting the faces on the base in flesh tones. Then paint the colour of the shoes around the bottom of each base, in a strip of approximately 1cm. You can also paint the underside if you like. Leave the rest of the base unpainted as this helps the surface to adhere to felt when gluing.
Step 3: The bride's dress
Choose a large piece of felt matching the main colour of the dress, and wrap it around the body, trimming off the pieces that overlap. Depending on the type of wooden base you are using this step may vary; simply aim to cover the base in felt. Leave around 5mm at the bottom to show the 'feet' if you wish, or if the wedding dress is very long you can have the fabric reaching all the way to the base of the doll.
Once you are happy with how the felt covers the base, glue it on.
Add any additional trimmings that you think are necessary here. I glued a small length of white ribbon around the bottom of the dress, to clean up the edges. You could also add ribbon to the collar, or the waist- anything that suits the design of the dress.
Tip: For a v neck collar, simply wrap each side over the front at an angle. For other shapes you may need to cut some additional felt off.
Step 4: The bride's arms
For no sleeves, simply cut out the arm shapes and glue them on. For short to midlength sleeves, you can cut a small oval of felt in the dress colour and stick this over the top of the arm.
Only attach the arms at the top for now- the hands will need fixing to the bouquet later.
Step 5: The groom's suit
Like with the brides dress, start by wrapping a piece of felt around the body of the doll. I used one colour for the shirt, and another for the trousers. Cut to size, glue on. For added definition I used grey for the trousers so that the shape of the black jacket would stand out more on top.
I then cut out the jacket and wrapped it around the body. For the collar, wrap the sides over each other at the front, and cut off any excess felt to get the desired effect. You can also add an additional shaped piece of felt for a lapel. I also cut out a small triangle at the back for the coat tails.
For an ordinary tie, cut out small felt shapes to fit the space and glue them on. For a bowtie, use a piece of felt with triangles on each end and tie a knot in the middle.
Tip: Use a length of ribbon for the tie instead of felt to make it more of a feature. Attach it as you would a normal tie.
Step 6: The groom's arms
Make the sleeves and shirt cuffs so that they fold in half to cover the hands. Glue it together, first the cuff over the hand, then the sleeve over both, so that the cuffs stick out a little. Then attach them to the body.
Tip: You can also add a small stitch to each hand to accentuate the thumb from the fingers.
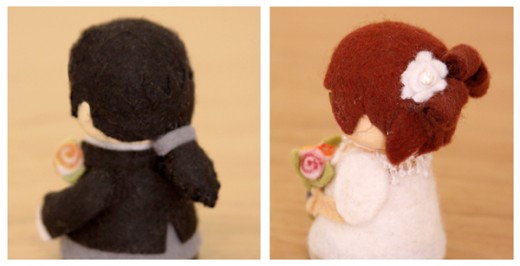
Step 7: The hair, part 2
For shorter hair and up-dos: cut off all the excess felt and leave only the area that covers the scalp. Leave it longer at the front for a fringe (bangs).
For long hair, cut out some long tresses to hang down at the sides and back. You can glue extra pieces on for more volume.
Try curling up strips of felt for up-dos and gluing them in place, or for ponytails and buns you can sew a small 'pouch' and stuff it with wool before attaching it to the hair. Use decorative items or felt to cover the join.
Step 8: The faces
Once the hair is in place, you can paint on features for the face. I added pink cheeks for that kawaii touch, and large black sequins for the eyes. But you can paint the eyes on or use any small decorations you like.

Step 9: Flowers
This part was really fun! You can use coloured felt but I thought it looked prettier to use white and just paint the top edges, like those two-tone roses you get. It matched our flowers too.
Roses: Simply cut out small strips of felt and curl them up. Pinch the bottom edges together and you can either glue or sew them together.
Other flowers: Cut out small flower shapes, and using the needle and thread, sew in a tiny bead for the centre.
Add the green leaves and stalks on top of these by wrapping shaped felt around them and gluing them down.
Then glue the bouquet in place, attaching the brides hands. Depending on the strength of the glue you're using you may want to sew it in place when attaching the bouquet. Same with the button hole for the groom.
Tip: For a more decorative bouquet you can wrap coloured felt or ribbon around the stalks.
Step 10: Final Touches
Add any jewelry in the form of beads, small gems etc. For example I threaded 3 beads onto some white cotton for the necklace.
Add any hair piece or veil. For the hairpiece I cut out a flower shape, added a small bead to the centre and glued it into the brides hair.

And You're Done!
You now have some cute cake toppers that will look great on the big day and last a lifetime after..
© 2011 Vanadis


