How to Make a Paracord Survival Bracelet or Keychain

DIY Paracord Keychain or Survival Bracelet
Survival bracelets or keychains are made by repeating a simple pattern of knots using a particular kind of rope called paracord, which is short for "parachute cord."
These items look cool, and they also have the potential to be useful in certain emergency situations.
Paracord is actually two kinds of rope in one: Within the outer layer of rope are strong, thin strings. Between the thicker rope and thinner strings, paracord can be used to solve a variety of problems.
Both the bracelets and keychains are easy to make, with the keychains being a simpler project than the bracelets.
Bracelet kits are available that come complete with lengths of rope and plastic side-release buckles. My preference is to buy the materials separately, which is less expensive and gives me more options for colors and sizes.
Paracord is extremely strong and versatile. Because the bracelets or keychains are made of knotted lengths of this rope, they contain a bit more than one foot of paracord for every inch of the bracelet or keychain. So if your wrist is 6 inches in circumference, the bracelet will be made of nearly 7 feet of rope!
In This Article
This article includes:
- Instructions for making survival bracelets
- Instructions to adapt the project in order to create paracord keychains
- An excellent video so you can see the steps in live action
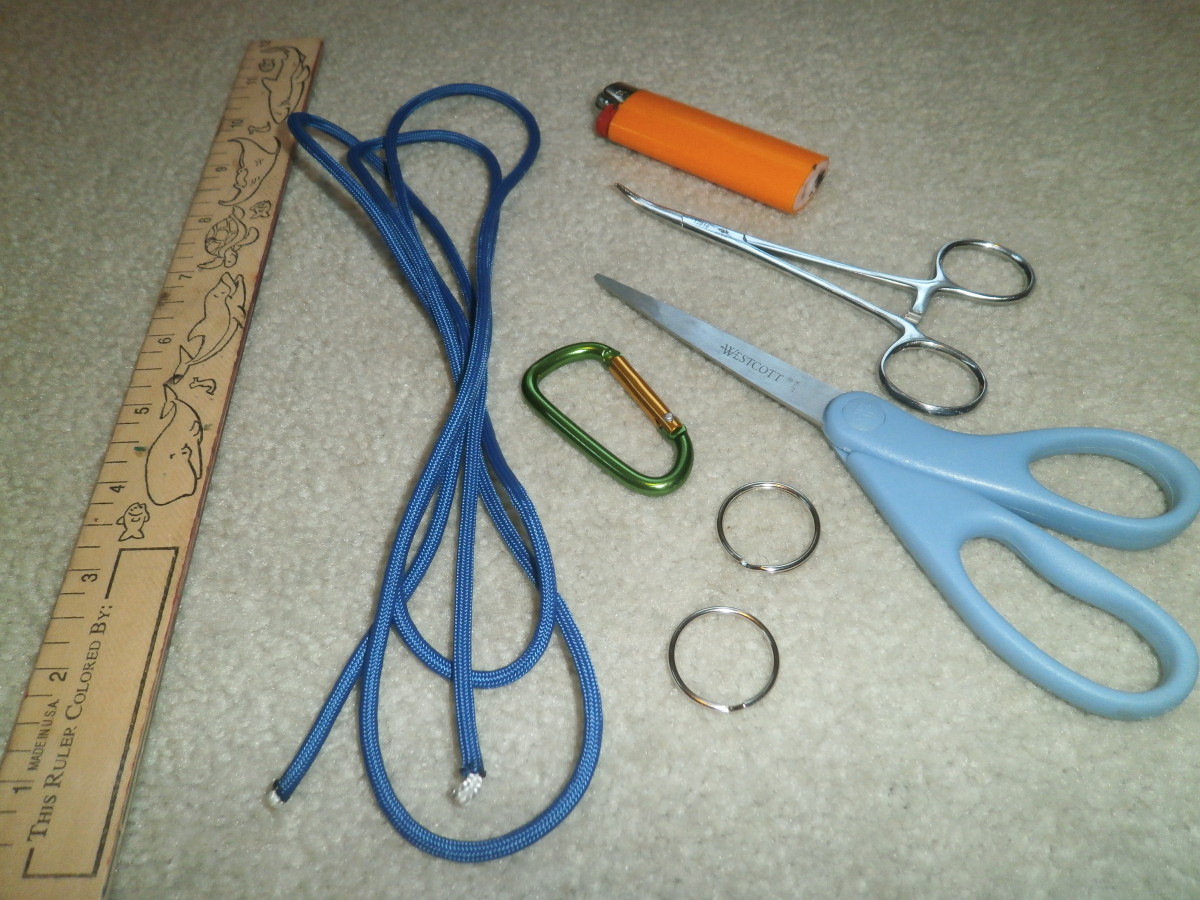
Supplies Needed
You only need a few items to create a paracord keychain or bracelet.
Keychain
- Paracord:
This is the paracord I use. It's made in the USA by a U.S. military veteran-owned-and-operated company, Dakota Gear. There are options for various colors and lengths.
- A ruler
- Scissors
- A lighter
- Key rings
- Tweezers or a curved hemostat: While tweezers can be used to tuck in the paracord tails at the end of the project, this step is far easier when using a
curved hemostat—in fact, the curved hemostat makes not just this project but many other projects a lot easier. Use it to wiggle the ends of the paracord through the knots. The hemostat locks on the paracord and is then simply released once the paracord has been threaded into place.
- A carabiner (optional)
Bracelet
- Paracord
- A ruler
- Scissors
- A lighter
- Tweezers or a curved hemostat
- Plastic bracelet clips or a contoured plastic side-release buckle: Buckles come in different sizes, so you can use smaller buckles for smaller wrists. Be sure to get
curved/contoured buckles for this project.


How to Make a Survival Bracelet
Here is the initial step-by-step process.
Step 1
Measure your wrist circumference by wrapping the rope fairly snuggly (but not tight) around your wrist. Pinch and hold the rope where it comes around to meet the end of the rope.
Step 2
Then, using the ruler, measure from the end of the rope to the spot you're pinching. Do this a couple of times to make sure you have the right measurement.
Step 3
Using the ruler, measure out a length of paracord to equal one foot for every inch of wrist circumference, plus one foot. As an example, my wrist is 6.5 inches in circumference. For my length of rope, I would measure 6.5 feet + 1 foot = 7.5 feet of paracord. This is enough to make sure that the finished bracelet won't be too tight and will have a little extra length to tuck in the ends when completing the project.
Step 4
The ends of the rope must now be sealed to make it easier to work with the paracord. First, use the tweezers or hemostat to pull out about 1/4–1/2 inch of the thin, white inner strings, then cut those bits of inner strings with the scissors. Doing this will help the outer colored part of the rope seal together better.
Step 5
With appropriate caution, light the lighter and pass the flame briefly over the end of the paracord. The rope does not have to be burned, just quickly heated. It only takes a fraction of a second in the flame to cause the rope to become slightly melty. Either pinch the ends of the rope together with your fingers or -- more safely -- lay the end of the rope on the ruler and tap the rope with a piece of cardboard or the bottom of the lighter. You may need to repeat this several times in order to get the paracord ends to fully seal. Please keep in mind that both the lighter and heated paracord are capable of burning skin!
With the ends of the paracord sealed, they won't fray and fight you as you thread them through the buckle holes and tie the paracord into knots.
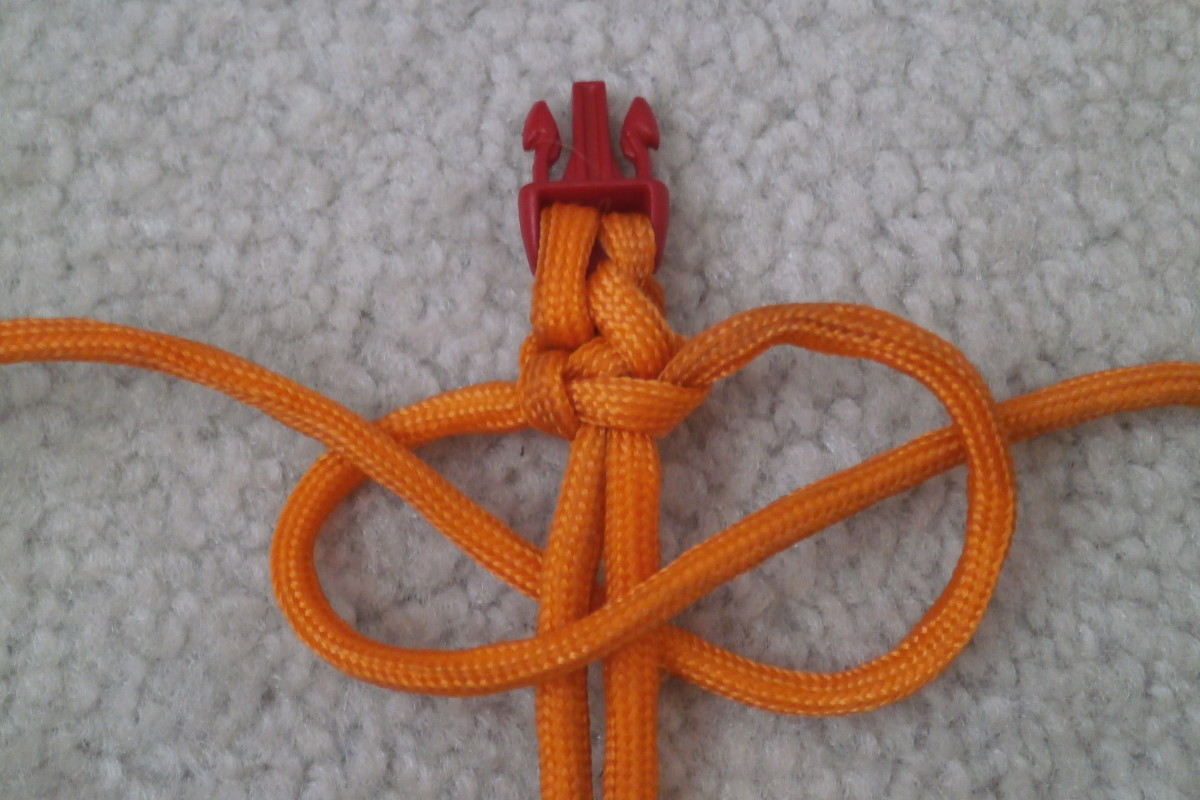
Connecting the Paracord to the Buckle
Click thumbnail to view full-size


Step 6
Separate the two pieces of the side-release buckle. Put the male end (the one that looks a bit like a fork) aside for later.
Take the paracord and double it up, placing the two ends together and finding the midpoint along the length of the rope.
Slide the loop at the mid-point of the rope through the slot in the female end of the buckle (the end that has a rectangular hole). Holding the buckle so that the inner curve surface is facing you, pass the loop through so that an inch or two of the loop is on the outer curve surface side of the buckle. Make sure the two halves of the rope are still of equal length.
Slide the ends of the rope underneath the buckle and through the loop. Pull the ends so that a snug knot forms against the buckle. The ends of the paracord should be even with each other (or very close to even).
Take the two ends and pass them through the slot of the male end of the buckle. They should pass from the inner curve side to the outer curve side.
Pull the rope further through the male end of the buckle to decrease the length of rope between the two buckles. There are now two ropes in between the buckles and two ropes heading out of the male end of the buckle.
Step 7
Using the ruler, adjust the length of the bracelet. The distance you're measuring is between the far end of the female buckle and the "base of the fork" of the male end. This distance should equal the circumference of your wrist plus one inch. My wrist is 6.5 inches, so I want my bracelet to measure 7.5 inches from the end of the female buckle to the base of the fork of the male buckle.
Without tugging the rope and accidentally changing the length, see if the bracelet will fit comfortably when wrapped around your wrist. You'll check the length of the bracelet again shortly, just to make sure. (Once I neglected to take this step, thinking everything was just right, then wound up with a bracelet that was too small!)
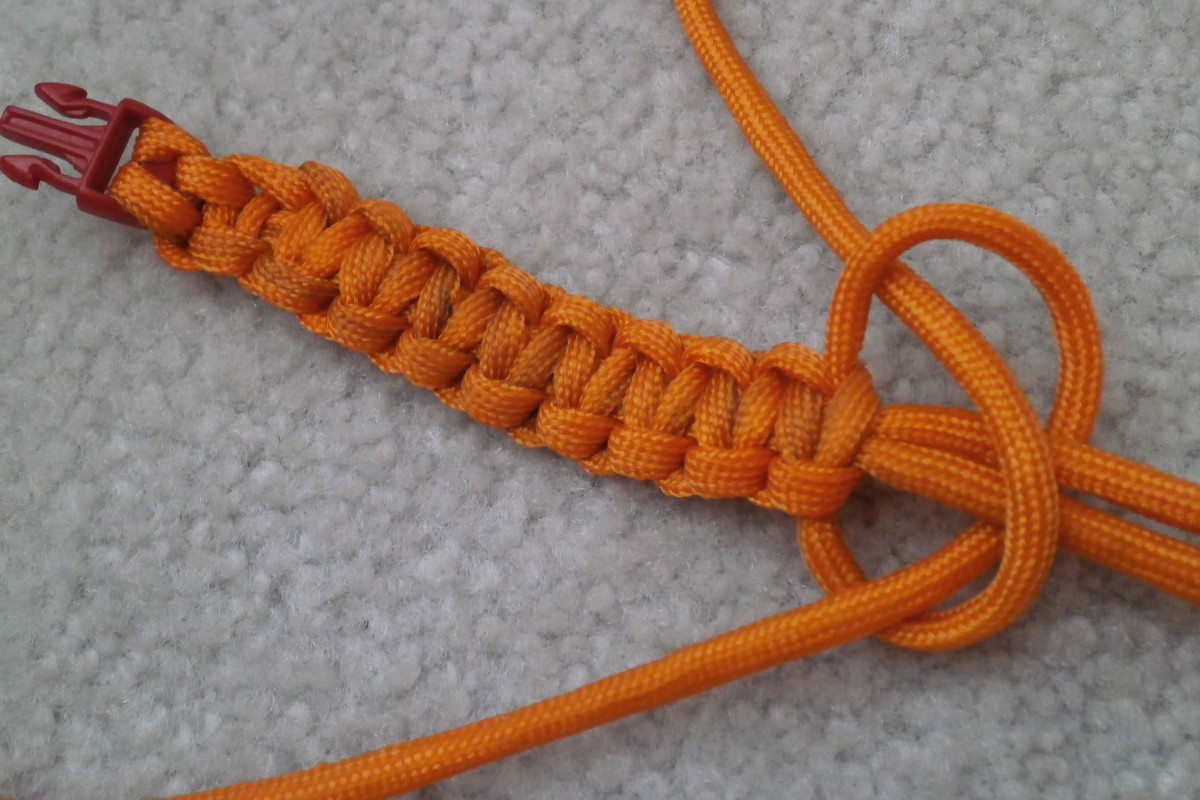
Tying the Knots
Click thumbnail to view full-size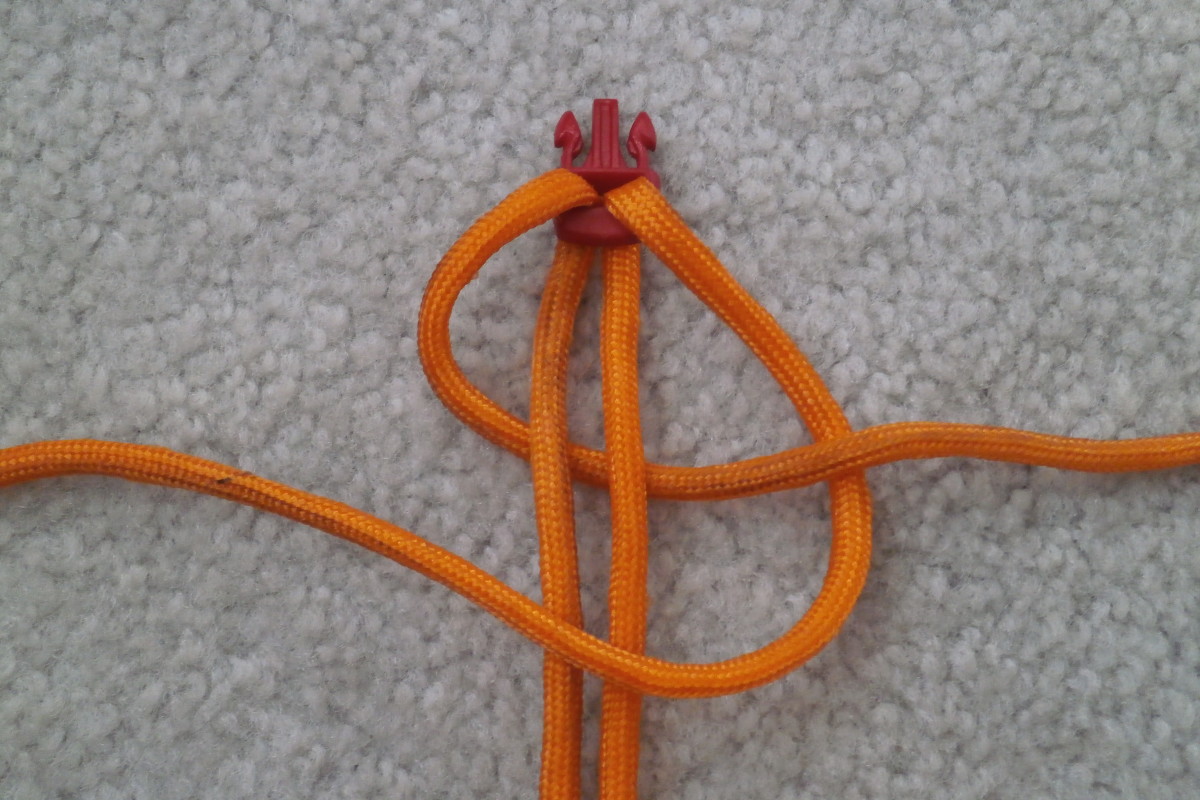


Step 8
Don't worry if this part seems confusing at first! These kinds of projects often feel overwhelming but then suddenly become clear and easy.
Sit with the male end further away from you and the female end next to you, with the inner curve sides facing down. (You're looking at the outside surface of the bracelet.) Take the free end of rope on the left side and pass it underneath the two segments of rope in the middle that connect the two pieces of the buckle.
After going behind the two ropes in the middle, it then goes over the rope on the right side.
Now take the rope that was already on the right side and pass the end of it over the two center segments and through the loop on the left side. (The loop on the left was created when the rope on the left curved around to go under the two ropes in the middle.)
Pull the knot tight. When this first knot tightens against the buckle, it doesn't look like much of anything. Don't worry - after a few more knots, you'll see the standard survival bracelet pattern appear!
Step 9
The second knot is exactly like the first but in the opposite direction. Take the rope that is on the right side and pass it under the two center lines, then over the rope on the left side. Then take the rope on the left side and pass it over the center lines and down through the loop created on the right side. Tighten the knot.
When you tighten the knots, pull the paracord firmly, making sure the segments of rope don't get twisted around. The knots should be good and tight.
Step 10
It's a good idea to check the length of the bracelet again. Wrap the bracelet around your wrist and verify that it is a good fit when the buckles are snapped together. If necessary, undo the first two knots and adjust the length of the bracelet.
Continue making knots in this alternating pattern of starting with the rope on one side and then the other – left, right, left, right....
You'll notice that there is a vertical "bump" of rope on the side when the knot is tightened. If that vertical bump is on the right side, it means that the last knot made started with the right rope going under the two center segments. So that indicates your next knot will start with the left rope going under the two center lengths. This is a good thing to keep in mind if you lose track of where you are!
Step 11
Continue making knots until you work your way to the other buckle and no more knots will fit. As you make the knots, tie them tightly and slide them up in order to maximize the number of knots that will be made.


Finishing It Off
Once you have knotted your way down the length of the bracelet, pass the two rope ends through the slot in the female buckle so that the ends are now on the inner surface of the bracelet. Depending on the thickness of the ropes and the width of the slot, this may be fairly easy, or it may require the use of tweezers or a curved hemostat, or it may be completely impossible!
If you absolutely cannot get the paracord through the slots, then continue to the next step, having the rope go around the sides of the bracelet rather than through the buckle. This is not ideal, but it will work.
You should still have a decent amount of paracord left. Trim the ends back to about 1 or 1.5 inches long. As you did at the beginning of the project, seal the ends of the paracord. First, pull out some of the inner fibers with the tweezers or hemostat and cut them back. Then seal the ends using a lighter to quickly heat the paracord and then carefully squeeze the ends of the rope together.
With the tweezers or curved hemostat, work the ends of the paracord in under the knots on the inner side of the bracelet. Continue wriggling, pulling, and tucking until the ends of the ropes are fully hidden. If they stick out, you might find them annoying against your skin as you wear the bracelet.
You now have your own homemade survival bracelet!
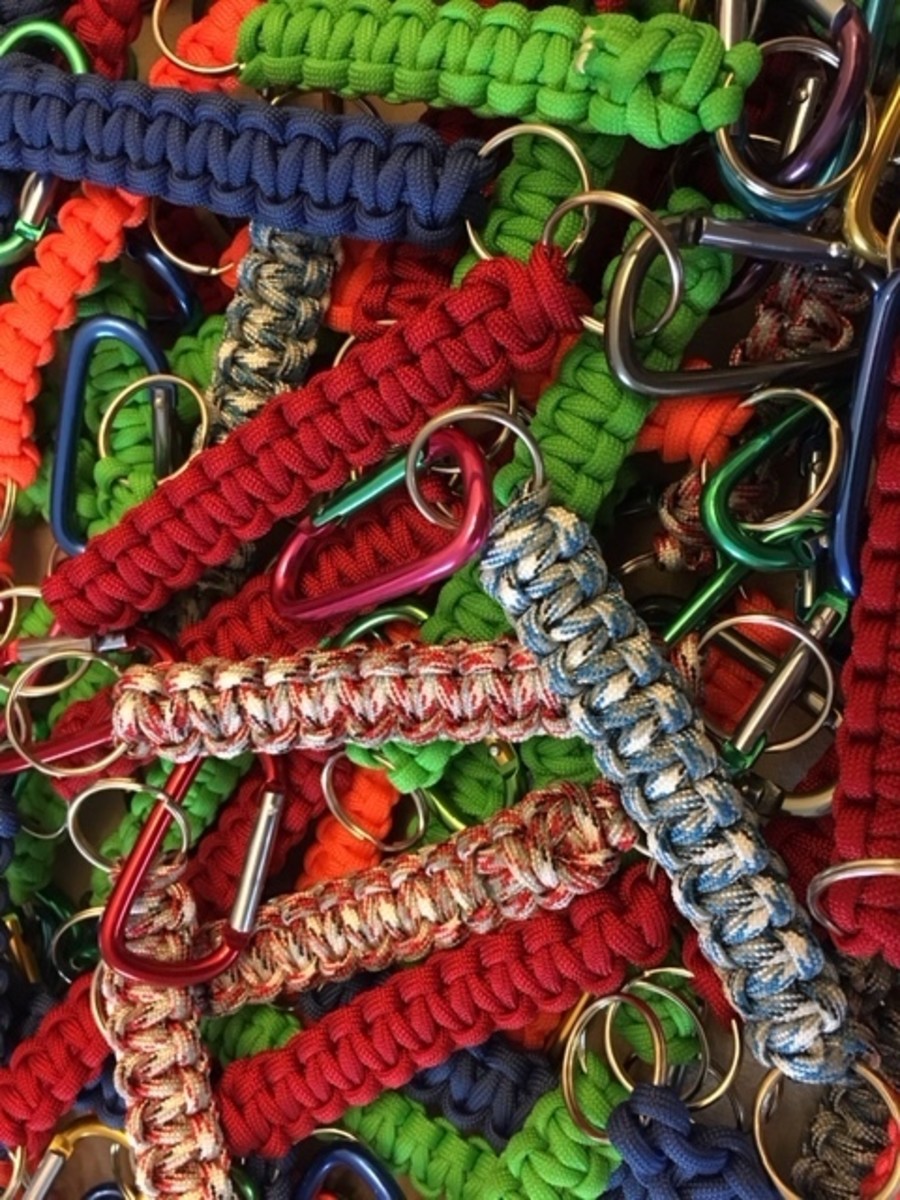
These are fashionable bracelets that can really come in handy if you need either a proper rope or the strong, thin inner fibers to repair or create gear.
By the way, if you want to carry a greater length of emergency paracord, you could make a survival belt! This will require much larger buckles and a greater length of paracord. Add several extra feet of paracord when you initially cut it, as this is a much larger project with greater variation in the amount of rope needed. Instead of using buckles, you could make a variable-length belt by having two key rings (or other rings) at one end and either nothing or a very small end piece on the other end. On the finished product, the second end would be looped through both rings of the first end, then looped back through only one ring and adjusted to fit the wearer.
Making a Survival Keychain
To create a survival keychain, the steps are nearly identical to making a bracelet.
This is actually an easier project, as you don't need to be exact in the length of the finished project. Also, looping the paracord through key rings is a lot simpler than passing it through the ends of the bracelet buckles.


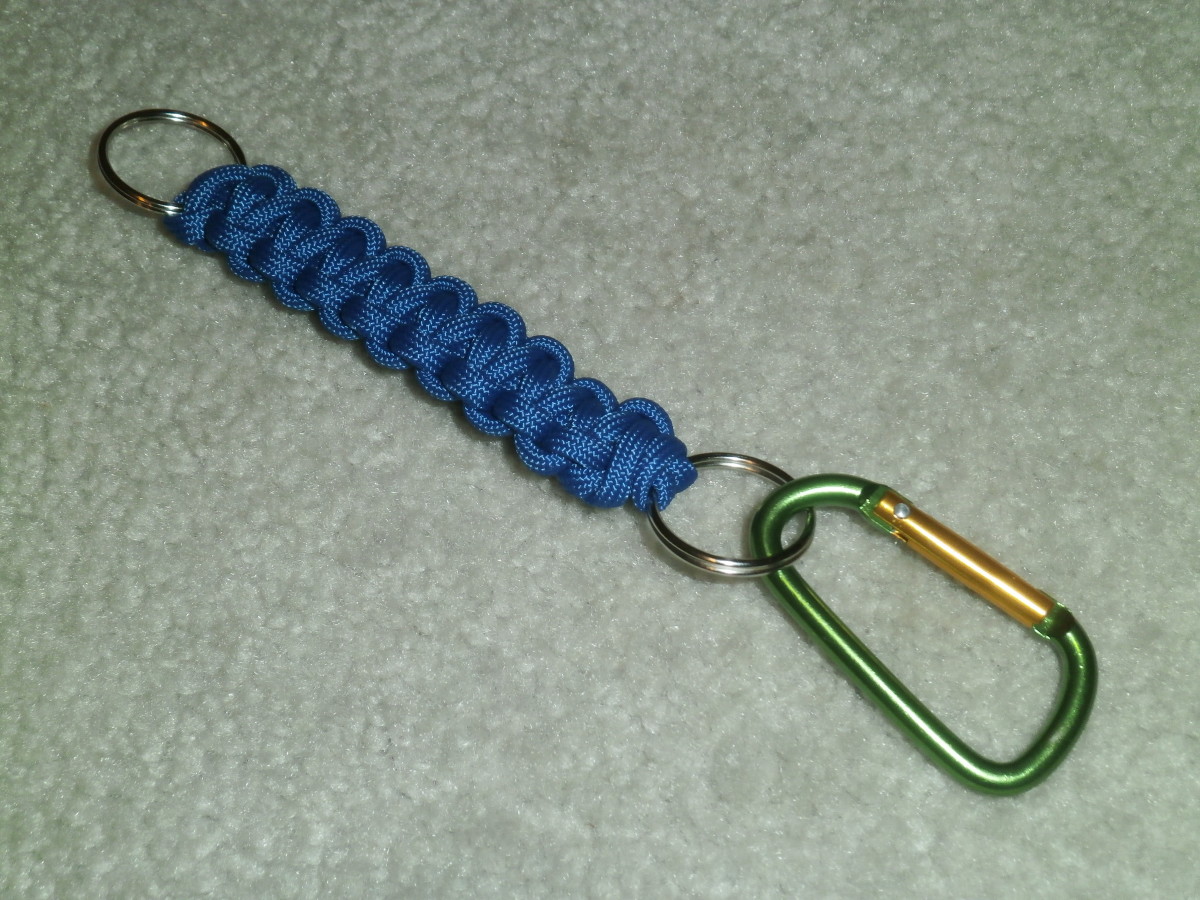
The supplies for the keychain are the same as for the bracelet, except there are no buckles. Instead, you'll need two key rings.
I like adding a carabiner to the keychains as well. The carabiner can be used to attach the chain to a bag, gear to a backpack, or for other purposes. While the carabiners I use don't lock and are certainly not climbing quality, they can serve to creatively solve problems where hooking items together is helpful.
For a four-inch-long keychain, I use just a bit more than five feet of paracord. This length leaves enough extra paracord to work in the ends. While this isn't a whole lot of paracord to use in an emergency, keychains much longer than this can be a bit cumbersome.
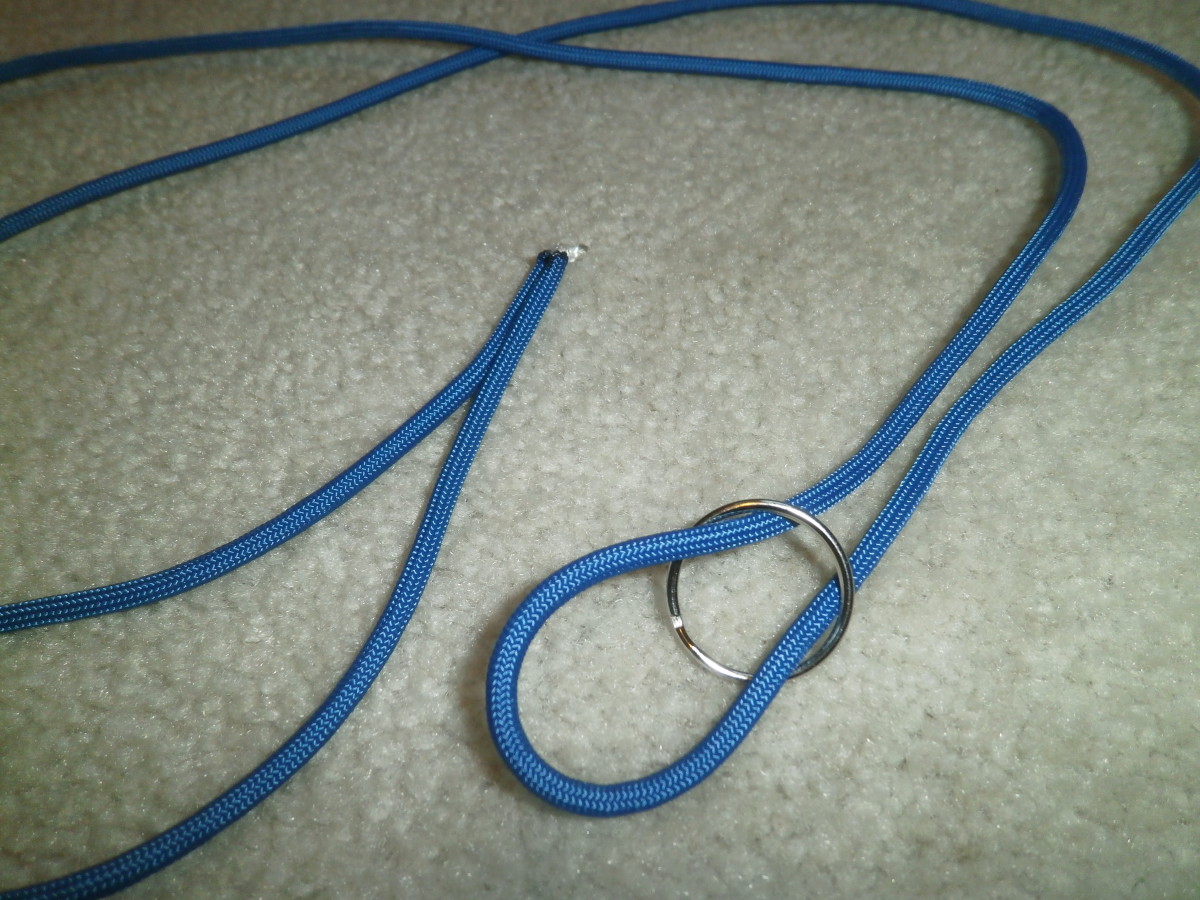
As with the bracelet, start the process by holding the ends together and doubling up the length of rope. Next, feed the loop at the mid-point of the rope an inch or two through one of the key rings. Then, pass the ends of the paracord through the loop. The ends should be even (or very close to even) when the rope is tightened.
Loop the two ends of paracord through the second key ring, then adjust the length of rope between the two key rings to four inches.
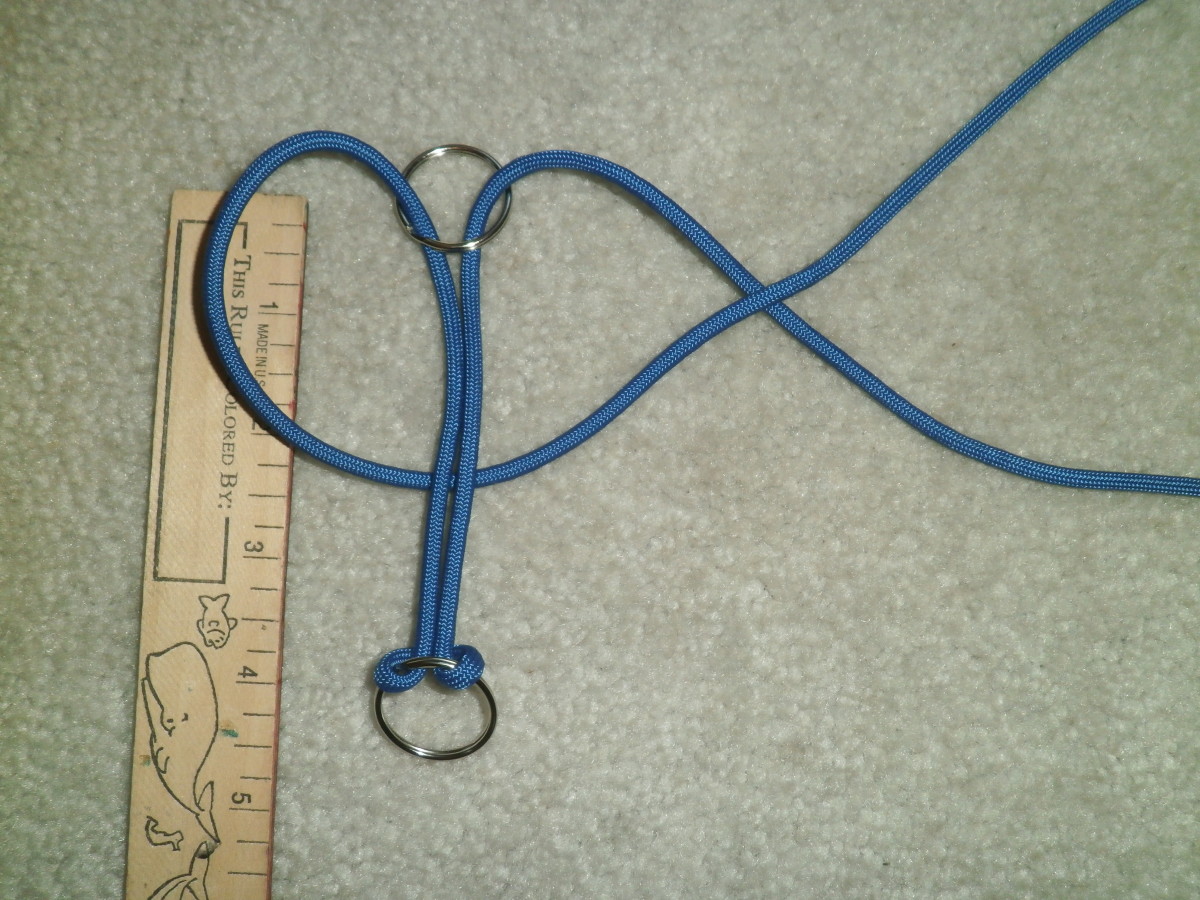
Knotting the paracord for the keychain looks exactly the same as for the bracelet, so the pictures to the right should look familiar. The bracelet description above provides greater detail, so please refer back to it if needed. You can also check out the link to the video below, which clearly shows how to make the knots.
Make the first keychain knot by taking the rope on the left and passing it behind the two middle lengths of rope and over the rope on the right. Then take the rope that was already on the right and pass it over the two middle segments and under the rope that had been originally been on the left-hand side. (The rope will go through the loop created when the left rope passed under the middle segments.)
Now comes the tricky part. The knot needs to be tightened so that it is firm but not too tight. When pulled too much, the knot gets misshapen and the keychain becomes shorter. Play with it and adjust it until you have a good balance of tension.
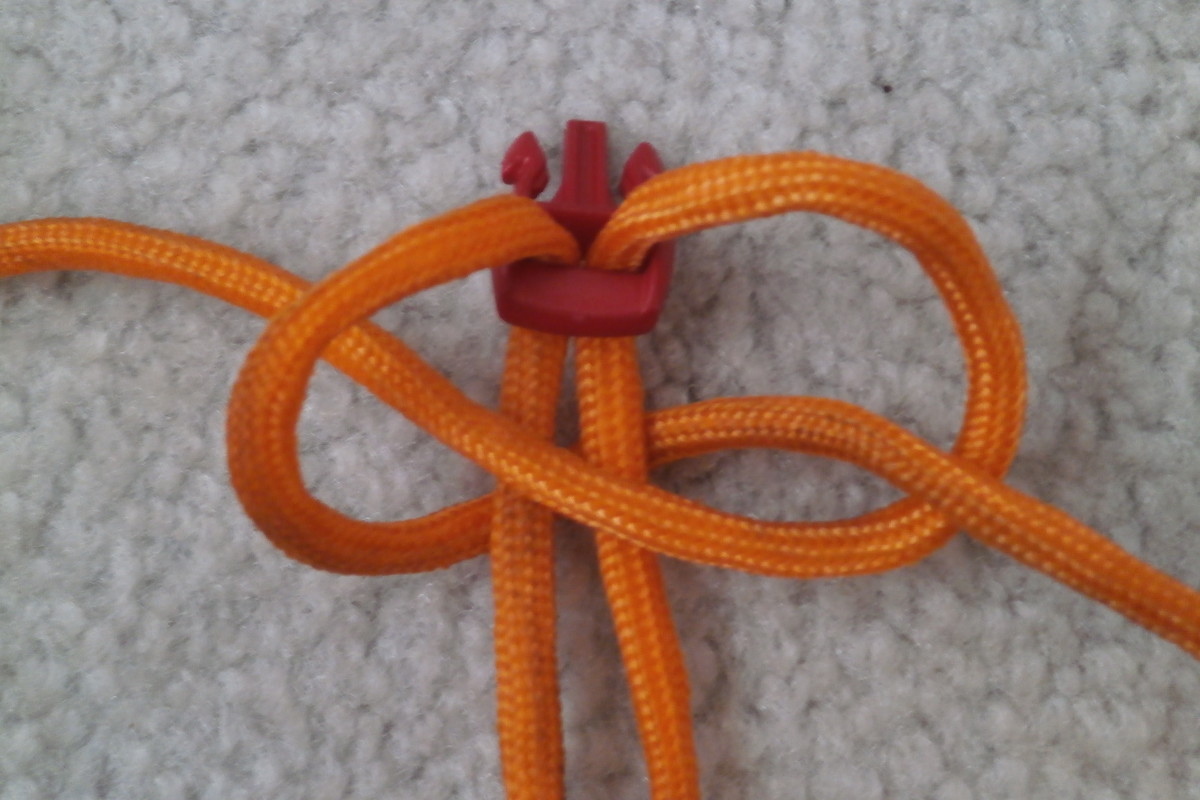
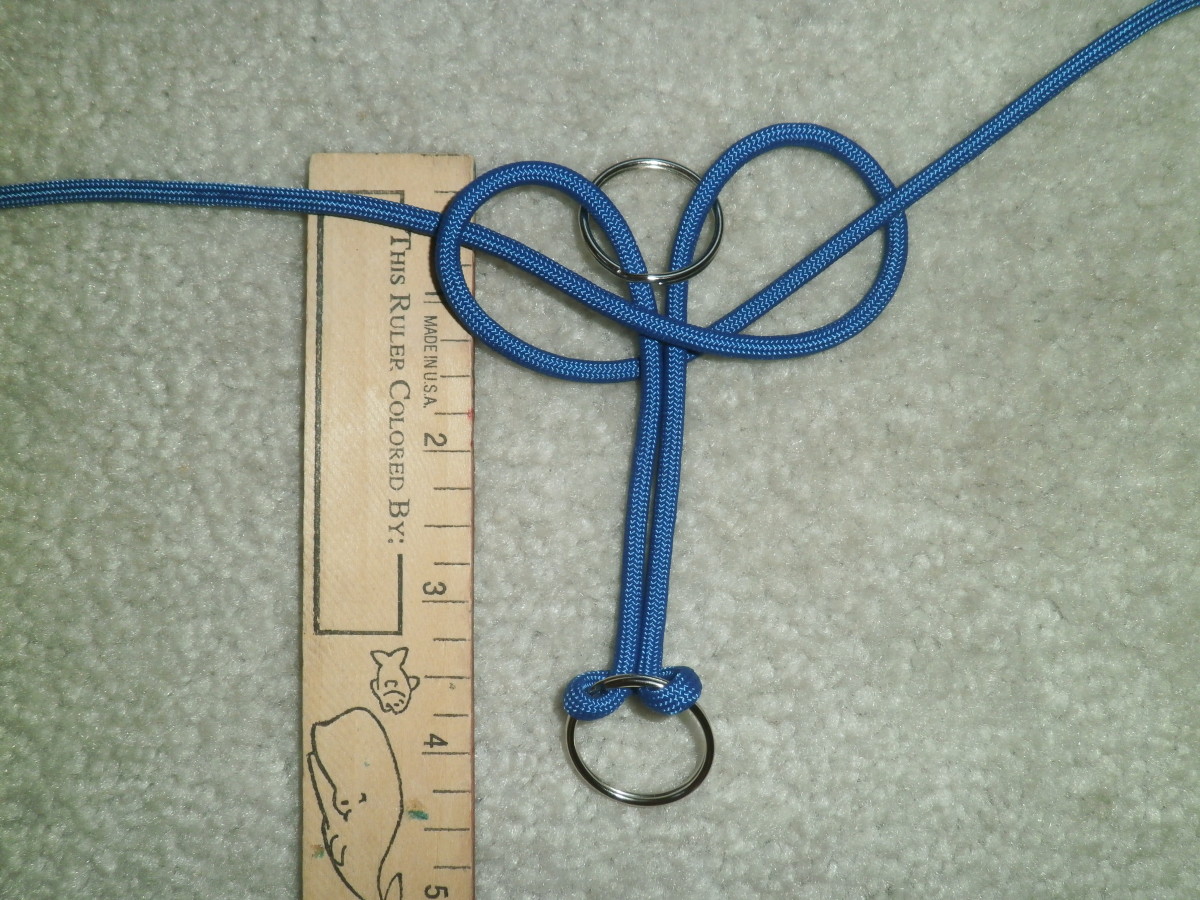
Once the second knot is completed, the keychain will become much easier to work with!
The second knot starts by taking the rope on the right and passing it behind the two middle lengths, then in front of the rope on the left. The left-hand rope then goes in front of the middle segments and behind the rope on the right -- which is to say, through the loop created by the right-hand rope. Tighten the second knot.
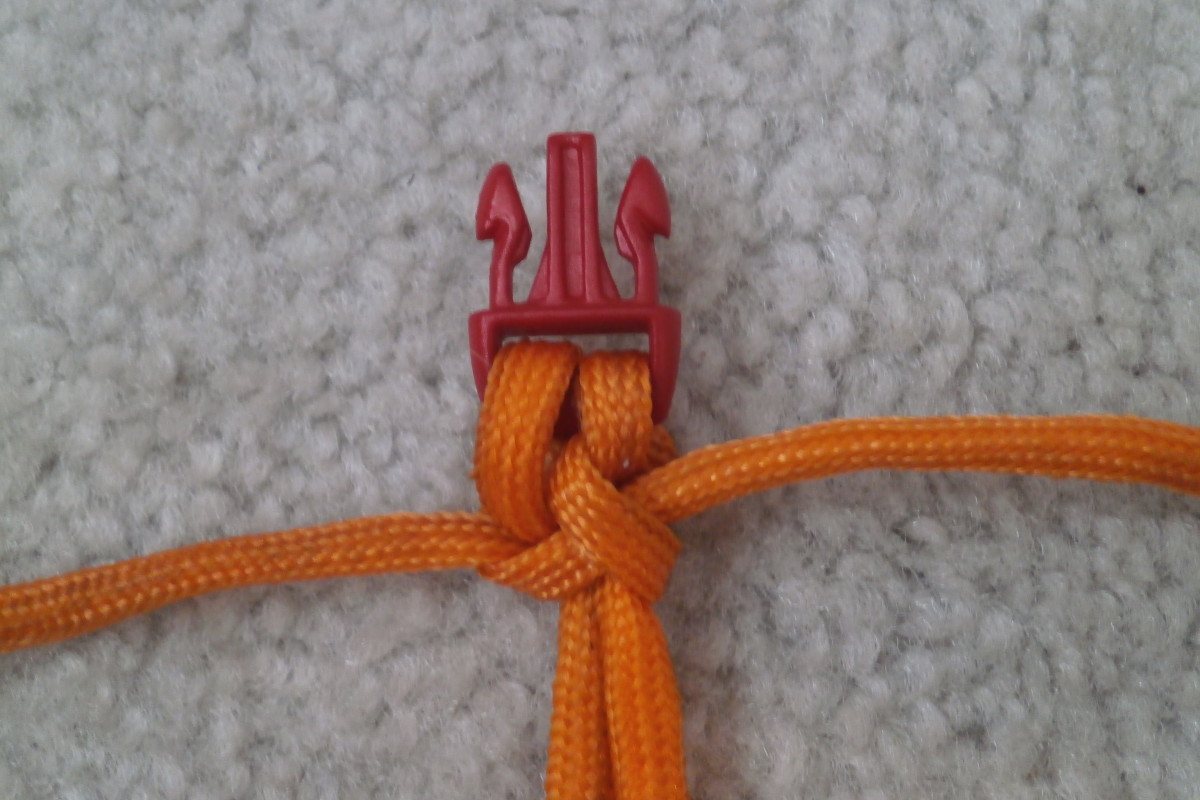
Continue making knots, alternating between starting with the right and left ropes. Tighten the knots as you go, sliding them toward the top key ring. The more knots you can make along the length of the keychain, the better the keychain will look and the more paracord will be available for emergency uses.
When you've made as many knots as possible, use the tweezers or curved hemostat to tuck the ends under a knot near the end of the cord. Cut the ends of the paracord fairly close, then carefully seal the ends of the paracord using a lighter. Heat the surface of the paracord and use a piece of cardboard to push the slightly melted ends against the keychain so that they become firmly attached.
This video clearly shows the technique for making a survival bracelet. The principles are exactly the same if you prefer to make a paracord keychain.