Fly Tying Techniques For The Beginner
Sorry, Hubpages Removed the Video
Hubpages reformatted and I lost the video. The written article is still intact.
Wait! Before You Start The Video, Read This First!
The above video captures the tying of three different flies. They are the woolly buggger (wet fly), the squirrel tail nymph, and the foam humpy (dry fly). All are edited in the video to demonstrate the fly tying techniques discussed below. Get to know some of the terms described below before watching the video.
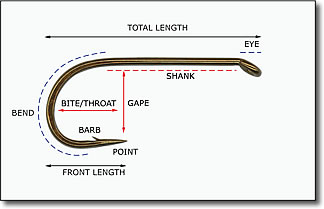
The Parts Of A Fish Hook
The following illustration designates the parts of a fish hook, essential in understanding the video.
Tie Back To Front
Nearly all fly tying patterns start with tying the thread at the back of the hook where the shank meets the bend. The thread is secured by simply overlapping itself. Flies generally have three parts - a tail, a body, and a head. Often times on dry flies and nymphs there is a hackle collar between the body and the head. The fly is started at the tail, moves to the body, and completes at the head. The thread is tied off at the head. The materials are tied so that they overlap the previous materials so that no gaps or rough seams appear.
Securing The Tail
With the thread secured on the hook, the tail material is placed on top of the hook. The thread is wrapped around the material and wrapped towards the front of the hook. If there is excess tail material to tie, it is best to cut and remove it to avoid bulking up the back of the fly.
The Collar And Head
Some flies have a hackle collar between the body and the head (squirrel tail nymph and humpy in the video). When you have finished tying off the collar, by default you have completed the head. If your fly has a collar, make sure that you leave enough room to finish the head as well. A common mistake beginners make is that they finish the body of the fly too close to the eye of the hook and do not leave enough room to tie off the collar and make the head. Tie the hackle feather so that the length of the feather lies back towards the bend of the hook. This keeps the individual hackle barbs pointing towards the back of the hook. Wrap the hackle feather forward and in the same rotation as the thread. When coming to the end of the hackle, pull taunt with the hackle pliers and wrap the end of the hackle a few times with the thread. The built up thread creates the head. Tie one overhand knot. Cut and remove the tag end of the hackle feather. Tie off with a whip finisher and lacquer the thread head. You have completed the collar and the head.
Making The Body
Materials for the body are tied at the base of the tail and on top of the hook. If the body material is wrapped around the hook independently from the thread (such as yarn for the woolly bugger in this video), it is best to tie the body material leading back off the bend of the hook. This results in the material covering the base of the tail better. If you have multiple body wrapping materials (woolly bugger again), the material that covers the bulk of the hook should be secured first so that it hides the other materials tied to the hook. If you are wrapping material independent of the thread, wrap the thread first up the shaft of the hook. This allows the material to grip the hook better. Also, you are going to need the thread near the hook eyelet to tie off the body at the upper shaft of the hook.
If the body material is not independent of the thread and is wrapped around the thread itself (termed dubbing and used with the squirrel tail nymph in this video), use wax on the tread to help grip the material. Apply the dubbing material sparingly. It is best to apply it to the thread tapered at both ends. Again, wrap to conceal the base material of the tail.
For some flies, the body material is not wrapped around the hook shank at all, rather on top of the hook (humpy in the video). In this case, simply wrap the thread up the hook shank and tie the material on the upper shank of the hook. If tying foam, make the first few wraps lightly, then tighten with subsequent wraps. This reduces the risk of cutting the foam.
When wrapping independent material on the hook shank, wrap in the same rotation as the thread. You will wrap the thread several times around the end of the material to secure it and if the material is wrapped the same rotation as the thread, the thread will tighten the material around the hook easier. Now, some fly tiers recommend that the additional material be wrapped around the initial material in the opposite direction (counter wrap) to help secure the first material and prevent unraveling. Personally, I have found it difficult to tie off the secondary body material snugly in the counter wrap. I rarely counter wrap . To help secure the wrapped material (not dubbing), fold the material back after a couple of thread wraps, cut the material off, and wrap the thread to hid the frayed material.
The Whip Finisher
The whip finisher is a unique fly tying tool used for make knots. If you were a Boy Scout or are an Eagle Scout, it is the same as whipping and fusing a rope to prevent fraying. Simply put, the thread overlaps itself around a loop with several wraps so that when the tag end is pulled tight, the wraps constrict the loop. This knot itself secures the thread well. If fly head cement or nail polish is applied, the risk of coming untied is very low.
The Head - Beads, Chains, and Synthetics
The earliest and simplest fly heads are built-up thread that is tied off and lacquered with fly head cement or nail polish (the squirrel tail nymph and humpy in the video). More modern flies have bead heads (woolly bugger in the video), bead chain eyes, and synthetic materials. If you have a bead for a head, do not forget to place the bead on the hook before you begin tying at all. In most instances the thread is tied off behind the material head. If there is room, it is best to whip finish the thread. If there isn't room, two overhand knots will suffice.

