Making a Simple Green LED Fishing Light - Part 2 PVC Body

Let's Build the PVC Body!
Here is Part 2 of a four part series of articles that describe how to make a simple Green LED Fishing Light powered by a 9V battery.
- Part 1 provides details for making the LED Circuit;
- Part 2 details the construction of the PVC body;
- Part 3 will cover assembly of the LED Circuit and the PVC body to make the light;
- And then, Part 4 will provide for testing the light and it's use in the field.
Good Luck and Good Fishing!
Note: The video in the sidebar is the second version of the light; it uses one 9 volt battery and less powerful but also less expensive LED diodes.


Materials and Tools for the PVC Body
To make the PVC Body, obtain the material and tools listed in the section below.
Materials:
- Two 2" Inside Diameter (ID) PVC Connectors
- One 2" ID Threaded Female PVC Cap
- One 2" PVC Plug
- One 2" ID PVC Section cut to 3" in length
- One 2" Diameter Lexan Polycarbonate Plexiglas (.093" Thick)
- PVC Primer and Cement
- Silicone Caulk
Tools
- Hacksaw (or power tool to cut PVC)
- Xacto Saw (or Hacksaw)
- File
Testing Material:
- Decoy Weights (or similar weight)
- Tissue Paper
- Bucket of Water
- Plumber's Tape


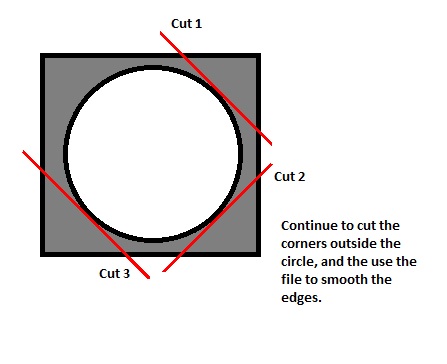
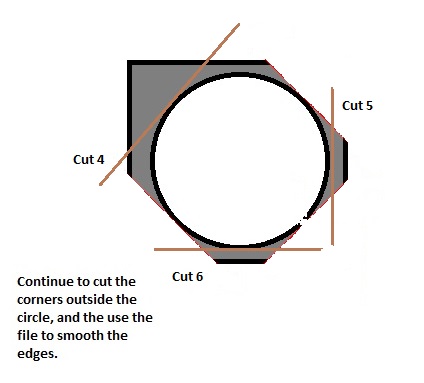


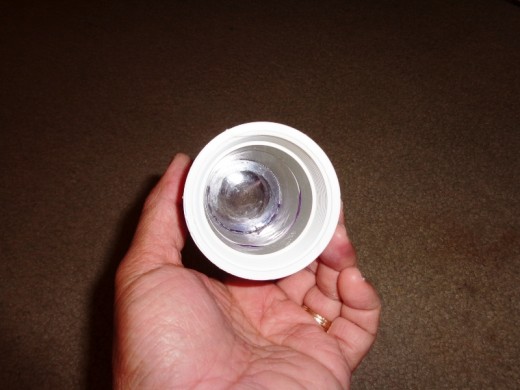
Step 1 - Plexiglas and PVC Preparations
In Step 1, the Lexan Plexiglas is cut square, trimmed and filed to a 2" diameter circle, and then the PVC Section is cut to a 3" length. To begin this step:
- Cut the Plexiglas in a 2.5" x 2.5" square.
- Center the PVC Section on to the square
- Trace the inside diameter of the PVC section on to the square
- Cut and file the square piece of Plexiglas to create a 2" diameter lens (see sidebar for cutting details)
- Finally, cut the PVC to a 3" length and then de-burr the rough edges.
Note: Lexan Plexiglas comes in 8"x10", 12"x12", and larger sheets. PVC comes in 2', 4', and 8' sections. If able, scrounge around for scrap pieces of material or purchase second hand. Else, if making only one light, go with the 8"x10" Lexan Plexiglas and the 2' section of PVC.


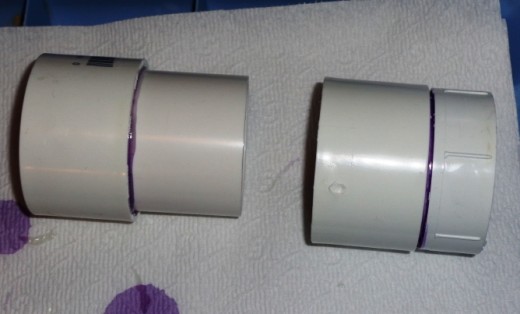
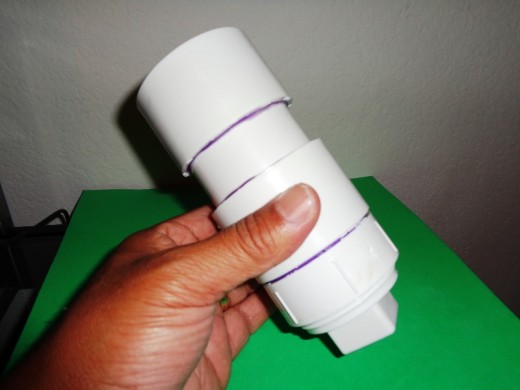
Step 2 - Dry Fit the Parts
In Step 2, the parts are dry fitted together to ensure part fit correctly. To begin,
- Dry fit the parts as described in the picture in the sidebar - specifically, PVC Connector, Lexan Plexiglas, 3" PVC Section, PVC Connector, Threaded Cap, Threaded Plug.
- If all parts fit tightly, proceed to Step 3. If they do not, use the file on the appropriate part to carefully remove material.
- In most cases, the PVC parts will fit snugly but the 3" PVC Section may require filing to remove burrs when it was cut to length.
- For the 2" Diameter circular piece of Lexan Plexiglas, it may also require filing in order to dry fit it to the PVC Connector.
- Once all parts have been dry fitted successfully, proceed to Step 3.


Step 3 - Assemble the Lens Cover
In Step 3, the Lens (2" diameter Lexan Plexiglas) is sealed inside the PVC Connector to make the Lens Cover.
- Do a final dry fit of the Lexan Plexiglas and the PVC Connector. It should fit tightly with no gaps showing between the Lexan Plexiglas and the inside lip of the PVC Connector. If there is a gap, you will need to cut and file another Lens. Else, proceed to the next bullet item.
- Apply Silicone Sealant to the inside lip of the PVC Connector, and then install the Lens. Push firmly to ensure no bubbles have formed and a good seal has formed between the Lens and the inside lip of the PVC Connector.
- Next, apply Silicone Sealant to the other side of the Lens (outside part that will be exposed to water).
- While the sealant is still wet, use a wet cloth wipe any residue that may have gotten on the Lens.
- Finally, let the sealant dry per the instructions on the container, and then proceed to Step 4 (in our case, we waited overnight for the sealant to cure).


Step 4 - Assemble the Lower Body
In Step 4, the Lower Body is assembled using the other PVC Connector and the PVC Threaded Cap.
- Follow the directions on the PVC Cement container to prepare and cement the PVC Connector to the PVC Threaded Cap.
- The PVC Cement used in this article called for applying primer to the inside of the PVC Connector and to the outside of the PVC Threaded Cap (non-threaded end).
- Then, almost immediately, this was followed up with applying the cement to the primed areas.
- This was followed quickly with a firm push to both pieces to seat the parts in place, and then a 1/4 turn to seal them.
- Once the parts are in place, proceed to Step 5.


Step 5 - Assemble the Upper Body
In Step 5, the Upper Body is assembled using the other Lens Cap and the 3" PVC Section.
- Same as Step 4 with respect to cementing, just different parts to cement.
- Once parts are in place, proceed to Step 6.


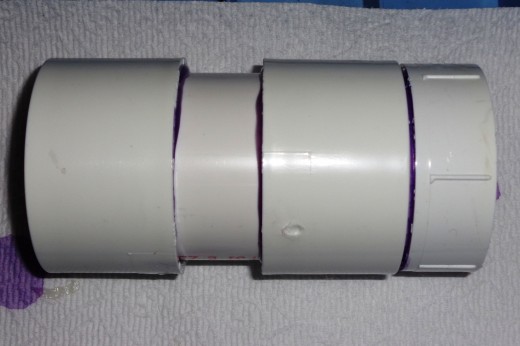
Step 6 - Final Assembly
In Step 6, the Upper Body and Lower Body are assembled to make the PVC Body
- Same as Steps 4 and 5 with respect to cementing, just different parts to cement again.
- Once parts are in place, let the PVC Cement dry per the directions on the container before proceeding to Step 7 (in our case, we waited 24 hours for the cement to dry before proceeding).


Step 7 - Test It
As a precaution against damaging the LED Circuit, Step 7 is a water test to ensure the PVC Body is waterproof.
- Take two decoy weights or other weighted object that will fit inside the PVC Body and wrap them with tissue paper, and then place them into the PVC Body.
- Next, apply Plumber's Tape to the PVC Threaded Plug's threads, then screw the plug securely in place.
- Then, fill the bucket with water and sink the PVC Body into the water. Be sure the PVC Body is fully submerged and remains underwater for at least an hour.
- Then, take out the PVC Body and check for water.
- If the tissue paper is wet, then fill the PVC Body with water, screw the Threaded Plug in place, and search for the leak. Once found, use Silicone Sealant to plug the leak, and then re-test.
- If the tissue paper is dry, then the PVC Body is waterproof. You are done.... standby for the next article!
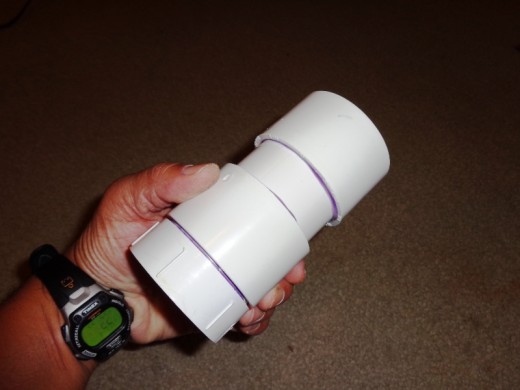
Finished PVC Body
Click thumbnail to view full-size


Part 3 is Posted!
Part 3 of the four part series of articles that describe how to make a simple Green LED Fishing Light powered by a 9V battery is posted!
Part 3 covers the assembly of the LED Circuit and the PVC body to make the light! Check it out at "Making a Simple Green LED Fishing Light - Part 3 Final Assembly".
Till then,
Good Luck and Good Fishing!
PS: If you are in a hurry, do check out the workarounds below that use a Mason Jar in the first example and a sealed glass container in the second example. They both work!
Easy Workaround with a Mason Jar
Click thumbnail to view full-size


Easy Workaround with a Sealed Glass Container
Click thumbnail to view full-size

")


