Beginner's Guide to Getting a Piercing

Especially for the young or the young at heart, body piercing is a great way to be self-expressive, fashionable, rebellious, or sexy without the commitment of tattoos, permanent cosmetics, or plastic surgery. When performed by a professional, body piercing is safe and not-too-painful. If you decide you don’t like it, you can always remove the jewelry and the wound will heal relatively quickly. If this is your first time getting a piercing or if you are unsure of what you want or how to go about getting your piercing, consider the following guidelines guaranteed to make your piercing experience a great one.
Step One
: Selecting a location for your piercingThe location of your piercing is extremely important, especially for youth.
It’s not just about what looks cool, although that is an important part of your selection.
There are many social stigmas, job concerns, and medical issues associated with certain piercings that should be considered before committing to them.
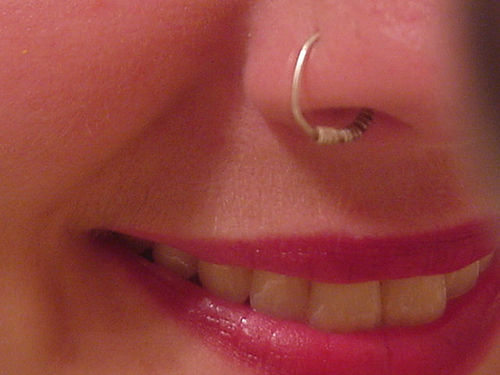
1. Facial piercing
Many parts of the face are easily pierced and these piercings are growing in popularity. Before getting a facial piercing, however, consider the healing process and the long-term effects of getting a facial piercing. Since these are difficult to conceal, many employers do not allow their employees to have facial piercings and/or will not hire someone with a lot of metal in their face. Healing processes tend to be shorter with facial piercings, however the swelling associated may impede speech or facial expressions.
Things to Consider Before Getting a Facial Piercing
-Swelling generally takes a couple days to subside, so make sure you have the time off work as speech will be inhibited (in the case of tongue/lip piercings).
-Your face (particularly your tongue/lip) has a high concentration of nerve endings. It will be an uncomfortable healing process.
-Bad habits, like chewing on your tongue/lip ring, can result in dental damage. Train yourself not to do so during the healing process.
-If you pierce your lip, make sure you choose a location that will not force the jewelry to rub on your gums, as this will increase your risk for gum disease or damage.
-If you get in a lot of fights, these piercings are not for you. Since facial piercings are typically well-rooted, having them ripped out could be disfiguring.
-All new piercings weep. Weeping is positive term for oozing puss. Keep this in mind when opting for a facial piercing, and perhaps plan your dates for after the healing process is complete.
2. Ear Piercing
Ear piercing is the most popular form of piercing and is easily done with a gun. This is fine for the fleshy, lower part of the ear. However, when piercing upper cartilage, make sure your piercer uses a needle. Ears typically heal without issue, but make sure you test yourself for metal allergies since this is the piercing location where these are most likely to be an issue. Especially in the upper parts of the ear, clean well and do not change the jewelry before the healing period is complete, as this could result in cauliflower ear.
3. Naval Piercing
Although this piercing is extremely popular, especially among females, it is important to note that this piercing has an unusually high healing time, often taking six months to a year before the jewelry can be changed without causing irritation or infection. If you do desire to get a naval ring, make sure you do so in an off time of year (such as fall or early winter) because once the piercing is done, you cannot submerge it in anything less than clean water until it has healed completely. That means no swimming. Also, this piercing is easily caught on clothing and bedding and should be babied carefully.
4. Nipple Piercing
This piercing is surprisingly less painful than most others, counter-intuitively. However, since the nipple must be clamped in order to hold in properly in place while the piercing is performed, it can be intimidating. Be prepared for heightened sensitivity afterwards and be sure to warn any sexual partners you may have to be gentle, even after the wound has healed. Although it is less painful than most piercings, it is more easily torn and can be excruciatingly painful if ripped. Especially for females, it is advised to opt for smaller gauged jewelry (I recommend 16g) to avoid tearing.
5. Surface (or Dermal) Anchors
These piercings are not painful at all (or very little) and only take a few moments to place. They typically consist of a small metal plate with holes designed to allow your skin to wrap through during the healing process, effectively anchoring them into place. From the plate juts a metal post onto which the jewelry can be screwed. Although relatively painless, it is important that you be gentle with this piercing for the entirety of the time you have it, because the skin is easily torn from the plate, loosening the jewelry.
6. Surface Bars
Surface bars are essentially barbells threaded underneath the skin with either end visible. Although this is becoming increasingly popular, particularly on the collarbones and hips, it would be ill-advised to opt for surface bars over dermal anchors. Although typically cheaper, surface bars migrate under the skin and are often rejected entirely by the body resulting in pussy, inflamed wounds that never heal. Don’t get surface bars.
Step Two
: Choosing a shopPiercings can generally be obtained on a walk-in basis at most tattoo parlors. I recommend calling ahead, in case there is only one piercer on staff or the piercer is also a tattoo artist and may be booked. Always make sure you are receiving a piercing from a licensed and experienced professional with a portfolio. It is always advisable to pay a little extra to go to a specialty piercing parlor over a tattoo shop. Make sure the shop is clean and the staff is knowledgeable before committing. A piercer should always open a fresh, sterile needle from medical packaging in front of you. Never allow a piercer to touch you with a needle you are unsure of. The piercer should always wash and wear gloves and their office should have a special container for the disposal of medical waste. If you’re ever unsure, it’s better to be safe and look elsewhere than take your chances.
Step Three
: Choosing JewelryThere are a wide variety of jewelry types on the market available to you to start off your new piercing. Barbells, labrets, loops, and horse-shoes are just a few examples. Select jewelry that is comfortable for you to wear that does not obstruct any of your day-to-day functioning. Take into careful consideration what you will be doing and where your piercing could potentially get caught, and avoid loops if you think there is a lot of potential for catching. The gauge or size of the jewelry you choose is also very important. 14g is the most common and easy-to-find size of jewelry and you’ll have the most luck finding pieces of jewelry that fit your style.
Step Four:
Getting the piercingActually getting the piercing is the scariest part of the process. Dress comfortably, clean the area thoroughly (although the piercer should use some sort of disinfectant before performing the piercing), and take a deep breath. There are three steps in the piercing process that can potentially be painful, beginning with the clamp (if your piercer is using one). The ache will be dull, but it’s going to build anticipation. If you are worried you may jump or move, invite a friend to hold you down. The actual piercing will only take a brief second which you will experience as a sharp pinch. The pain is fast and always less than what you expect, but it will scare you so be careful not to jump. The most painful portion of the piercing is the insertion of the jewelry, as this can take a moment longer and requires the stretching of your already open wound. Be careful not to hold your breath, because by this time, you have been sitting for a while and put yourself at risk of passing out. The insertion of the jewelry will be a more painful pressure that will end in a dull ache that will not last for more than a minute after the jewelry is inserted. Once you’re finished, the site is going to swell, but the pain won’t set in for about an hour. In reality, the piercing is the easy part. The pain comes with the healing process!
Step Five
: AftercareThe first few weeks are critical in keeping your piercing healthy and making sure they heal properly. Do NOT change your jewelry for the full recommended timeframe provided to you by your piercer, even if the wound seems healed and you have some sweet new jewelry you want to show off. Aggravating the wound too early on could potentially set you back weeks in the healing process and build too much scar tissue around the opening of the wound. Although the aftercare instructions provided to you by your piercer is the best source of instruction, the following these guidelines will ensure your piercing heals properly.
1. Clean your piercing several times a day with saline solution (salt water) or cleanser provided by your piercer. Allow the water to soak in, gently moving the jewelry around to loosen built-up debris before rinsing.
2. Avoid playing with the piercing or scratching at the site. Do not clean with your fingernails.
3. Never use alcohol, peroxide, or other harsh chemicals to clean your piercing. This will cause a build-up of scar tissue that won’t look pretty and could cause problems with your jewelry.
4. Avoid irritants such as anti-bacterial soap, chlorine, and hair product chemicals.
4. Don’t cover your piercing with a bandage, even if it is weeping or bleeding. The wound needs to breath in order to heal properly.
5. Expect the wound to weep for weeks to months after the initial piercing. Unless it becomes red, puffy, or tender, this is likely not an infection. Weeping is the body’s natural way of cleaning the wound. Even if it is gross, it’s good for the new piercing.
6. Most piercings will get infected at least once during the healing process. Don’t panic and remove the jewelry, as the skin that heals over the wound could prevent the damaged tissue within from breathing and healing properly. Jewelry allows a way for your body to push out the infection, and it will heal. If it doesn’t clear up after a few days or if it gets worse, contact your piercer or doctor.
Following these simple steps will ensure you have a positive piercing experience. When approached properly, having piercings can be very rewarding and you’ll find they can be very addictive!
If you ever have any questions during the healing process or need assistance changing your jewelry, your piercer should be available for you.
Remember, it’s better to ask for help than let your body pay the price!


