Halloween Nail Design

Spider, Web, and Polkas!


New Ideas!
Crystal's View:
Nail design is so much fun! You have a plethora of polish colors to choose from and you are only limited by your imagination (well, and skills).
I recently bought a new orange polish for the month of October made by SinfulColors Professional love the color on my nails. The polish was super cheep and has a sort of creamy bright color to it. I enjoy making different nail designs and thought of the spider web and from there I figured a spider itself wouldn't hurt. The polka dots on the pinky was an after thought though. It looked to bare to be just orange for my liking so I added a little something to spice it up. The same with the white stripes! I liked the finished outcome so much I decided I would share with you all.
To get the Halloween design look please follow the directions below! Thanks!
Things I used...
Here are the items I used:
- Black and White Stripe Rite Nail Art Polish
- Courtney Orange by SinfulColors Proffestional
- In a Hurry Air Dry Top Coat w/ UV Protection
- Clean area to lay my hand flat
Photo Guide to Follow :)


")


Let's Get Started w/the Spider Web
- Make sure to remove any previous nail polish on your nails. We don't want any weird color mixing going on. Nail polish remover with acetone removes polish the easiest for natural nails. Warning: If you have acrylic nails on...use nail polish remover without acetone or it will eat away at the acrylic nails.
- Pick your colors. For this tutorial I used the Courtney Orange, Black and White. In my opinion...no other colors screams Halloween like black and orange :) But the design can be done in any colors really.
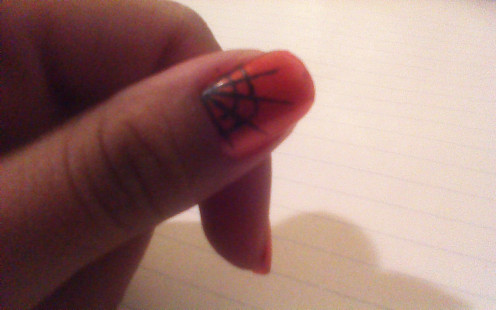
- Let's begin with the spider web. I used my thumbnail for this design because it had the largest surface area to create a good sized web. I used the black striping polish to make 4 evenly distributed lines coming out from one spot in the corner of my thumbnail.
- Patience is key! Begin making the webs. Start from the side closest to you and work your way outward so it doesn't smear. Slightly curve your lines. My nail was too small for the beginning part so I simply made a half circle for the first row of web. Then began with the curves for the next two rows.
- Voilà, you have created a spider web! Congratulations....I know it wasn't super easy!
Time to Make the Spider Design
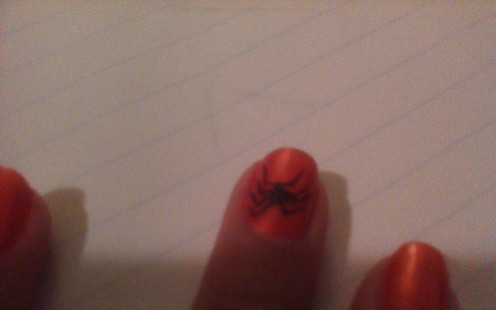
- Start by picking your nail you want the design to be on. I chose my middle finger because it seemed like the easiest place.
- Begin with a small oval with the black striper polish.
- Decide which side left or right of the oval you want to start making legs on. I made each individual leg in two lines.
- The first line coming from the oval was small. Then the second line began where the small line left off at about a 90° angle. Simply put, one smaller line goes up and the other longer line goes down from the connection point.
- Continue with this method to create 4 legs on each side of the oval.
- Tada! You just created a spider! :)
- Remember that the polish I am using can be washed away with water...so if you mess up, simply wash away the mistake with a Q-tip. The nail polish base stays intact.
Extra Touches!
- My pinky was still only orange so I decided to make some dots. If you have a dot tool...it is so much easier to create the polka dot look. Unfortunately I don't have one yet, so I used the black polish striper very carefully.
- I dipped the brush into the black polish so that enough polish was on the very end of the brush. I stroked the brush against the inside of the polish bottle to get rid of the extra polish on the length of the brush but ensuring the end of the brush remained the same.Then I slowly made tiny so called "dots" in the same area to create a medium sized dot. They were more like very small line strokes.
- Make sure to evenly distribute the dots so that they don't seem so uniform like all in a straight line going across the nail. You want dot madness, trust me! :)
- Next, on the other two nails left without a design I used the white striper polish.
- Begin from the corner furthest from you and slowly bring the brush at a curve to the other side. This part can be fun. You can make straight horizontal or vertical lines or diagonal ones. Whatever works best for you and your style will be the most enjoyable to show off!
- For this look, make sure to always begin from the same point. Similar to when making the spider web design.
In the end....make sure to place a protective clear top coat. These designs wash away extremely easy with water. So two coats is not overdoing it :)
Thanks for reading! Hope you enjoyed it!
Also enjoy...
- Striped Nails with Easy Flower Design
Tired of wasting money on nail salons? Try this simple yet beautiful design to spice up your nails without the strain on your wallet!


