How To Plot a Diamond
The Difference Between Plotting And Grading
Grading a diamond entails locating, identifying, measuring and classifying all inclusions and blemishes, color, and carat weight as well as analyzing all the angles and symmetry of the cut. This requires a level of skill and knowledge only acquired through years of dedicated training or through years of hands on experience.
Plotting a diamond is much easier and almost anybody can do it. Plotting the diamond only requires that we view the diamond under magnification, and draw a diagram of the size, shape, and location of all inclusions and blemishes detected, so that in the future that picture can be used to match it with the same diamond. We don’t need to know what the inclusions or blemishes are or mean, or how they affects the value of the diamond, we just have to be able to render them on paper so that at a later date, by comparing the diamond under magnification to the plotted inclusions, anyone will be able to tell if the diamond being returned is the same diamond that was plotted.
When a diamond is being plotted what we’re simply doing is a visual survey of the diamond. To do it effectively it’s always a good idea to start at the same place, to always study one facet at a time, and to always finish plotting the inclusions and blemishes of one type of facet first before moving to the next type of facet.
Why Plot a Diamond. Diamond plotting is used to ensure that the diamond you are handing over to a jeweler for repairs is the same diamond you are given back when the repairs are done. Every diamond has natural inclusions or blemishes, but no two diamonds have them in the same location or size. Inclusions are like a fingerprint to a diamond. Even diamond classified as Flawless will have inclusions, they’re just not seen under 10x magnification, (10x magnifications is standard when grading diamonds) but if the Flawless diamond is inspected under higher power magnification inclusion or blemishes will be detected.
Less than 1% of diamonds are classified as Flawless so the majority of diamonds can be plotted with a 10x magnification although using a higher magnification will make it easy to locate and identify inclusions.
Let’s get the basics out of the way so we can start plotting diamonds.
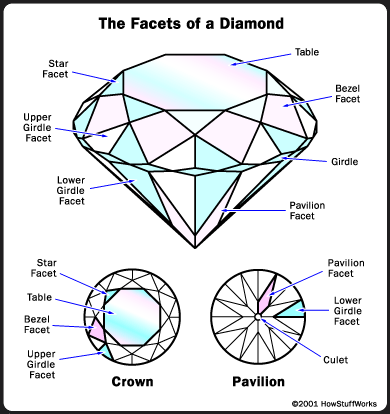
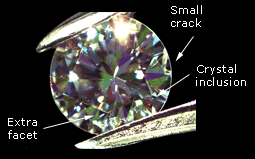
What is a Blemish. A blemish is any imperfection found on the surface of the diamond.Blemishes can consist of scratches, burring, un-aligned facets, chips on the girdle, naturals, pits or cavities. Anything on the surface of the diamond which impedes the light from entering the diamond cleanly can be considered a blemish. Blemishes are plotted in green ink.
What is an inclusion. An inclusion is any imperfection found in the interior of the diamond. Inclusions may consist of carbon not crystallized into a diamond, it could be other minerals caught in the diamond as it was created, or it could be a fissure where the edges of the diamond failed to mate. Anything in the inside of the diamond which obstructs the light from bouncing cleanly inside the diamond can be considered an inclusion. Inclusions are plotted in red ink.
You’re going to need a couple of items.
- A Diamond
- A 10x loupe (a higher power loupe would make it easier to plot)
- A diagram of a diamond (can be hand drawn or printed)
- A pencil
- A red pen
- A green pen
Plot the Diamond one Facet at a time:
The Table
The table is the largest facet on the diamond, it sits on the center of the diamond. (See side diagram) Start plotting the inclusions or blemishes on the table by inspecting the center of the table using the loupe or microscope, then move in a counter clockwise direction to the outer lines of the table.
Use a pencil on the plot sheet first (the diagram of the diamond), to get the right shape and size of any inclusion that you see on the table. Draw lightly and don’t be afraid to erase and draw again. The important task is to get the shape and the location of the inclusion you detect as close to the original as possible. If it’s a curvy inclusion then you draw a curvy inclusion on the plot sheet. If it’s a dot shape inclusion you draw a dot shape inclusion. When you’re plotting the diamond you are trying to draw a map of where the inclusions and blemishes are and what they look like. Use the facets as grids and draw the inclusion exactly where you see it, in relation to other facets.
When you’re satisfied that all the inclusions (remember that inclusions are internal and blemishes are external) have been properly represented on the plot sheet, use a red ink pen to trace over the pencil markings to make the plotting permanent.
Once all the internal characteristics have been plotted we move onto blemishes. Start again on the center of the table and proceed as before but this time you only concentrate on the shape and location of blemishes on the table. Blemishes are on the surface of the facets and once plotted properly, and you are satisfied with the results use a green ink pen to trace over the pencil marking to make the plotting permanent.
Star Facets
The star facet is the small triangle shape facet closest to the table (see side diagram). Start by inspecting one star facet, use the pencil to draw on the plot sheet any inclusion you can detect and move on to the following star facet. Once all the inclusions on the star facets have been plotted to your satisfaction use the red pen to trace over the pencil drawings and make the plotting permanent. Follow the same procedure with plotting the blemishes of the star facets and transferring them to the plot sheet with green ink.
The Bezel Facets
The bezel facets are the large facets that look like kites. Start with the bezel facet that adjacent to the position of the first star facet plotted. If you always start in the same area it will ensure all of the facets are covered. Inspect the bezel facets, use the pencil on the plot sheet to draw any inclusion you can detect and move on to the following bezel facet. Once all the inclusions on each bezel facets have been plotted to your satisfaction use the red pen to trace over the pencil drawings and make the plotting permanent. Follow the same procedure with plotting the blemishes of the star facets and transferring them to the plot sheet with green ink.
Use the same method for plotting the Upper Girdle Facets, The Girdle, The Lower Girdle Facet, and The Pavilion Main Facets. Remember to plot the inclusions in pencil first, then trace the pencil lines with red ink to make them permanent, then proceed to plot the blemishes with pencil then transfer them to green ink.
Following the system of inspecting one category of facets at a time, first for inclusions then for blemishes will ensure the diamond is properly plotted and will eliminate any confusion when the comparison between the diamond and the plot sheet will take place.
A diamond with numerous inclusions can be easily plotted but a high end diamond with few or minute inclusions can be more challenging and following the plotting system described will ensure inclusions or blemishes will be located and correctly plotted.

