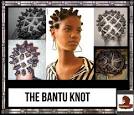
Bantu Knots Hairstyle

If you are at a loss as to what next to do with your hair,then read on and learn how to create the Bantu knots Hairstyle. It is youthful and looks complicated. The knots are one African American hairstyle that is still rare.
Bantu knots are a variation of the 'thread' hairstyles that any female growing up in West Africa is familiar with.
What makes this different is the way the hair is twisted and tied down. Better still, when Bantu knots are removed, it leaves natural looking curls that can last up to a week. This is called a knot out.
Step One - Prepare the Hair
Wash your hair thoroughly before you start. braids and Weaves dry out the hair, so condition with a deep oil conditioner. Also, when you remove the knots, you need to leave the hair dry so the curls last long.
Comb and brush the hair thouroughy, ensure it is completely detangled. Any kinks will lead to rough, tangled Bantu knot outs.
This is a wet hair style, so you can use a leave in conditioner and spray with water as you go on.
Steps to the Bantu Knot hairstyle
The Bantu knots are easy to create if your hair is at least medium length. The larger the partings, the looser the curls when you do the knot out.
For tighter curls, make the partings 1 inch square or less.
Step Two - Part the Hair to ceate Bantu Knots
If your only intention is a Bantu knot out, that is you intend to loosen the knots and comb out the hair you may not need to pay so much attention to the parting.
However if you intend to wear the bantu Knots out them well defined parting is a must. Squares and diamond shaped partings are really beautifull. You can ask a friend to help you with the partings the first few times you try it.
Step Three - Twisting the Hair into a Bantu Knot
This is the tricky part yet its really easy.
Dampen the hair with water, a setting lotion or hair gel. Any hair holding product will do.
Work the hair one section at a time. Secure sections you are not working on with hair bands.
Firmly grasp the hair section, Comb through and ensure hair is very damp. Twist the hair gradually and steadily as if trying to open a jar or doorknob. Start from the base and move up the hair length till you are holding the tips of a coiled length of hair that looks like a screw.

Step Four - Creating the Knot
Holding the screwed hair, give it a few more turns and the hair starts to fold on itself. Stretch it out and use your finger to make the folding start around the center of length. Twist some more and the hair will continue to coil. Lay the coils below each other, each one closer to the scalp.
You can either tuck the end in or secure with a rubber band to complete the Bantu knot.
Step Five - How to Create the Bantu Knot out style
To create the flowing tresses of a bantu knot out, wait till the hair is absolutely dry and slowly undo the coils.
If the hair is even just a little wet, all your work will be in vain. I have found it is easier to knot the hair at night and sleep with a net on. In the morning, I blow dry before removing the knots.

Getting the Best from your Bantu Knots
Remove the knots with care. Finger comb through and leave it rough. That way the hairstyle will last for a longer time.
Blow dry at night if you sweat a lot, and spray on some oil moisturizer every other day. That's about all the maintenance you need with bantu knots.
If you have cornrows in front before the knots start, brush them and moisturize, so they look fresh and neat.
Related
")
How to Tie Basic Macramé Knots (With Chain, Braid and Cording Patterns)

Iconic Hairstyles from Margot Robbie

Haircuts for Little Boys: The Long and the Short of It

Woman's Guide: Asian Romantic Long Hairstyles for Round Faces that Boost Your Beauty

How to Choose the Right Hairstyle for Your Texture and Face Shape


