How to do Nail Art of Pikachu from Pokémon

Pikachu-style Nail Art

Nail Art, Pikachu-style
Pikachu fans, here is a tutorial on how to do your own Pikachu-inspired nail art. Don't worry if you don't have mad art skills, just take a look at the easy diagrams for four different Pikachu styles, and check out the nail art tips at the end. Soon you'll be able to do your own Pikachu nails with ease!
Materials

Materials for Pikachu-style Nail Art
For this project, you'll need the following supplies:
- Yellow nail polish, opaque preferred. I used Maybelline Color Show, Fierce N Tangy 230
- Nail art pens in white, red and black, such as Sally Hansen 02 Black, 01 White, and 06 Red (Optionally, you can use an extra fine tip white French nail pen.)
- Clear top coat polish. I used the one in Nailene kit 61056 "Skinny French Tip 2 Go"
- Nail polish remover
- Cotton swabs and paper towels
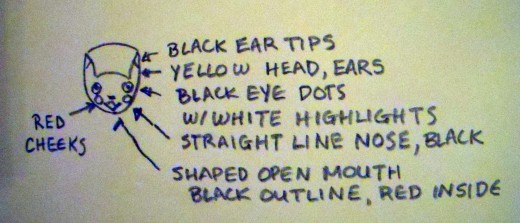
Nail Art Diagram: Happy Pikachu
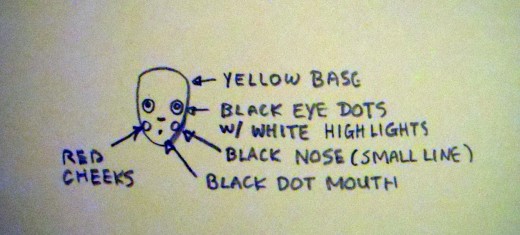
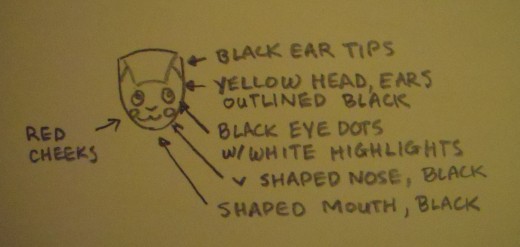
Nail Art Diagram: Full Face Pensive Pikachu
Nail Art Diagram: Full Face Happy Pikachu
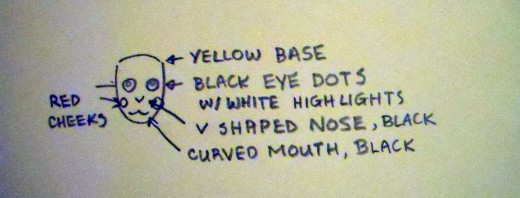
Nail Art Diagram: Smiling Pikachu
Steps for Pikachu-style Nail Art
Step 1: Take a look at the different Pikachu-style diagrams and decide which one you want to do. Depending on the style, you'll either paint the entire nail, or you'll paint half the nail for the face and add ears.
- For face with ears: Using yellow polish, cover half the nail bed for the face. To do the ears, apply thin lines of yellow polish along the side of the nail bed from center nail to the top of the nail bed. You may need to do two coats if the yellow polish is thin. In that case, allow polish to dry completely before adding the second coat.
- For full face: Using yellow polish, cover the entire nail bed and allow polish to dry completely.
Step 2: For face with ears: Using the black pen, add ear tips Note that the ear tips have a slanted line where the black and yellow meet; it does not go straight across.
Step 3: Using the black pen, draw two round black eyes.
Step 4: Using the black pen, draw the nose. You can make a slight v-shaped nose or a straight nose, depending on the expression you want to capture.
Step 5: Using the black pen, draw the mouth as shown in the diagram.
Step 6: Allow all black polish to dry completely.
Step 7: Using the red pen, draw round cheeks as shown in the diagram.
Step 8: For open mouth: use the red pen to fill in an open mouth.
Step 9: All all red polish to dry completely.
Step 10: Using the white pen, apply tiny white dots in high center of eye.
Step 11: Allow all white polish to dry completely
Step 12: Repeat with remaining nails as desired.
Step 13: Seal all nails with a top coat of clear polish and allow to dry.
Step 14: Enjoy your Pikachu-style nails!
Tips for Nail Art Success
- Start with clean, dry nails! Wipe them with nail polish remover and allow to dry before you begin.
- If you're having trouble drawing perfect circles, try a nail dot tool like the one Sephora carries.
- Clean up smudged yellow polish right away with a little bit of nail polish remover on a cotton swab. Don't wait until the end as you may accidentally remove too much and have to redo the nail.
- Feel free to experiment with your Pikachu-style nail art! Use the black pen to add an outline around the ears and top of face.
- The white part of Pikachu's eye is actually not centered in the black circle. Check to make sure it is high-centered, at the top part of the black eye.
- If you're having trouble getting the face to look right, try painting the nail upside-down. You might be surprised at how artistic you really are!