Learn How To Tie a Tie Necktie or Bow Tie Step By Step

Tie Tying
Are you one of those men who never completely undoes the knot in your tie and puts it over your head and then tightens the tie rather than having to retie it?
Is your significant other tying your tie?
If you answered 'yes', then it's time to learn how to tie a tie. Tie tying continues to be one of the most struggling challenges for men. But if you are properly shown how, it is like riding a bike, you never forget how. So let's get started.
First I will walk you through step by step the tying of the neck tie, then we will move on to the bow tie.
The Four in Hand
The most common style of necktie tying is the Four-in-Hand. I feel you should start here and when more confident or want a change, advance to different techniques. The Four in Hand is suitable for most occassions and is by far the easiest to learn.
Start by standing in front of a mirror. (It is much easier to see what you are doing.) Button your dress shirt all the way to the collar and flip up the collar, then drape the necktie around your collar with the wide part of your tie hanging twice as low as the thin part.
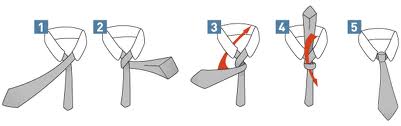

The directions I am giving you are what you will see in the mirror, so go with your mirrored image- no looking down. Okay, your ready to tie your own tie!
- The wide part of the tie should be at your right side
- Cross the right side over the left. (Wide over skinny)
- Now bring that large part and put it underneath the skinny part and bring right (basically you wrapped it around it)
- Cross the right side over the left
- Tuck the wide part through the center (where the tie meets) and bring up towards your chin
- Now, do you see where it crossed over? You want to take the wide part that you have pulled up towards your chin and tuck it through that overlap.
- Use one hand to pull the narrow end down gently and use the other hand to move the knot up until it reaches the center of the collar.
YOU DID IT! (?)

Doesn't look right?
Try again.
Sometimes the first time is a 'learning' experience, so just try again. Things take time and when you feel comfortable you will master it, kind of like when we learned to tie our shoes. The first time they were so loose the bow fell right out, you had to keep practicing. Same with tie tying- but I know you can do it- so try again!

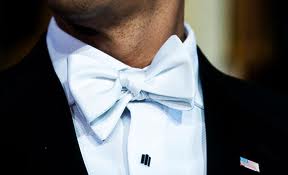
How To Tie a Bow Tie
First off, I am proud of you not using a clip-on. Although that is a solution for most, I applaud you for learning and purchasing a 'real' bow tie.
This tie is a little more detailed I guess you would say as in my experience it takes a couple times to get it right. But don't give up, keep trying.
Alright, let's get started.
Bowtie Video
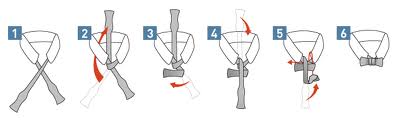
Again, stand in front of the mirror. Directions are intended to be followed by your mirror image.
- Lay tie around your neck. The side on the right should be slightly longer than the left by a few inches
- Cross the longer side (right side) over the left
- Bring the longer end (the side you just crossed over) underneath the left side or (shorter end) and then bring it up to the center (towards your chin)
- Fold the shorter end horizontally (this will be the front of your bow)
-
Lay the longer end over the bow (shorter end)
-
Now fold the longer end horizontally just as you did with the shorter end
-
Put the longer end through the loop at the back of the shorter end.
-
Pull both ends slowly to tighten the knot
Did you get it?

No man disappoints in a tie. Whether it's a casual look with a dress shirt, tie and jeans or decked out in a tuxedo with bow-tie.
Whatever your event, learn and know the basics of tying a tie, your mom won't be there forever...lol.
Take care and Happy Tie Tying!