How to Apply Fake Eyelashes


Open your eyes to false eyelashes
False eyelashes aren't just for celebrities on the red carpet. They've become so popular that you can easily buy lashes for any occasion, including day wear if you just want your lashes to look thicker.
Many women are put off trying false lashes because they seem like such a fiddle to apply. Fear of them falling off in public is also something that holds people back from taking the plunge.
This step by step guide aims to help you choose the right lashes for you and how to put them on, so that they stay on until you want them removed.
If you've tried false lashes before and given up, read our guide and have another go...
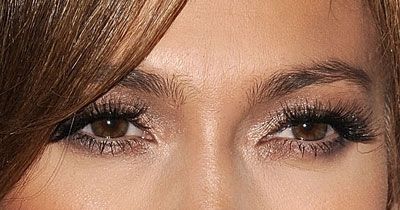
just take a look at the before and after picture.
Doesn't that inspire you?
Step One
Here’s your shopping list to make sure that you have everything you need before you start. If this is your first time buying falsies, you may be overwhelmed by how much choice there is and make a panic buy that isn’t really suitable for you.
Thinking about these pointers before you head out to the mall, or online, will give you a much higher chance of getting what you want and being happier with the end result.
If they're for day wear, to make your lashes look thicker or just a little longer but still natural - look for a set that vary in length. They may look 'spiky' in the packet but they will look much more natural once they're on. Aim to find a pair that is a similar length to your own lashes.
Fakes that are all one length are better kept for a dramatic evening look, especially if you're going for a 60's vibe.
If you want to open up your eyes, choose lashes that are longer in the centre.
If your eyes are wide apart, lashes that are longer in the centre will suit you best. If your eyes are close together, choose lashes that are longer at the outer corners. This will give the illusion of your eyes being further apart.
Give nature a helping hand... - ,,,it'll be our secret


Kate Perry is a great ambassador for false eyelashes. She's fun, fresh and doesn't take herself too seriously - and she has beautiful eyes.
Eylure are so impressed with her that they've named a whole range of false eyelashes after her. They've put a lot of thought into the selection - there is something for everyone.
They're high quality and very reasonably priced, so if you're a beginner, the Eylure range is a great place to start.
Take a look at the huge choice, but remember what you're aiming for. Do you see now why we asked you to decide what you want before you go shopping? With such incredible choice, it's easy to get carried away and come home with something - or several things - that are wonderful, but not a good fit for what you want.
Browse, browse, browse...and then decide. Have fun!
Think about what kind of eye makeup you will be wearing with your lashes
If it’s for daytime and you’re wearing light coloured or nude shadow (or no shadow) and brown or grey eyeliner, you’ll get a much more natural look with lighter shades of false eyelashes.
If you’re wearing stronger, deeper darker colours of shadow and dark or metallic eyeliner, you’ll need very dark and lashes so that they will be seen against the darker background.
The bestselling nude eyeshadows available right now on Amazon - These are great for setting off your daywear false eyelashes for a natural but enhanced look


Choose your Glue
Most false eyelashes come complete with a tiny tube of adhesive. Check on the pack if the glue is white and dries clear. If it doesn’t, it’s a good idea to buy some.
Some glue is dark and stays dark but you’re best avoiding that until you’re more accomplished at putting on your lashes. Even then, it’s probably best kept for night wear when you’re more likely to be wearing darker shadow and eyeliner.
Tip for choosing glue
The best glue to choose is one that is white but dries clear. The advantage of having glue that starts out white is that it's much easier to see where you're putting it. If it dries clear, it will hide any tiny drips that you can easily cover with shadow or eyeliner.
Your eyes may water
You’ll need some cotton buds or tissues as your eyes may water if you’re not used to putting eyelashes on. If your eyes are prone to watering, you may find it easier to buy individual lashes or buy strip ones and cut them into small sections. Putting them on individually will mean you’re putting your eyelids under less tension which can cut down on the irritation and subsequent tearing.
Also, if your eyes water, it can make the glue slide off. If you’re using individuals or cut down strips, you’ll only have to re-apply a tiny bit instead of having to start over.
Step Two
You're almost ready to get started. Find a place in your home where you can sit or stand with the light behind you and a mirror in front of you. If this is in the bathroom, put the plug into the sink just in case you drop a false eyelash. You don't want to be unscrewing the U bend when your date is due to arrive in ten minutes!
Gather all of the things you will need. Pack of false eyelashes, glue, Q tips or tissues. If you're going to be cutting your false eyelashes, you'll need a pair of small, sharp scissors. Embroidery scissors are idea.
Tip for hygiene
Wash your hands. This is for two reasons. You'll be putting your fingers very near to your eye and good hygiene is important. While we're on the subject of good hygiene, don't ever share your false eyelashes (or any eye makeup) with anyone else as this is one of the quickest ways to spread infection.
Also, washing will take surface oils off your hands which will make the lashes easier to hold.
Step Three
Make up first or afterwards?
Some makeup artists and glue brands advise you to put on your eye shadow, eyeliner and mascara before your false eyelashes. Others say put the lashes on first. So it’s pretty much up to you. Experiment and find out what suits you best.
Take a deep breath... - remember even Adele had a first time for putting on her falsies!

Step Four
Now you can open the packages and lay out everything that you need. Take the false eyelashes out of their pack very gently – you want to avoid bending the lashes or breaking the arch that they are fixed to.
Tip - storing your eyelashes
Try to keep the packaging as intact as possible if you want to re-use your false lashes. It will give you the perfect place to store them.
The first thing to do is hold the lash strips to your eyelids to see if they are a good fit. Ideally, you want the strips to be the same length as your lash line but they may be longer. That's no problem, just carefully trip a little bit of the end until they fit properly. Take off a tiny bit at a time - you can always take off more but once it's cut, you can't get it back again.
If you're aiming for a natural look, try cutting one strip in half and apply one half to the outer side of each eye.
Symmetry is important for a polished look. You're aiming to have the lashes starting and ending at the same point on your natural lash line.
Apply your glue
This is where many people come unstuck (sorry for the pun). Ten minutes of struggling to put a wobbly strip of thick glue on the eyelashes that then stick to your hand...we've all been there.
The easiest way to apply glue is to squeeze a very thin line of glue onto the back of your hand. If you're right handed, put the glue on your left hand and vice versa.
Holding the strip of false lashes by the lashes, pull the arched seam through the glue on the back of your hand.
Now you wait. If you try and put the lashes on immediately, you will get into a squishy mess. Wait for at least 15 seconds to allow the glue to become tacky.
Tip your head back slightly which will make your eyelids naturally close slightly.
Bring the strip of lashes down from above rather than straight on. This will help you to get the seam much nearer to your own lash line.
You're going to use your fingers or application tool to press arched seam of the false eyelashes onto your eyelid a millimetre above where your eyelash roots are.
Start pressing the seam firmly onto the outer edge of your eye and work your way across to the other side. This is where having prepared your lashes to fit should make the process a lot easier.
Once you're happy with the positioning of the strip, let go and wait for the glue to dry. This can take around two minutes but brands can vary. It should tell you on the glue packaging.
If you're unlucky enough to get any glue in your eye, rinse it out with warm water immediately. Then you'll have to start over.
A helping hand
If you're squeamish about putting your finger so near to your eye (many people are, you're not alone) you might like to try using an eyelash applicator. They're all variations on tweezers and are now so well designed that they can be used with precision and confidence.

Curl up
Carefully curl your real and fake eyelashes together with your eyelash curler. This will open up your eyes but more importantly, it will help your real and false eyelashes to merge together giving a more natural look. It will also reduce then tension of the false lashes on your eyelids and will make them more comfortable to wear. If you curl your lashes (real and fake) it will prevent them drooping.
Mascara
Applying mascara will help to blend your own lashes with the fakes, especially if the fakes are darker than your own.
For a natural day time look, use brown or gray mascara. For night wear, black is the favourite.
If you want to re-use your false lashes, use a dark, dramatic pair that won’t require mascara and just put mascara on your own lashes before applying your fakes. This will cut down on how much you need to clean your false lashes once they’re off and will help to prolong their life.
Bestselling mascaras on Amazon... - ...for that perfect finishing touch

Eyeliner
When you’re wearing false eyelashes it’s probably easier to use a pen, brush or gel eyeliner. Using a pencil may drag your eyelid and compromise the glue, causing your eyelashes to come away from your lid.
Using eyeliner with your false lashes is great for two reasons.
1. It emphasises your eyes
2. You can use it to fill in any small imperfections where your false lashes meet your eyeline.
Individual lashes
You can buy packs of individual lashes (which are actually small clumps of lashes) or you can cut a strip down to your own desired thickness. For the beginner, they are actually easier to put on because you don’t have the pressure of having to get the whole lot right first time, which you have with a strip. They do take longer though, so be prepared to factor in more application time.

A makeup artist's tip is to put mascara on before you start applying your individuals.
Because they are smaller, they have a smaller area to stick to.
Putting on mascara will give them something else to adhere to.
How to apply individuals
Use the glue on the back of the hand technique as we did with strips.
Hold the lash end with your fingers or tweezers and dip the tip end into the glue.
Wait for the glue to go tacky – just a few seconds. You’re working with less glue here so it will take less time to get to the tacky stage.
Start at the outer corner. Press the clump into your own lash line, wiggling it slightly to give it a greater chance of sticking properly. Keep going until you have the desired effect.
Don't just grab and pull! The skin around your eyes is very delicate and if you don't want wrinkles, you need to treat it gently.
Use a makeup remover that is suitable for use on eyes. Pour a little into a saucer or small bowl and dip a Q tip in until it is saturated. Gently rub it along the false eyelashes at the point where they are sticking to your lids. Now wait a few moments to let the remover do its work. It will take a little time for it to soften the glue.
Now you can pull the strip off very carefully - start at the outer corner of your eye and roll the strip as you make your way across to the inner corner.
Tips - how to avoid 'pink eye'
Don't plunge your Q tip into the bottle of makeup remover. You may well need to dip it more than once and if there are any germs on your eyelashes you will be introducing them into the bottle. If you do this, the next time you use the makeup remover, you could be putting your eyes at risk from infection. Many people get 'pink eye' from doing this.
Don’t ever attempt to wash your false eyelashes. They won’t survive the experience. Instead, clean them carefully with a Q tip and eye makeup remover (in a saucer or small bowl as before). Make sure that you have removed all traces of glue, eyeliner or mascara.
Put your lashes back into the packaging they came in to protect them and keep them clean.
Sleeping in fake eyelashes
Don't do this...
Don't.
No, really dont.
It's a real no no to sleep in false eyelashes. It will irritate your eyes and can weaken the root of your own eyelashes...did we say don't?
Have we convinced you?
Would you try false lashes after reading this article?
Related

Where to Buy the Best Dramatic Fake Eyelashes for Theatre, Goth or Drag

Look Your Best - A Great Alternative to Wearing Mascara

Get The Look -Gia Carangi Inspired- Simple Look That Goes A Long Way Tutorial

Car Headlight Eyelashes & Eyeliners Stickers/Decals

Painful Things Women Do and Go Through To Look Pretty/ be Beautiful