Gel/Shellac Nail Pedicure: How To Do Your Own at Home

If You Want Pretty, Shiny Toe Nails That Require Minimum Maintenance and Cost.
The Answer: Home Gel/Shellac Pedicure.
I used to go the salon for gel nail polish pedicures and now I have fallen in love with the home gel/shellac system. If you want beautiful nails but do not have the time or inclination to visit a spa then read this article. It offers a wonderful alternative to salon nails and gives detailed instructions on how to give yourself a shellac pedicure. You will be able to look absolutely gorgeous at a low cost and the process is easy and fast. The result is flawless, strong toe nails that last up to a month.
In this lens you will learn how to give yourself a pedicure as well as how to apply and remove gel/shellac polish at home. I've researched the web and included links to the top YouTube tutorial videos as well as my favorite product links to Amazon. At the end of the lens you will be given a chance to vote and leave comments and suggestions.

All rights reserved. This article or any portion thereof
may not be reproduced or used in any manner whatsoever
without the express written permission of the author.

Before You Begin...
Purchase these items:
All of these products are included in Amazon links in this lens. The good thing is that once you've invested in the products, you will have them and use them for years to come. It is very much worth it!
1) Rubbing alcohol and mini spray bottle
2) Lint free cloth or wipes (not cotton balls because they leave residue)
3) Bond Aid by OPI
4) Gelcolor by OPI base coat
5) Any color of shellac polish (OPI, Gelish, Red Carpet, etc.)
6) GelColor by OPI top coat
7) UV or LED light (options are discussed below)
The Home Pedicure

Before applying your gel/shellac nail colors, you need to give yourself a pedicure. This is super easy to do and feels so good when you're done.
You will need 100/180 grade nail file, 80 grade nail file, nail buffer, cuticle pusher, cuticle clipper, toenail clipper, nail cleaner and cuticle oil. For your convenience, all items are included in Amazon links within this lens.
1. Soak your feet for 10 minutes or so in warm water. This softens the dry outer layer of the skin and makes it easier to remove. If you like, add some bath salts or aromatherapy to enhance the process.
2. Clip your toe nails as short as you like them. If you are used to wearing high heels without an opening for your toes then shorter nails are most comfortable.
3. Push your cuticles back gently with your cuticle pusher then clip them gently with your cuticle clipper.
4. Clean along the outer edges of your nails and under the nails.
5. If you have any ingrown nails then make sure that you turn the cuticle clipper perpendicular to the tip of the nail so that you may clip deeper around the outer corner of the nail. Be careful as you do this.
6. File and shape your toe nail ends using 1st the coarse grade file and moving to the softer grade.
7. File your toe nail beds (the surface of the nail) using the coarse grade nail file first followed by the softer and finally the nail buffer. File until the nail bed is smooth. Remove any nail dust from your nails.
8. I usually apply the cuticle oil once I’ve completed my shellac process. Otherwise it can cause chipping.
Now you are ready for your gel/shellac nail polish application. Yay!
NOTE: If you accidentally over-clip a cuticle and it bleeds, make sure you clean it well and apply antibacterial ointment before continuing with your pedicure.
The Easy Gel Nail Process

Once you've given yourself a pedicure, you are ready for this quick and simple process. I learned these steps partly through online research and home trial as well as having shellac pedicures done by a professional.
1) Spray nails with rubbing alcohol.
2) Wipe nails dry with a lint-free cloth or wipe.
3) Apply an even layer of your base coat. Make sure you cover the entire nail, beginning at the border of the cuticle. Do not worry if it looks too thick just focus on covering the nail, including the tips. This seals the nails and helps prevent chipping.
4) * Carefully place your toes into the UV and turn it on for 1 minute. If using the LED light then cure for 30 seconds.
5) ** Use the side of the nail buffer sanding block that doesn’t have file paper to smooth out the base coat of clear polish. Do this by beginning at the cuticle, applying gentle pressure and sliding the sponge out to the tip of the nail. You may have to do this two times for each nail to prevent bubbling. You should only do this step over the base coat.
6) Apply one even layer of any gel/shellac color polish. Make sure you begin at the cuticle and include the nail tips. I like to begin in the center then do each side as far as possible and finally once lightly over the tips.
7) Use the UV light again for 1 minute or the LED for 30 seconds.
8) Apply a second coat of color gel/shellac polish.
9) Use the UV light 1 minute or the LED for 30 seconds.
10) Apply one even layer of your top coat gel/shellac, with the same technique as before, cuticle to tips.
11) Repeat UV or LED procedures.
12) Apply a second coat of the top coat gel/shellac.
13) For the final cure, double the times on the lights. Use the UV light for 2 minutes or the LED for 1 minute each foot.
14) Spray toes with alcohol and wipe with a lint-free cloth. Now you’re ready with fabulous feet for up to a month. Yay!
NOTE: You may use this same exact procedure for gel/shellac manicures at home. The only difference is that you will need to add an extra minute UV or 45 seconds LED lamp time to your thumbs after applying the color polish. You do not need to do the extra times for the clear polish. This prevents chipping on the outer corner of the thumbnail.
*Check the instructions on the curing lamp you purchase. Times may vary from what I have indicated.
** See below for a picture of the nail buffering sanding block.
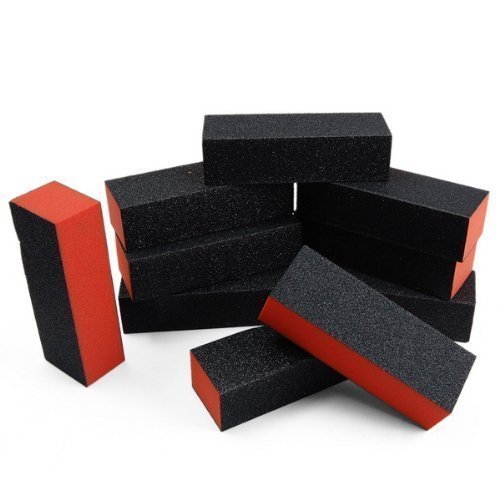
Picture of Nail Buffer Block
The orange side is what I want you to use to smooth out the base coat of clear polish after it has been cured in the UV or LED lamp.
UV and LED lights for pedicures
I use an UV light for my nails, but the newer LED lamps cure your nails in much less time. The downside of the LED lamps is that they are a more powerful light and can be more damaging to your skin. If you choose the LED, I would highly recommend using the protective gloves.
Youtube Tutorials for Home Gel/Shellac Nails
These videos include application and removal of the gel/shellac polish in manicures. The same techniques apply for pedicures.
Double Top Coat
Why Do I Need It?
From my experience, the second layer of top coat aides in thickening the nail, making it stronger and allowing the gel nail polish to last longer. I've tried it with one versus two top layers and two definitely makes a difference. Since I won't need to change my pedicure polish until a month later, I spend the extra time for the better outcome. This is why I recommend two top coats.
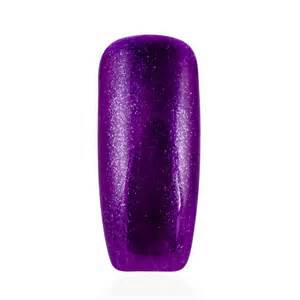
My Favorite Gel/shellac Polish Color
I love to wear bright pinks, oranges, purples and even blue nail polish colors. Here are a few specific brands that I've tried and loved; plus I always get so many compliments on these colors!

Sparkly Nails
If you would like your nails to sparkle then simply select a sparkle polish and add it on top of your color coat the same way you would do a color coat. Follow the single coat of sparkle polish with your 2 layers of top coat and your glam nails are ready to go!
Removal of Gel/shellac Polish

For removing your gel/shellac nail polish, you will need Vaseline, 100% acetone nail polish remover, cotton rounds, aluminum foil, cuticle pusher. Amazon links to most of these items can be found as you scroll down the lens.
Although the process does take more time than removing regular nail polish, it is definitely worth the wait for strong, shiny nails that won’t chip until your next pedicure is due. Also, the same procedure applies if you are removing gel/shellac manicure polish.
1) *Cut the cotton rounds in fourths or halves if needed, so that they are the perfect size to fit on your nails.
2) *Cut 10 - 1” by 2.5” strips of aluminum foil.
3) Use the coarse grade file on each nail to break into the polish, removing the shine.
4) Apply Vaseline to your cuticles. This protects them while the acetone is soaking.
5) Saturate the cotton with acetone and apply to nailbed.
6) Use the aluminum foil to secure the cotton in place by wrapping it around the toe.
7) Complete this process for all of your toe nails.
8) Set a timer for 10 minutes.
9) Remove one toe wrap at a time and use your cuticle pusher to gently scrape off the gel/shellac polish. Sometimes not all of the polish is removed and all you need to do is reapply the wrap for another 5-10 minutes.
10) Once you’ve unwrapped each toe and cleared the nail of polish then you are ready to do your home pedicure followed by the application process of more shellac.
*If you prefer, you may purchase gel removal wraps. These pre-made wraps contain the cotton pad for soaking off plus the foil for wrapping it on.
Gel/shellac Removal
I usually find cotton rounds and aluminum at the Dollar Tree. I have tried the removal wraps and they are more convenient and easy to use.
Home Gel/Shellac Nail Pedicures - Are They For You?

Here is your chance to vote on gel nail pedicures! If you've had one done professionally, you are familiar with the time, money and expertise required. Also, you are probably aware of the absolute beauty your toes exude with the gel nails.
What do you think about this easy home version?
Please give your ideas about gel/shellac nails at home and guide readers to another useful lens!
Thanks ~ Beth