Create Your Own 3-D Images

Make Your Own 3D Magic
When perceived depth** images came out, I decided it was either a
voodoo-type magic, or an explainable phenomenon. As I didn’t believe
much in voodoo, I decided to study this science. Once I got a toe-hold
on it, I practiced at making my own. After becoming familiar with the
nuances, I decided that anybody could do this, to one degree or other.
Before I give a few pointers on the fun you can have, let me first say
a little about the art of diverging your eyes:
When we focus on a single object, we tend to cross our eyes to the
extent that would cause the sight line of each eye to land on the thing
we’re looking at. In other words, the two sight lines would land on the
same spot. With perceived depth, we focus on two different points that
look basically the same. Some people tend to cross their eyes to the
point where the sight lines cross, and the left eye sees the image on
the right, and the right eye sees the image on the left (see figure
1a).

Others tend to diverge their eyes. In this case, the left eye sees the
left image, and the right eye sees the right one (see Figure 1b). I
like the idea of diverging the eyes to see perceived depth for two
reasons: The eye muscles don’t have to work so hard, and the image
appears larger.
I did all the work for this hub with the assumption that the reader
will diverge his/her eyes. You can still cross your eyes if you wish,
but the images that should be coming out at you will go inward, making
a hole in the background image, and it will appear smaller than if you
diverge your eyes.
Some of you will say you can’t diverge your eyes. If you can cross
them, I think you can diverge them, too. I was originally an
eye-crosser. But when I saw that most perceived depth images were
designed for the diverging of the eyes, I worked at it constantly untiI
I got efficient at it. I learned how to diverge my eyes by getting close to
the piece, then slowly backing away. It was very hard to do this, and I
failed continually, but I kept doing it 10-20 minutes per day, until I
eventually achieved it. It was only two or three days before I got it
right. Now it’s second-nature. I used to feel nauseous when I both
crossed my eyes and diverged them while searching for perceived depth
images. This, too, was soon conquered, and now there’s no discomfort at
all when I enjoy perceived depth images. This type of thing can be
worked out of you just like jet pilots have to learn how to not black
out when they undergo extra g-forces while doing a hard bank or up-turn on their
aircraft.
If you need further help in learning how to see perceived depth images,
let me know, and I’ll send more information.
One word about why we perceive depth:
If there were two vertical bars in front of you and the one on the
right were closer, your left eye would see more space between the two
bars than the right eye would. This disparity is sent to the brain,
which has a mechanism to interpret the two opposing images: It’s called
stereopsis. In other words, you perceive depth. The brain, where all
this work is done, cannot see the outside world. It depends on and
receives data from the eyes, and processes the data. If the data it
receives is consistent with its paradigm for what constitutes
stereopsis, then it turns the image into a 3-dimensional layout. A
perceived depth image has elements that are consistent with that
paradigm. Therefore, we perceive depth from this two-dimensional
surface.
One may think he/she sees depth from one eye, but this is learned depth
perception. If you were to enter a room full of unfamiliar clutter at
eye level -- keeping one eye closed, you will likely have trouble
deciding where some of those things are placed spatially. But if you
can see where, for example, a wire dangles from the ceiling and where
it’s plugged in, you will have no trouble putting it in its true
position because of what you know about that object. On the other hand,
if you saw a thin rod, one you haven’t seen before, and if you couldn’t
see which table or chair it’s sitting behind, you will have trouble
knowing exactly where it sits.
Another trick our mind uses to describe depth is assessing the
“vertical position” of an object within your field of view. The lower
it is, the closer it will appear to you. So the strange objects in the
room must be at eye level or higher in order to demonstrate this point.
In other words, you should enter the room while sitting in a chair with
wheels. There are more ways to see learned depth, such as those
perspective tricks that artists use, but that’s fodder for another
discussion.
Perceived depth images remove all these details that serve as learned
depth clues. The only one that remains is the set of stereopsis
elements.
Now, to the hands-on fun:
Before I start my step-by-step project, I’m going to show you a simple
exercise that can be done with a word processor and a printer, to
familiarize you with the concept of perceived depth: Type in a line
that says something like:
I do 3-D. I do 3-D. I do 3-D. I do 3-D.
Now, make several lines exactly the same, but on the third line, take out the space after the second set of phrases, like this:
I do 3-D. I do 3-D. I do 3-D. I do 3-D.
I do 3-D. I do 3-D. I do 3-D. I do 3-D.
I do 3-D. I do 3-D.I do 3-D. I do 3-D.
I do 3-D. I do 3-D. I do 3-D. I do 3-D.
I do 3-D. I do 3-D. I do 3-D. I do 3-D.
Note that when you diverge your eyes until the same phrase is combined
by your two eyes, the phrase that is spaced a shorter distance will
come out at you. (If you cross your eyes, it will make a hole in the
paper.) Also note that the phrase to the right is back down on the
paper, even though it is not aligned with the phrases above and below
it. If it were lined up, it would create a hole in the paper. But
because it has one space in front of it, it is placed on the paper with
all the rest that have that same spacing.
This is how perceived depth works; whatever is moved to create the
stereoptic effect, everything beyond it moves too, in order to remain
on the background level -- unless there’s another shape desired.
On to the main project, which is made up of step-by-step exercises:

The easiest exercise is to draw a series of random vertical lines, as
in Figure 2. Go ahead and try it, without worrying too much about
keeping them straight or parallel. Now, diverge your eyes (or cross
them) and look at your work. The more there are opposing curves, the
more the lines will appear to be dancing, bending in and out from the
surface of the paper.
Now, let’s get some organized depth:
When you look at a door that’s facing you from the end of a hall, that
door will look wider than the doors about ten feet in front of you,
because the closer doors are seen at an angle. So if you draw two lines
at a given distance, then more lines outside those two at a shorter
distance, and so on, then when you diverge your eyes, it will look like
you’re looking down a hallway (see Figure 3). If you cross your eyes,
it will look like fence posts coming out at you. You now have an object
(a hallway) that’s wider than the distance you are diverging your eyes,
which is one of the wonders of using patterns to create perceived
depth; you could make a mural 10 feet wide, and see 3-dimensional
shapes by only diverging your eyes a couple of inches.
For the next exercise, trying putting the lines at the center a short
distance apart, and the lines outside of them with more space between
them. Now, you have fence posts coming out at you when you diverge your
eyes.
Next, put circles centered on top of each line in an even row. Each
fence post will now have a little “sign” on it.
Now, erase the vertical lines and leave the circles where they are.
You’ll see little round signs floating in the air and coming out at
you, with the center one being the closest.
Put a vertical line passing through and behind the left-most circle.
Behind the circle next to it, put another vertical line, but a little
beyond the center point of the circle, like in Figure 4. Continue
putting in vertical lines, spaced exactly the distance between the
first two lines. Doing this – placing the vertical lines the same
distance apart, you’re creating a back wall that is perfectly flat, and
only two-dimensional, with the circles coming out from the wall (see
Figure 4).

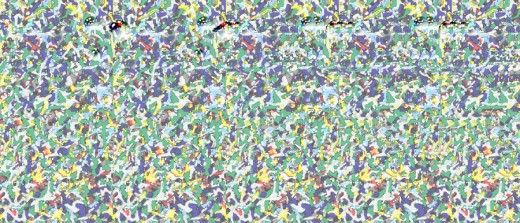
If you were working with a pattern like the one at the top of this
article, you probably won’t have opaque circles to take on a 3-D
effect. But this won’t matter. For the next exercise, go ahead and
paint a vertical line in the left-most circle, the same width as the
line behind it, as in Figure 5. Now, copy that circle with the vertical
line, and paste it exactly over the next circle. Keep doing this until
all circles have the exact vertical line. The effect of the circles
coming out at you are the same, because the circles’ vertical lines are
the same distance apart as the circles are.
What if you wanted to create the illusion of a solid band coming out at
you, instead of just the posts? To do that, extend the vertical lines
through the circles, and erase the corresponding section of the
fixed-width posts, as in Figure 6.

To this point, everything can be done by hand, without any software. To
continue without software, the following exercises may prove to be
challenging.
Now, to give your band a convincing solid look, you need to replace the
circles with square patches of any pattern, each individual patch being
the width of each space between the circles. Place the patches over the circles, as in Figure 7. Note: the patches are not the width of the vertical lines, but made to fit each
space between the circles, on center. To do this, you may need
PhotoShop or Corel Draw/Corel Photo, or a copy machine that can enlarge or reduce **horizontally only** to a specified percentage or width. If you don’t have a copier
or PhotoShop and still want to do this, make a dot matrix, maybe five
across and six deep evenly spaced on each patch. When reducing or
enlarging the patch, evenly divide the distance again by the number of
columns of dots and draw in the new dots on those measurements, keeping
the horizontal rows the same height.
For example, a short patch might look like this:
. . . . .
. . . . .
. . . . .
. . . . .
. . . . .
. . . . .
and a longer patch will look like this:
. . . . .
. . . . .
. . . . .
. . . . .
. . . . .
. . . . .
Another possibility is to make some squiggly lines. Trim them
top and bottom. Also trim them the same width that exists between the
first and second circles, on center. Place this box – the lines or dots
– between the first and second circle. Its vertical edges should
dissect the two circles in the middle. Copy that box, and move it over,
keeping it the same height, until its left edge butts against the right
edge of the first box. Shrink this second box **horizontally** until it
fits exactly between the second and third circles. Each vertical edge
of the box should dissect the centers of the second and third circles.
Keep doing this, covering the circles. Toward the center, the patch or
box may need to be stretched horizontally, instead of shrunk. When
you’re done doing this, it’s okay to now shift all the patches at
once to the left, to cover the left half of the first circle. Or you
could just crop the piece. Now, you have a solid band coming out at
you, as in Figure 7. Mine looks like you’re looking at the corner of a
fence. Yours may appear different or rounded.
Using these techniques, you can create different shapes. For example if
you made one patch large and one small, and alternated them back and
forth like this, you would get an image with accordion folds. If you
want an irregularly-shaped image you should work with smaller component
squares at this point, as a shape that has a diagonal edge will create
another type of problem.
In my next hub on this 3D series, I will address that problem, so that
round or curved objects can be made. This should be sufficient for the
time being, to give you time to experiment, and to become familiar with
this art form, and perhaps you’ll even figure out how to proceed
without my help.
Have fun with your perceived depth projects!
**I coined this term so to not use a trade-marked or copyrighted name.


