Make Your Own 3-D Photos and Projects - Part 3

With the camera you have now, you can make 3D photos, even though it isn’t designed for 3D work.
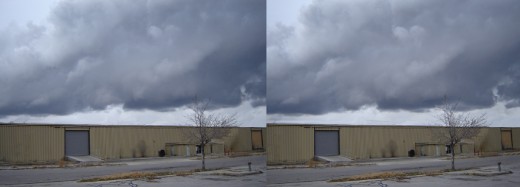
I’ve shown you how to do simple 3D drawings in an earlier hub, and then I demonstrated how to do “Magic Eye,” or what I called “Perceived Depth Images.” Now, you’re ready to do something a little more simple: taking 3D photos of the mountains and clouds around you, and of your family and friends. The photo set above can be copied for experimental use only, to test the 3-D effect. It is designed to be viewed by diverging your eyes, a trick I taught in the first article of this series. (The following information is copyrighted as of and by way of the publication of this article.)
The first thing I would have you do is to take your camera, and get into a car where someone else is driving. Find a good mountain scene, or beautiful clouds, or an impressive sunset. (Note that there's no need to use a
tripod; most "misfires" can be solved by moving the viewers (see below) until the pics line up. Or, if you're going to use a computer to process the pics and arrange the pair, you can crop one pic to fit the
other.) While your friend is driving at a reasonable speed, point your camera at a unique spot. Snap a picture, point your camera at the same spot, then snap another picture. Do this as often as you’d like. A general rule of thumb in knowing how far to move between pictures is: move until you
see a small separation or shift between two distant mountains or hills
that overlap.
When I first started this, I used 35mm film and had the photo-developers make slides. I then bought two simple slide viewers that weren’t too large. In other words, I wanted something that didn’t put the separate viewing lenses further apart than my two eyes when the two viewers were placed side-by-side. The first picture I took was put in the left viewer, and the second was in the right one. I moved the viewers until the two pictures combined into one, and voila! a 3D image popped out at me. Once your eyes combine two pictures like this, the whole 3D scene will stay together, even if you move one viewer a little without moving the other.
Someone once showed me two pictures he took of his girl friend. (Often, people take two pictures of the same scene just to make sure they get it right.) After I examined the photos, I did a crossed-eyed look at them (they were too big to let me diverge my eyes) and noticed that the two made a perfect 3D picture. My friend had done 3D without realizing it!
I took a picture of Timpanogos Mountain in Provo, Utah using this system. Upon viewing the 3D image, I found that the small mountain in front of it was further from Timpanogos than what my two eyes could determine. I concluded that our eyes are too close together to truly see 3D on a large scale.
Once, I took a picture of a sunset where its rays were shooting skyward, separated by clouds. When I looked at the 3D results, the rays appeared to come toward me, missing me by just a few yards above my head. What an amazing eye-opener that was!
The wonder of this system I invented lasted for a while, until I became a bit unhappy with the overall effect: the mountains always appeared very small. I theorized that the reason this happened was two-fold: With snapshots 20 or more feet apart, it was like a giant was looking at the scene, a giant with 20 feet between his two eyes! To a giant that tall, the mountains, indeed, would look small to him. Also, I was looking at slides, which made the view very tiny.


So when digitized cameras came out, along with computers and color
printers, I decided to print out my photos on 8-1/2 x 11 paper. I put
the two pieces of paper into a loose-leaf binder. I used a mirror to
deflect the line of sight of my right eye, and printed a reversed image
of that right side. See Fig. 1 for how this works.
Most of the time, when you take two photos
so far apart, you’ll get two different foregrounds. Normally, this does
not destroy the 3D effect of the more distant background. It’s like
when you’re hiding in the bushes, and each eye sees different twigs or
leafs. You learn to just “see through” those close-up images. For
example, if you hold your fingers close to your eyes while looking at
something more distant, you'll see what you want quite clearly. People
learn to ignore such transparent and close-up images. However, in my
next series on 3D work, I’ll show you what I do to solve that problem,
in case you wish to make your finished product more impressive.
Meanwhile,
enjoy this simple procedure, and please give credit to “Sam Antone’s”
invention if you use it (My pseudonym is Sam Antone, the name I used
when I came to HubPages originally). If you sell anything made from
this system, let’s talk about it.