- HubPages»
- Technology»
- Computers & Software»
- Computer Software
A Free Video Editing Software - Blender as NLE

The Video Editing Layout

Getting the Movie Strips in Project


Starting with Video Editing using Blender
After downloading and installing this great 3d Software - Blender, you can simply open it and ignore everything you see - the complex 3d modelling and animation UI, the sheer amount of buttons - just ignore and simply locate the box saying "Default". This is just next to "Help" on the top most menu bar. Click to see a drop down, and choose "Video Editing".
[Screenshot Above]
In the Bottom left portion of this screen you should be able to locate the add menu. It’s just below the channels our movie and audio strips will sit once we add them. Check out the image below. There is a helpful tooltip - you’ll find these with most menu items. Isn’t the world amazing? :)
[Screenshot Right #1]
As soon as you click on the “Add” Menu and then on Movie - you will be presented with a different looking File Explorer - single click will not select - it will open your folder. But your file will be just selected with single click. If you’d like to see the “thumbnail preview” of your files, click on the button with "four squares” icon - locate it next to “Create New Directory” Button at top left portion of the screen. Check out the image
[Screenshot Right #2]
- there’s another life saver tooltip - I didn’t have to label my screenshot. Time to update my FB status to “Feeling Blessed” :D
This is how your channels would look:
[Screenshot Right #3]
Add one more movie like this. There would be audio strips too (of a different colour - cyan to be precise - than the dark blue movie strips) - which you can remove, or edit - as in animate - but that is some quite advanced stuff - not for beginner level. Just let them be at moment. Either place your timeline (the Green Vertical Line) at the point you want to add the second movie, (say, after the first movie) and then add the movie (the movie will be added at the frame the timeline is - it’s sort of cursor) or add the movie, place your timeline where you want the movie to be and Hit Shift+S to snap the movie to that location. (You could also alternatively grab and move the clip.)
You can right click on a strip to select. Hit G to grab the movie and your mouse movement can now change the location - you could change the channel, or you could change the frame numbers or the time you want this video clip to appear in the final video.
Effect Strip with a different Color
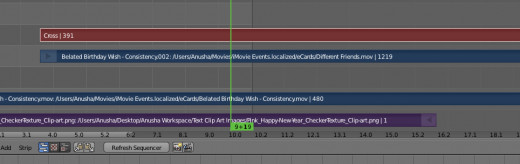
Adding Effects
Once you have two or more clips added, you could add effects. Select (Right Click to select and Shift Right Click to add to selection) the clips in the order you want them to appear - if you want movie A to cross fade to Movie B, then select them in order - first Movie A and then movie B. Remember, the order is important, the location of movie clips doesn’t matter. (However, you could always select the effect strip later and “Swap Inputs”)
Add an effect strip - say cross - once you have two movie strips selected. The movie strips can overlap each other - and the effect will be applied to the duration of overlap. We can also use images instead of movie strips.
[Screenshot - Right]
Tip - You can use Blender to apply a watermark a video (use an image with alpha channel) by using Overlay Effect Strip. The position of this image can be animated over time - to give a moving watermark instead of a static one. Details on this in another hub some other time :)
Taking a Preview
Use Alt+A to take preview of how your video would look. This will appear in the window with black background on right top portion of the Video Editing Screen.
Add more strips and effects according to your requirement, and take previews to make sure they are looking as you want them to. Some strip movement, some swap inputs (select the effect strip and Hit Alt+S - alternative use the Strip Menu - choose "Swap Inputs”) and you should be ready to rock, umm render. :)


Rendering to the final video.
In order to render to the final video - just remember the last frame number of the last strip in your project.
Blender has a very flexible interface when it comes to windows. But it can be slightly complex for a beginner to understand. For now, let’s learn this, we can have as many windows as we want, and change the window type to any of the 18 types. We’ve already been using 5 of these types in our existing Video Editing Layout. First is the info at the top - displaying the File and other menus, second is F-Curve Editor, which we haven’t used much, and we would replace it soon, third is the Preview Window which is a type of Video Sequence Editor Window (Available types are sequencer, preview or both), and then is the Sequencer containing our channels, fourth type is the timeline. 5th Type would be the File explorer that we briefly opened to select our files. Yeah that’s a window type too.
Now, let’s change the F-Curve Editor into Properties window. (We could have and ideally should have added a new window, but since F-Curve Editor is for Advanced Animation stuff, which is out of scope of this hub, hence we’re simply replacing this window) Click on the Editor Type and Choose Properties.
In Frame Range, click on End Frame, and enter your frame number. Choose an appropriate frame rate (29.99 is standard - but there are many standards)
(This hub assumes that you’ve videos of same frame rates - working with videos having different frame rates will require a Speed Control Effect Strip - a little advanced for this hub - but you know what to look for if you need to. This effect strip can also be used to add a slow motion or fast forward effect - Enjoy :) )
Choose the resolution (if you have videos of different resolutions - you might require a transform effect strip)
(By default, in the post processing section - it’s the bottom most section - both compositing and sequencer are selected. If for some reason, they are not selected in your project, make sure Sequencer is selected.)
In the output section, choose the destination folder. I normally choose the output settings as shown in the image below, these work with youtube too, but you could choose other settings as per your requirements. Just make sure you’ve got a combination that works.
Click on the large Animation Button. Sit back and relax while your videos are edited and mixed to create your final masterpiece. It doesn’t have to be a master piece - but it will your own creation!
Would you try Blender for Video Editing sometime?
You came so far, that you're looking at this poll. So, will you try Blender sometime?
Conclusion
As I mentioned in the beginning, this hub is not meant to be a comprehensive guide to video editing using blender. It’s just a sort of teaser - yet it has enough information to get you started. Check out these video tutorial series to gain more knowledge. I plan to make more hubs for some cool advanced stuff in Video Editing using blender too. But alas, plans are not always implemented, and when they are, they take so much time sometimes :)
Blender is an open source software, so you can use it free of cost. The downside is the complexity of adding all these "effect strips" and not so user friendly UI, but the complexity is just the cost of immense flexibility you'll get in later more advanced editing requirements.
If your needs are too simplistic, I'd suggest you stick with the slideshows created by iPhoto or similar software. But if you're all for some cool stuff like fading your video clips to a color of your choice, and then fade into another video clip; adding flexible moving watermarks of your choice; using multiple Picture in Picture effects in the same project and lot more - than off course you should get your hands dirty! :)
Videos added in this hub will take you a step ahead. So watch them and Happy Editing :)
Hope you found this interesting, and please leave some feedback, for anything you liked / disliked / and/or you think can be improved.