A Web Tutorial Series: Creating Your Own Presence on the World Wide Web - Introducing HTML 5
Recap of the First Tutorial in this Series
in the first tutorial in this series, "Web Tutorial Series: Creating Your Own Presence on the World Wide Web With Little or No Prior Experience or Costs", there was a rather informal introduction to the facts:
- most webpages could be constructed with little or no cost involved
- we briefly pointed out that a text editor was required, products such as OpenOffice or Microsoft Word contained "hidden" formatting which made their use inappropriate for creating web pages
- plain text could be saved in a file which had a type of html and displayed
- and, without concern for the formal shell which should be used for a technically correct web page, introduced the syntax of the various levels of heading markup
What was presented was although incomplete could referred be referred to as a static pages, in both the text message example and the heading example. There was nothing about the page that could be considered changeable.
In our one example, we entered in a short note and were able to display a simple web page only noting that the formatting of the message did not match the text file entered. HTML can be dynamic in and of itself, but with addition of the power capabilities of CSS could be made robust and dynamic.
Goals for This Tutorial
Notepad and Notepad were discussed and it was noted that Notepad++ if used has a number of advantages of Notepad and if your working environment would allow it it would be preferable to use thand at editor and we will demonstrate some of these features here.
The other thing which we want to create is a formal template which would meet WC3 conformity.
Since this is all new knowledge, as we proceed with these tutorials, hints and tips will also enter the picture.
Let's get started!
Creating the Formal HTML 5 Template
The first statement which should apperar at the top of every HTML 5 page should be the following:
<!doctype html>
this identifies the page as a HTML document.
The next line is the <html> tag and at the very end of the document the </html> ending tag is needed. Between these tags is the content of the web page.
Following the <html> tag, is a tag which is an exception to the rule. The <meta> tag can be used in a number of ways to which we will not concern ourselves at present. The one argument which is needed is one which identifies the character encoding which is used in the document. For the present the identifier for this is charset= and the value for it is UTF-8, which is a coding standard which represent over one million possible character codes.. The meta tags (and the there may be more than one) are placed within the <header> section.
Also, within the header a <title> tag may appear. The <title> content is what is placed in the browsers-tab for the page..
The final HTML markup that we illustrate in this example is a <link> line. Links are quite important in HTML development. They point to external files that are required in the page. Our link is to a CSS style sheet. The development of web pages involve content and style.. After the web page content is completed styling elements are generally added. Information contained in a style sheet which is linked in end. In earlier versions of HTML the styling used was "carried" along with the content and although HTML 5 carries the ability to specify styling in its tags it is generally discouraged except for rare instances of "one offs". It may be repetitious but it needs to be drilled in :"HTML is for content, CSS is for style".
The next section is the <body>. The body is where the content and content formatting takes place. Although one could just enter plain text here this is not a good practice. The next section will illustrate why this is true.
We close this part of the discussion with a summary of what was described above. The page as it now stands is:
<!doctype html>
<html lang="en">
<head>
<meta charset="utf-8 />
<title>HTML Template</title>
<link rel="stylesheet" href="main_stylesheet.html">
</head>
<body> This is where items such as headings, lists, etc. is placed
(For illustration purposes only! This is a very bad practice!)
</body>
</html>
Notepad versus Notepad++
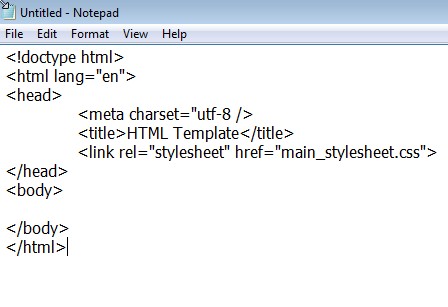
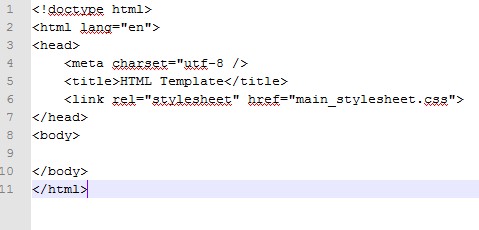
Now that we have finished our template in Notepad, we can reproduce the same template using Notepad++.
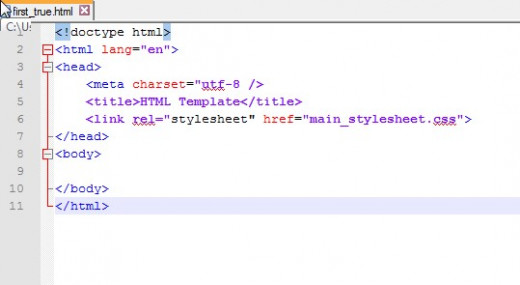
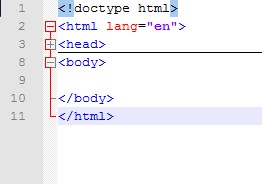
One might say that there is no discernible difference except for line numbering. This is quite true because we have not saved the file as yet. Notice what happens when we save the file as type html. The text takes on color attributes on keywords. Sections of the file can be collapsed or expanded thus it becomes easier to identify missing end tags to match the respective beginning tags. Thus, with Notepad++ misplaced tags are more easily identified. Also be having the ability to collapse code there is less screen clutter. The section currently being developed has fuller "eye attention".from the developer.
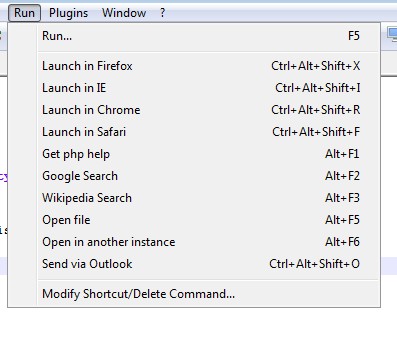
One additional advantage which Notepad++ has over Notepad is the ability to launch the web page directly from the Notepad++ screen by selecting Run followed by any of the available browsers available on your machine. This is important in tat not all browsers support all of the features which you may have included in your HTML code. A web page which is not tested against the major browsers might cause display problems which results in low customer satisfaction.
Helpful Tip The version of the code run is the version which had been saved. So always save before launching.
The following snapshots illustrate the points discussed in this section.
Notepad versus Notepad++ Examples
The Bane of White Space
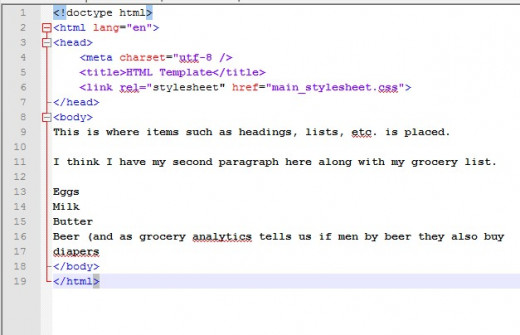
This is a concept that often trips up new developers. Remember this important fact -- with reference to HTML. ALL WHITE SPACE IS IGNORE.
We close this tutorial with a simple example. Suppose you wanted to have two paragraphs and a list. So you enter the code in the body as shown in the snapshot. Now look at the web page as its displayed. Not what was expected?
What we need to do is use HTML tags to achieve the desired results.
Whitespace is Ignored - It's not WYSIWYG

Wrap Up and What's Next
A lot of ground was covered.. The basic template for the web page was created. There are more details but the template has been built. Save a copy of this template so when creating your next web page you have a place to start.
The advantages of Notepad++ over Notepad were illustrated. There are other fancier editors that can be deployed but at this stage anything more powerful than Notepad++ would only add to the complexity.
We will investigate the solution of the problem of whitespace in the next tutorial.when we learn about creating paragraphs and list. We will also discuss in-line spacing where word spacing is required. But that won't be the end of it much later we will look at tabular output and other spacing problems.
Till next time!
Web Design is a Universal Language
