- HubPages»
- Technology»
- Computers & Software»
- Operating Systems
Arch Linux - Hummingboard
What is a Hummingboard
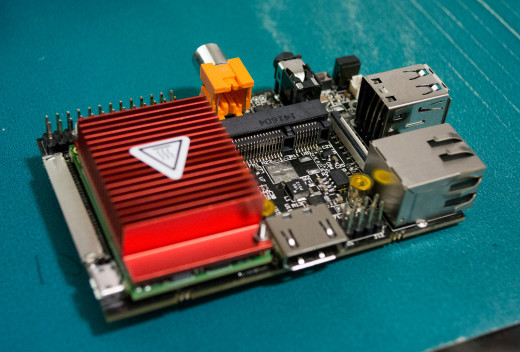
A Hummingboard is a small pc board roughly the size of a creditcard. These small pc's operate using small amounts of power, usually a couple of watts, compared to normal pc's. The best known Arm mini pc is the Raspberry Pi. The Hummingboard i2eX is a more powerful mini pc than the Raspberry Pi - it has a dual core Arm processor, 1 GB of memory, 1GB ethernet port, two usb ports, infrared, hdmi port and an msata 2 slot for adding an msata ssd to the system.
The system runs smoothly and my only gripe is that it runs really hot when you watch movies on XBMC. I have got this Raspberry Pi casing but I removed the cover because the system would get as hot as 80 degrees celsius. Now without the cover it get 50-60 degrees when I watch something on XBMC. In the near future I will buy another case with a fan attached to it to lower the temperatures. According to some people on the solid run forum this can lower the temperatures to 30 - 40 degrees.
Image Hummingboard

Arch Linux Installation
My goal was to have a system with xbmc on it for entertainment, but also to have it run a mailserver with Roundcube webmail so that in the future I could not only access my email on my network via imap through Thunderbird but also remotely.
Debian
My first choice was to run Debian on it. I have been managing several Debian servers and Ubuntu desktops so this is the distribution I am most experienced with. First I tried the Debian Jesse image from the solid run website which got totally messed up after doing an update of all the packages. Some systemd problems which made the system inaccessible. After that I tried the image provided by Igor found here. Although this image was a lot better I could not get xbmc to work. So I decided finally to give Arch Linux a go.
Installing Arch
First I tried installing Arch using the solidrun wiki found here. This resulted in an unusable system. Not sure why it did not boot properly. So next I tried the Arch wiki found here on the installation tab. After following all these steps you should get a bootable arch system with a root user which has the password root. Starting with a separate /boot partition would be better if you want to add an ssd later to your system. This is because you will have to copy new kernel sources to the sd card, because the sd card is needed to boot the system even with an ssd. If you have a separate boot partition you can mount it via /etc/fstab this will install the new kernel updates directly to your sd card.
Some things you might want to do after installing Arch:
Updating Arch Linux
pacman -Syu - this updates all the repositories and installs the latest packages. If you are used to Debian this is the same as "apt-get update && apt-get dist-upgrade" so a lot shorter.
pacman -Scc - this clears the cache - its like apt-get clean with Debian.
Change root password and add another user
passwd root and useradd user - I had to create the home dir manually and copy all the bash files from /etc/skel.
mkdir /home/username
cp /etc/skel/.* /home/username
chown -R username: /home/username
chmod 700 /home/username
There is probably an easier way than this with the useradd command.
You might want to disable root access via ssh - change /etc/sshd_config - PermitRootLogin no
Even better is to disable password logins and go with keys like I did.
Change from dhcp to fixed ethernet address
I followed the excellent arch wiki on networking. https://wiki.archlinux.org/index.php/Network_configuration#Static_IP_address Follow the instructions under Persistent configuration to get a fixed ip. You may also want to disable dhcp afterwards.
I created this shell script you can run to check the temperature while xbmc is running. You need to install hddtemp if you have an ssd like me. pacman -S hddtemp
vi /root/temp
#!/bin/bash
#
# check system temperature
euid="$(id -u)"
if [[ $euid -ne 0 ]]; then
echo "This script must be run as root" 1>&2
exit 1
else
echo "CPU temp"
cat /sys/class/thermal/thermal_zone0/temp
echo -n
echo -n
# 70 C temp thermal management
echo "HDD temp"
hddtemp /dev/sda
fi
chmod +x temp to make it executable and you might want to copy or move it to /usr/local/sbin so that you can execute it as temp otherwise you have to execute it as /root/temp or ./temp in the root home folder.
After doing all these steps you will have a pretty solid Arch Linux installation. You can do some more tuning and even install an SSD to your system like I did. See the ssd section how to migrate your brand new Arch install to the ssd drive.

Installing XBMC Kodi
Installing XBMC on Arch was a breeze compared to the hoops I had to jump through with Debian. Now you can also install Kodi (latest version of xbmc - follow other step)
Install xbmc:
pacman -S xbmc-imx-git
Install Kodi
pacman -S kodi-imx
Start xbmc for the first time
systemctl start xbmc
Start kodi for first time is the same but instead of xbmc kodi:
systemctl start kodi
Enable the xbmc service so that xbmc will start when you power on
systemctl enable xbmc
systemctl enable kodi
Getting CEC to work
Add the following:
vi /etc/udev/rules.d/99-hdmi-cec.rules
KERNEL=="mxc_hdmi", SUBSYSTEM=="mxc_hdmi", GROUP="video", MODE="0666"
KERNEL=="mxc_hdmi_cec", SUBSYSTEM=="mxc_hdmi_cec", GROUP="video", MODE="0666"
Turning the tv off also shutdown Kodi (XBMC) and Arch. On my Samsung TV there's a setting that says something like turning the tv off turns also other attached devices off. Disable this if you do not want Arch to shutdown each time you turn the TV off. Which is very annoying if you use your hummingboard for more than just XBMC/Kodi.
Installing Alsa
Run the command below to install the alsa packages
pacman -S alsa-plugins alsa-utils alsaplayer alsa-tools
Backup asound.conf - mv /etc/asound.conf{,.bak}
Edit asound.conf:
vi /etc/asound.conf
pcm.!default {
type hw
card 2
}
ctl.!default {
type hw
card 2
}
Test of it works:
aplay -c 1 test.mp3
You first need to upload a test.mp3 file to your hummingboard - I used: scp test.mp3 192.168.1.8:
Change the last ip to the ip of your hummingboard.
You should hear sound coming from your tv.
Controlling XBMC
You can use your laptop or pc to control xbmc with a browser by going to http://ipofyourinstallation:8080 in my case its http://192.168.1.8:8080/
Or what I also use is the android app Yatse - you can find it in the google appstore for free. I control xbmc with my phone.

SSD
I bought the Crucial M500 120 GB msata ssd for my hummingboard (about 65 euros). Unfortunately the package contained smaller screws than the one I needed to attach the msata ssd to the Hummingboard. This small problem was easily fixed by unscrewing one screw from an old sata harddrive I had lying around. You will need a torx screwdriver to attach the msata tightly to the board. I followed this guide here to install the os which was on the sd card. Follow the following steps to get a working system on ssd.
- prepare the filesystem as root: cfdisk /dev/sda
You can also use fdisk if you want like in the guide - I like cfdisk better. I used the whole disk so I made one big partition with the Linux filesystem. Then format your new partition: mkfs.ext4 /dev/sda1 - now you have one big Linux partition on your ssd. - Next is copying all your stuff from the sd card to the ssd. The hummingboard will be using the sd card only for booting in the future and the rest is executed from the ssd. Add two directories for mounting: mkdir /tmp/source /tmp/target
Mount sd card on source: mount /dev/mmcblk0p1 /tmp/source/
Mount ssd on target: mount /dev/sda1 /tmp/target/
Copy to ssd: (cd /tmp/source; tar --backup -c *) |tar -C /tmp/target -xv - Final step is to change the boot parameter on the sd card so that it knows where the root file system is. I made a backup first! Incase you want to revert. cp /boot/uEnv.txt{,.bak}
Edit uEnv.txt: vi /boot/uEnv.txt
Change root into: root=/dev/sda1
sync disk: sync
Reboot: reboot
Now you have a working system that reads the first from the sd card then boots from ssd. It should be a lot faster now than before.
Important kernel updates:
When ever you get a kernel update it will be called something like this: linux-imx6-cubox-dt with a version number it is important to copy all the files to the sd card. Also Arch will give a warning that you should copy the image to the sd card. I will run you through this trivial process below:
Mount the sd card on /mnt : mount /dev/mmcblk0p1 /mnt/ - cd /mnt/boot/
Make backup of the old stuff to directory old: mkdir old then move old images to old: mv /boot/imx6* old/ - move zImage too - mv zImage old/
Now copy all the new files from the ssd /boot directory to the sd card /boot directory
cp /boot/imx6* /mnt/boot/
cp /boot/zImage /mnt/boot/zImage
Now you can reboot with your new image. You can check the image by giving the following command: uname -r which should display the latest kernel. Check package with this command: pacman -Q | grep linux-imx6
Performance Tuning
The default scheduler for Arch is bfq which is more suitable for normal harddrives. We would like to run the deadline scheduler. Here is how to change it - it should all be on two lines (i.e. the comment and the action line):
vi /etc/udev/rules.d/60-schedulers.rules
# set deadline scheduler for non-rotating disks
ACTION=="add|change", KERNEL=="sd[a-z]", ATTR{queue/rotational}=="0", ATTR{queue/scheduler}="deadline"

Crucial M500 120GB mSATA Internal Solid State Drive
Backup and restore
Making a backup of your sd card is very easy under Linux. Warning: make sure that /dev/sdb is your sd card and not your harddrive - check by using df -h to see mounted partitions! Usually sda is your first harddrive. And do not swap if with of! Run as root or use sudo like below.
sudo dd if=/dev/sdb of=arch.iso bs=1M
The backup will be the same size as your entire sd card -in my case it was 8 GB.
Restore your image back to an sd card: - Again make sure that /dev/sdb is your sd card otherwise you may destroy your Linux drive.
sudo dd if=arch.iso of=/dev/sdb bs=1M

![[OLD MODEL] Crucial M500 120GB mSATA Internal Solid State Drive CT120M500SSD3](https://m.media-amazon.com/images/I/41PDup5RbXL._SL160_.jpg)


