- HubPages»
- Technology»
- Computers & Software»
- Computer Software
How to Defragment a Hard Drive: Using Windows to Your Advantage!

How Often Do You Defragment Your Hard Drive?
Automation: the bread and butter of the computer world
Welcome to the start of a series of hubs I plan to write as part of a beginner's guide to basic computer automation. As it turns out, computers are great at something humans are pretty mediocre at--doing many simple steps over and over again. In fact, most everything your computer does is, at its most fundamental level, millions and millions of tiny chores (called instructions) given to it by the CPU. So if your computer already does so many things automatically, wouldn't it be great if you could offload mundane maintenance tasks as well? In this tutorial, I'll show you how to make your computer defrag your hard drive without you ever needing to think about the task again!

What is Fragmentation, and What Good Does Defragmenting do?
If you've been using computers for a while, it is highly likely you have at least heard of the term defragmentation before, or as it is more commonly called, defragging your computer. But what is it, and why does it help speed up your computer?
A simple explanation is that your hard drive is not one tidy, singular piece of hardware. It may physically look like just a disk (if you've ever seen a drive outside of its cage, that is), but logically your computer views it in a more complicated way. A hard drive is often made of 3 or more individual disks, called platters, that add up capacity to make the 1-4+ Terabyte hard drive we have available today. Each of these platters is further divided into sectors, which are essentially imaginary boundary points on each platter that help your computer organize data on them. And here is the root of the problem of data fragmentation.
Every time you put something on your hard drive, which is called a write operation, the computer automatically picks a platter and sector to start magnetically assigning those 1's and 0's. However, if you are saving a big file to the drive, like say a movie or a video game file, the whole file will very likely not fit neatly into the chosen sector. So the computer puts as much of the information as it can in the sector, marks the start and end location, and then finds another sector or several more sectors to finish the write operation. Over time, after thousands of write operations, your data looks somewhat like a college dorm room in terms of organization.
This scattering of data over time is what is called fragmentation. The reason it causes your computer to perform more slowly over time is because data is read off of a platter somewhat like how an optical light reads a CD or even how old vinyl records are played. Except in the case of a hard drive, the head that reads the data is an incredibly lightweight and speedy piece of hardware. However, even thought he head is fast, it still takes time for the disk to rotate around to the correct sector for the head to read the data. If your data is scattered all over the drive, the head has to frantically bounce around to get all of the data. This is what causes drive slowdown.
Defragmentation essentially moves data around so that large files are sequentially located and not scattered all over the drive. Now when you load that game up, or watch a movie, the head has less distance to travel, and all the data is loaded faster. Kind of like picking up and organizing a messy room.

The Software, and Some Notes
OK, enough with the science lesson. Let's get down to the point of the article! There's some good news for those of you who want their computer to run as quickly and efficiently as possible; good defragmentation software is totally free, and getting the task automated is a piece of cake. Before we begin, however, I'll be making a few assumptions:
- You're using Windows 7 (or Vista). System maintenance is different on Linux and Mac OS X, so I'll be sticking with Windows in this guide.
- The software I'll be using for demonstration is Auslogics Disk Defrag (direct download link).This is totally free to use and download. Be warned though, as the usual free software caveats apply; be very careful when installing, as companies try to get you to install crapware from the install wizard. Don't just blindly click "next"!
- You're new to automating tasks in Windows. I'll walk through the process step by step, but won't get into overly technical details about why some of this works the way that it does. There are already great articles on this topic, and are beyond the scope of this hub!
- Special Note: If you have purchased a Ultrabook or Apple Laptop very recently, your computer may have what is called a Solid State Drive, or SSD. These never need to be defragmented, and in fact defragmentation can do slight harm to these special drives. If you know you have one, then you don't need to defragment, it's as simple as that. If you're not sure, Google search your desktop/laptop model and see if yours has one. Similarly, don't defrag things like flash drives or SD cards.
Alright, let's begin!

Writing the "Batch" File
The real reason automation is so great is that it lets you keep your computer in peak condition without you needing to constantly perform mundane tasks. You can make the tasks run whenever, as frequently as you like, and even have complicated requirements for running operations. For this tutorial, we'll start simply.
First, let's make the actual automation command file. This is called a batch file in Windows. While this may sound indimidating, don't worry! It is really just a text file that contains commands that the defrag software understands, that Windows handles in a special way. Let's write that file now. First, make a new folder somewhere to keep this file. You can name it "Automation", or "Steve", just so long as you know where it is and what's in it. Now, right click in this folder and scroll down to the "new" option in the context menu. A list will pop out from the "new" arrow, so scroll down to "Text Document" and click on that option. A new text document will appear inside the folder now, and its name will be highlighted in blue. Name it something like "Automatic Defrag" and press enter to save the name.
Now open up this file and enter the following information:
cd "C:\Program Files (x86)\Auslogics\Auslogics Disk Defrag"
cdefrag -o c:
It should be noted here that this command works fine only if you installed Auslogics Disk Defrag on your main hard drive, in the normal Windows folder for programs. You can find out where your program is installed in the following way:
- Open the start menu and type in "Auslogics". There should be a "Programs" section that pops up. The first program is almost certainly the defrag software. Right click on it and click on "Open file location."
- An Explorer window will pop open with all the contents of the software inside. Ignore the contents for now. Near the top of the window, you will see the general path to the software, something like "Computer --> Local Disk (C:) --> Program Files (x86) --> Auslogics --> Auslogics Disk Defrag" or something similar. Next to this path is a little folder icon. Right click this icon, and a file path should highlight in blue, something like "C:\Program Files (x86)\Auslogics\Auslogics Disk Defrag" or something similar. Right click on this blue text and select "Copy".
- Go back to the text file you just made and highlight the "C:\Program Files (x86)\Auslogics\Auslogics Disk Defrag" portion. Right click on this highlighted text and select "Paste". Voila! Now you know the file path is absolutely correct.
Save the text file you just made. In order to turn this in a batch file, we need to change the extension. Right click on the text file, click on "Properties", and in the text field on the general Tab that pops up, it should say something like "Auto Degrag.txt". Highlight the "txt" and type in "bat" in its place, then click OK. A warning will pop up, click "Yes" (we know what we're doing!). Now your file should have two little gears for its icon, indicating it is a batch file.
You have just written a basic program that tells the software to defragment your C: drive, using the "optimize" option. If you have more than 1 hard drive or partition, you can make a minor modification so all of the drives are defragmented. If you have, say, a C: and a D: drive, simple right click on your batch file, select "edit", and change the second line to the following:
cdefrag -o c: d:
That's it! We're almost done now. We just need to tell Windows when to do the defragging, and we'll be done.

Automating with Windows Task Scheduler
Now let's tell Windows how to run that batch file we just wrote. To do so, we'll use a built-in Windows automation utility, called Task Scheduler. Here's a step-by-step process to get this task automated:
- To open it up, click on the start menu, type "task" and press enter. Task Scheduler should pop up. Make the program fullscreen if necessary. When it opens, look on the leftmost pane of the program and click on "Task Scheduler Library." Now, click on the "Action" tab on the top of the window, then click on "Create Basic Task."
- A new window will pop up asking for a name and description for the task. Something simple will do. Naming it "Automatic Defrag" and leaving the description empty is fine. Click the "Next" button.
- Now you select the trigger, or in this case, how often you want the program to run. The program we wrote does the slow but thorough defrag, so it can be run less often. I personally run it once a week, which is a pretty reasonable frequency. Click "Weekly", then click "Next."
- Now you pick a starting date, along with a starting time. The time is personal preference, but generally, I like to set these tasks to run when I'm not using the computer at the same time. You can even set it to run in the early morning, so that your computer wakes up, defrags, and goes back to sleep. Note that this isn't a huge deal as this program will only run once a week. Next, set it to recur every "1 weeks" in the box and choose whichever day suits you best. Click "Next."
- The next section, titled "Action", wants to know what to do at the specified time. The default "start a program" is what you want, so leave it there and click "Next."
- Now you need to guide the computer to the batch file. You do remember where you saved it, right? Next to the text box, click "Browse" and navigate to the batch file. Double click on the batch file to input the path automatically, then click "Next."
- This is just a review of the task. Check the "Open the properties dialog" option, then click Finish.
- Optional: you probably want to be able to wake the computer from sleep to run this program, so click on the "Conditions" tab of the new window and check the "Wake the computer to run this task" option. Click OK.
- Time to test the program! To perform a test run, find the name of the task in the list of tasks in from of you, right click it, and click "Run." If you hear your hard drive churning away, it's working! As a more legitimate check option, look over at the "Last Run Result" column. What you want to see is "the operation completed successfully. (0x0)". The defrag might take a while, so if this column is empty, wait a bit and look again.
You're done! Now your computer will automatically perform a thorough defrag at the allotted time, without any intervention! You have now freed yourself to spend more time getting work done and less time looking at the small details.
These are the basic steps for performing any automation task. I plan on writing more beginner automation tutorials, so stay tuned! For those of you who did this for the first time ever, congrats on trying something new! Sometimes small things can fall through the cracks of an explanation, which I understand well, so if it didn't work for you, feel free to post in the comments and I'll try to help out as best as I can. And if everything worked great, let me know that too!
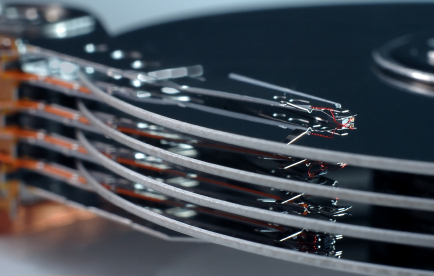
Watch a Defragmentation in Action!
See It In Action!
Someone opened their hard drive casing (a bad idea unless you don't want to use your drive for much longer!) to show what it looks like when a hide drive performs a defrag. What you're seeing is the hard drive head moving data around on the platter, as I talked about at the beginning of the article. Enjoy!
Related

Symptoms of Hard Disk Drive Failure and Data Protection Strategies
")
Fixing an IBM T43 Thinkpad which Hangs at Start-up and 2010 Error during Rebuild (In Vancouver)

How to Build an Awesome 386 Computer - Part 1: The Hardware

Surplus Auctions - How To Get A Cheap Used Laptop For Personal Use Or Re-Selling

Top 10 Easy Tips To Speed Up Windows XP


