- HubPages»
- Technology»
- Computers & Software»
- Computer How-Tos & Tutorials
Compaq Presario Laptop RAM Memory Upgrade
The simple steps to upgrade a Compaq Presario Notebook Computer
Most modern laptops lend themselves very readily to simple upgrades such as increasing the Random Access Memory, often referred to as RAM or DRAM.
The Compaq Presario Notebook is no exception to this statement and provided you select the right memory that is compatible to the system and hardware you are using, your notebook upgrade can be carried out in a few simple steps and should take no longer than about 10 minutes.
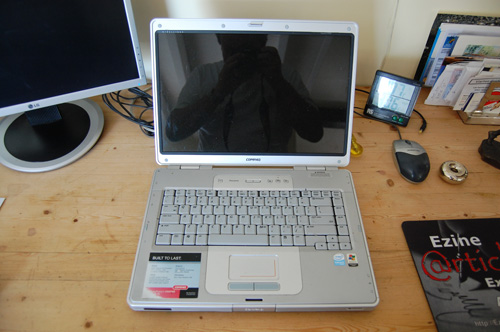
The model I show being upgraded here is a V5207NR
First things first, the memory that is compatible with this particular model for its maximum capacity comes in the form of 2 off 1GB cards in a 200-pin SODIMM package. In other words the maximum you can upgrade to with this PC is 2GB of RAM.
You don't have to upgrade to the full 2GB option because with this model if you use a compatible memory card to the spec below you can mix different values, my recommendation would be however that you just go for the best specification you can, otherwise you will just find yourself doing a further upgrade a few months down the line.
The full specification for the 1GB card is: -
DDR2 PC2-5300 • CL=5 • Unbuffered • NON-ECC • DDR2-667 • 1.8V • 128Meg x 64
The 2GB kit is also available from Amazon UK although Amazon.com will ship to the UK and make the charge in GBPs.
This memory set should be compatible with all the V5****** series of notebooks, but it is worth double checking.
*If you are upgrading a different model or make you should check the specifics for that PC, see below.
Optimum memory cards for a Compaq Presario V5207NR
Adding Laptop Computer Memory
Upgrade Procedure
Removing all power
First make sure that you unplug the A/C adapter from your PC and put it to one side.
To remove all power to the PC you will also need to turn it over and remove the battery. Push the slide latch across to the release position, you can then lift the battery module out in a hinge motion lifting the edge nearest the slide latch first. Place the battery to one side.
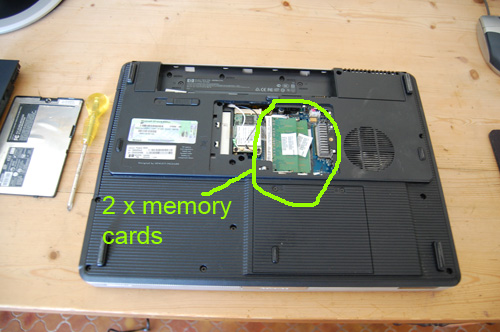
Removing the card cover
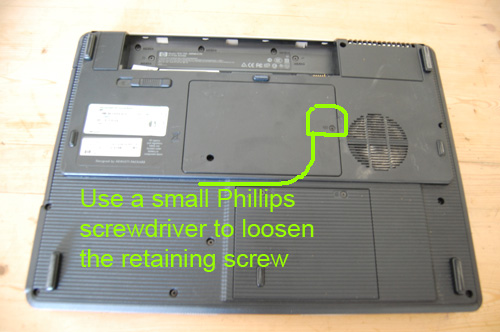
For the Presario all you need to do is undo a single screw as shown using a small Phillips screwdriver, the cover can then be carefully lifted up from the screw end. There are small lugs down the side of the cover that will offer a little resistance, just carefully ease the cover up until the lugs unclip, do this slowly and gently to avoid damage, they are quite robust so should release without too much trouble.
Removing and replacing the cards
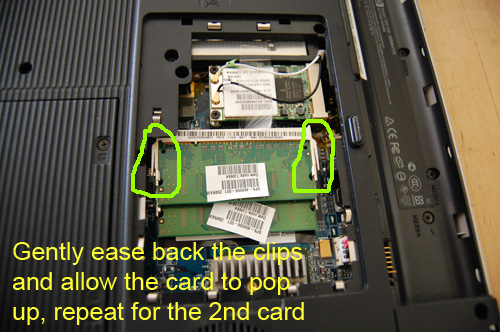
Once the cover is removed you will be able to see the existing memory boards, they are secured at the edges with small spring clips. Simply ease these clips away from each end of the board simultaneously until the board pops up.
Note the orientation of the board so that you can orient the new board the same way and then pull it out of its slot. Repeat the process for the 2nd board if you are changing both.
Check the new boards against the old to make sure they are physically identical along the connecting edge. If they are not then you have bought the wrong product.
The new boards can now be fitted by reversing the process, check the orientation and note the position of the small slot in the connecting edge of the board, this will line up with a feature in the board slot to ensure you have the board the right way around.
Push the board into the slot at the same angle as you removed the old one and make sure it is fully home by applying gentle pressure, obviously for this model you need to fit the bottom board first.
When you are happy it is fully home then simply, but gently, press the edges of the board to sit the board back flat, listen for the click of the end clips as they pop into place, this indicates the board is fully home. Have a look to make sure the clips are properly in place and then fit the 2nd board using the same method.
Replacing the cover and battery
Now all you need to do is replace the cover, hook the end opposite the screw into its location slots and ease the cover down, again there will be a little bit of resistance from the side lugs but just gently press them into place and when the cover is virtually flat and clipped, tighten the screw and nip it up.
Replace the battery module and you are ready to go.
Power up and check the amount of RAM you have
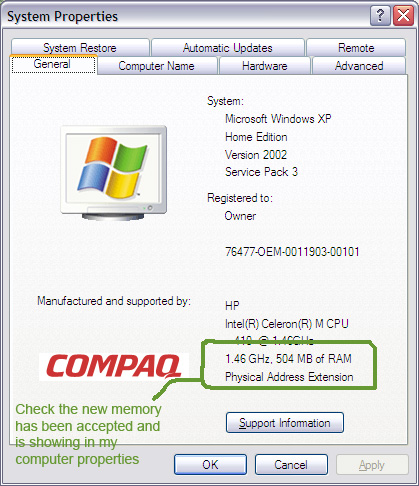
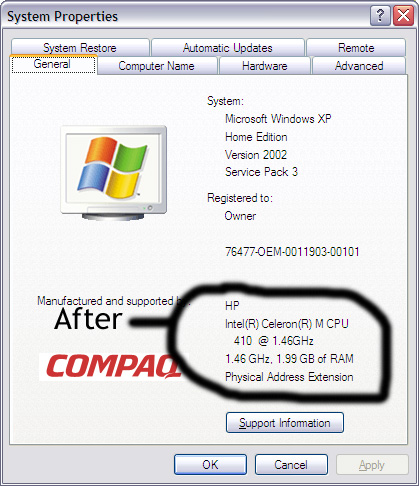
Plug your A/C adapter back in and switch on the PC, it should all boot up with no problems, once it is up and running, click on 'Start' then 'My Computer'. Right click in the panel and then click on 'properties' at the bottom of the pop up menu. Look to see how much RAM you have, it should be equivalent to the amount you just installed or at least somewhere close, it may show a little less as some memory is pre-allocated.
That should be it, a fairly straight forward process once you have the correct and compatible memory, as you can see from the before and after comparison.
You may need a PC memory finder
If you are unsure of the type of memory you need for your particular PC to do an upgrade, you may need to refer to a specialist that can tell you exactly what you need to upgrade the computer memory on your make and model of PC.
Bear in mind that there are some limitations within your computer hardware that will limit the amount of memory you need and there will be further limitations as a result of the Operating System you are using, for example a 32 bit OS like Windows XP will only recognise and register either 3GB or 3.5GB of memory. So going for the most memory you can fit into the available slots may not actually get you the amount of memory you thought you were going to get.
Once you have found the specification you need it is worth checking out what you can get it for on Amazon, I found the prices were actually often better than the specialist suppliers. Just click on the Amazon link for Laptop Memory to take you to the correct page.


