Complete Joomla Tutorial for Beginners

Basic Requirements
Joomla is an easy-to-use content-management system with immense flexibility and options. It has a special user-friendly interface, which makes it easy to build Web sites and powerful online applications.
Joomla was created in 2005 by some open-source developers. With facilities like gorgeous templates and friendly community, Joomla has become a popular PHP based platform for creating websites. It has more than 200000 users and contributors all over the world. In this tutorial, we will discuss how to make an awesome Joomla website easily.
There are three requirements for installing Joomla.
- Web Hosting Requirement
- FTP software
- Zip software
First, we need to create an SQL database in order to install Joomla on to it. Joomla stores its files in a database. We need a web server to store these. It is better to use a Joomla-friendly web host, which have a wide range of Joomla experiences. There are two types of servers where we can store files. Though most Joomla websites run on Linux servers, we can use windows servers as well. We are going to focus on Linux hosting using Apache web servers. However, if you are thinking of using windows servers, you still might find this tutorial useful for you.
There are some technical requirements for installing Joomla 3.0 on servers. You do not need to understand this, just ask your provider if their hosting meet these technical requirements.
Shortly,
1. In Linus hosting, we will need-
- Apache 2
- PHP 5.3.1
- MySQL 5.1
2. In Windows hosting, we will need-
- IIS 7
- PHP 5.3.1
- MySQL 5.1 or MSSQL 10.50.1600.1
There are many ways we can install Joomla. Either, we can use software, or can do it manually. Many hosting companies provide support for quick installation. It is an online hosting panel provided by the companies. Third-party software like Softaculous, Simple script and Fantastico are normally used there. Usually installing Joomla is much easier and time saving by using these host panel features.
The other way to install Joomla is to do it manually. This requires more work and some additional software. FTP software is used for data uploading and Zip software for extracting Joomla. We will discuss more about quick installation and standard installation in the later part of our tutorial.
Installation Process
Quick Installation
In quick installation, we are going to use Softaculous to install Joomla in a c-panel. This installation will require a hosting with cPanel facility. This installation is very quick and easy to go.
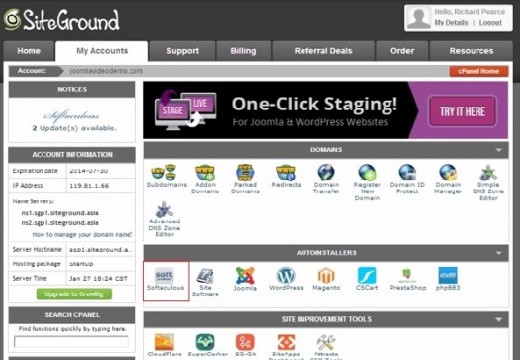
Locating cPanel
First, we need to log into our hosting using username and password and then access our cPanel. After that, we will see a screen with lots of features. Scroll down, find the auto installer, and then click on to Softaculous icon.
Joomla Installation process
We will see many options there. Find the Joomla button and click onto it. Then click on “Install” button.
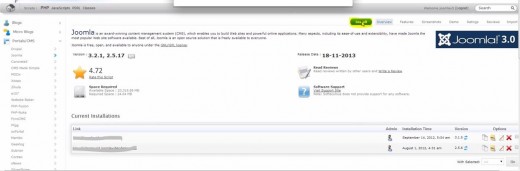
There are some options like, versions of Joomla, Choose protocol, Choose domain, Database name, etc. We will select Joomla 3.2.1 version and choose a folder for new application. If we do not want to create it in a new folder, we can always leave it empty.

Now we need to fill some basic information like administrative username, password and e-mail address. We will give a correct email address so that we can regain access after forgetting passwords. Filling each of the information boxes, we will proceed to install.
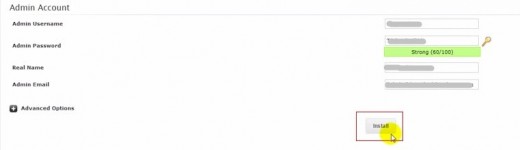
Joomla 3.2.1 will be installed in a few seconds. Now we can open our browser tab, navigate our web address and view a standard Joomla website that contains sample data.
Manual Installation
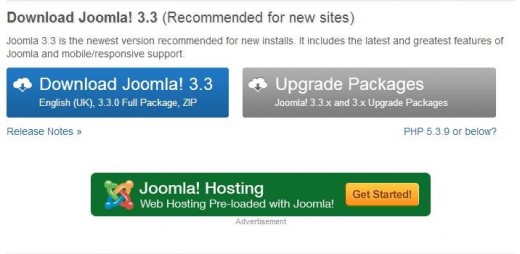
STEP 1 - Get File from Joomla
This is the standard installation of Joomla. We need to download Joomla installation package from the official Joomla website “Joomla.org”. Click the Download Joomla and save it your located directory. Once we have downloaded it, we need zip software to extract the files.
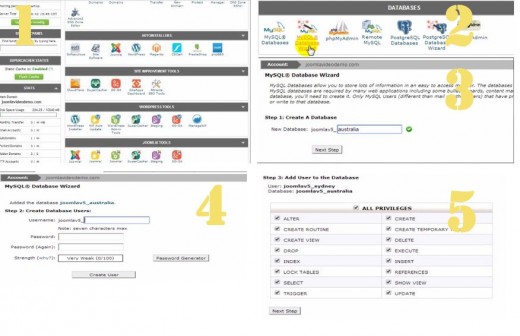
STEP 2 - Create a Database
Second step is to create a database into the web host. We do not need to understand how the database works; we are just going to use it by following the simple guide. To create a database, we need to specify a database name, a database user and for the password for the user.
1. Log in to the control panel by using host information.
2. Click the MySQL database wizard in the control panel.
3. Give a name to the database and click next
4. Enter a username and password to the database and click create user button.
5. On the next page, leave all the boxes checked and proceed to the next step button.
That’s it! We have completed Joomla installation. Now we have a complete Joomla website fully functional!
STEP 3 - Upload and Extract Joomla File
We need to upload the Joomla files to our web server. We will see the actual steps of uploading file, using cPanel.
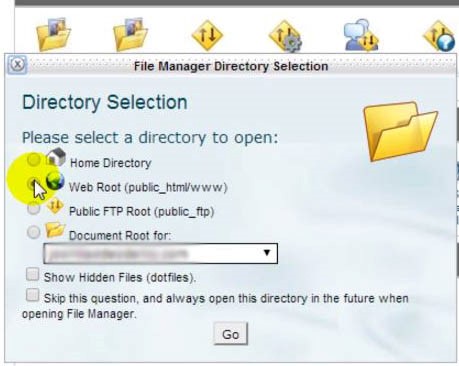
1. We will log into the control panel and look for the file manager in the file section. Click the file manager and choose the default option “web root."
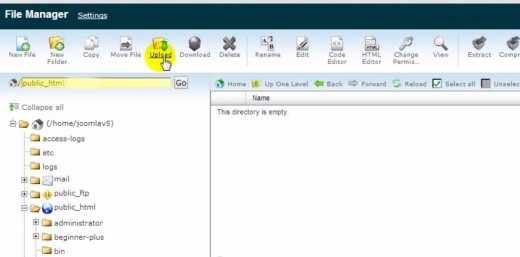
1. We will see our hosting account where website files are stored. In cPanel, there is a folder name public_html. This is where Joomla file will be uploaded. We can create sub folders in that directory as well by just clicking on the new folder at the top. Click on the right folder where you want to upload your files. Click the upload button, navigate the downloaded Joomla files, and upload to that directory.
1. After finishing the upload, click the backlink. We will see the filename of our Joomla package. Click the file name and extract it using the extract button towards the top. This process will take some time.
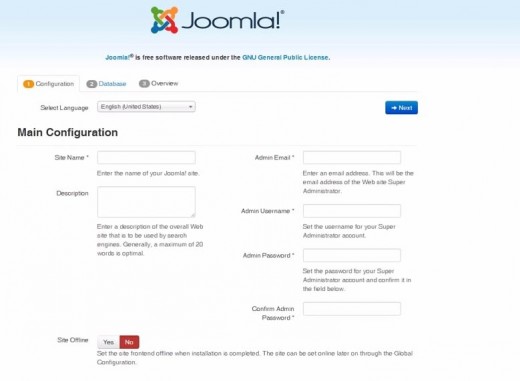
STEP 4 – Go Through the Installation
If we have uploaded our installation package correctly, we will see the installation page by navigating domain or subdomain address. Enter Site name, Description, Admin email and Admin password to the blank area appropriately. Once we have filled all the areas, we can click the next button to move on to the database section.
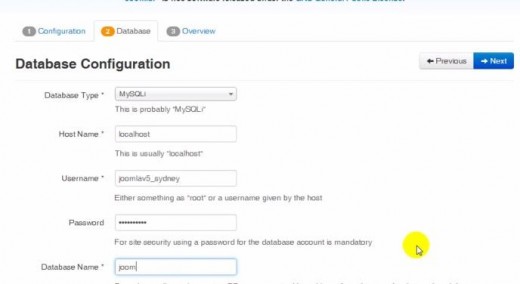
In the database section, we will see information boxes like Database type, Database name, Username, Host name and Password. We will leave database type MySQLi and Host name as Localhost, and fill the form appropriately. Click the next button to go to the last page of the Joomla installation.
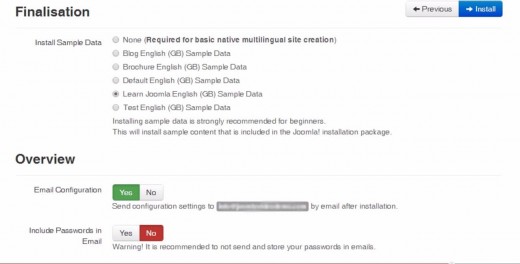
Now we are on the last page of the Joomla installation. Here we can specify some simple things. We will select learn Joomla button and leave Email configuration to yes. We will leave including password in Email to No.
The next part of this page shows some checks before installation. If we see our server meet all the Joomla requirements, then we can proceed.

After checking recommended settings, if everything goes well, we can hit the install button and wait for the process to complete. If everything went properly, we will see a confirmation page. However, we need to click on “Remove installation folder button” for the security reason.

That’s it! We have completed Joomla installation. Now we have a complete Joomla website fully functional.
Special Thanks to my dear friend, Asif Monir, for his valuable contribution!
© 2014 litsabd
Related

How to Install NComputing X550 Card, XD2 Thin Client and vSpace Virtualization Software

How to Oil Paint: Step-by-Step Tutorial for Beginners

How to Set Up Remote Desktop Services in Windows Server 2016

Setting Up a Remote Desktop Gateway in Windows Server 2016

How-To Install Ubuntu, Steam & TF2 under VirtualBox on Windows to get Linux Tux Promo

")
