How to create Bootstrap login template

This article shows how to create a responsive login template using Bootstrap front-end framework. Bootstrap web front-end development framework cut down lots of UI development time. Once you build a web template using bootstrap framework it will work on all the devices such as desktop, tablets, mobile devices etc. To get started with bootstrap, we need to download Twitter Bootstrap and extract it into a folder or use there starter templates.
Setting up a basic bootstrap web page template
Next step is to create a web page using the default template given in the Bootstrap site. To create the HTML page, you can use any html code editor. In my case I use Visual Studio (you can download Visual Studio Express edition for free)
Now your webpage code will look like as follows;
<!DOCTYPE html>
<html lang="en">
<head>
    <meta charset="utf-8">
    <meta http-equiv="X-UA-Compatible" content="IE=edge">
    <meta name="viewport" content="width=device-width, initial-scale=1">
    <title>Bootstrap 101 Template</title>
    <!-- Bootstrap -->
    <link href="CSS/bootstrap.min.CSS" rel="stylesheet">
    <!-- HTML5 Shim and Respond.js IE8 support of HTML5 elements and media queries -->
    <!-- WARNING: Respond.js doesn't work if you view the page via file:// -->
    <!--[if lt IE 9]>
      <script src="https://oss.maxcdn.com/libs/html5shiv/3.7.0/html5shiv.js"></script>
      <script src="https://oss.maxcdn.com/libs/respond.js/1.4.2/respond.min.js"></script>
    <![endif]-->
</head>
<body>
    <h1>
        Hello, World</h1>
    <!-- jQuery (necessary for Bootstrap's JavaScript plugins) -->
    <script src="https://ajax.googleapis.com/ajax/libs/jquery/1.11.0/jquery.min.js"></script>
    <!-- Include all compiled plugins (below), or include individual files as needed -->
    <script src="js/bootstrap.min.js"></script>
</body>
</html>
When you open your web page in the browser you will see a screen displaying Hello, World.
Get started with bootstrap responsive login template
Now change the default code Hello, World into Login Form template. Before you build any Bootstrap web design templates you need to wrap your entire html code that comes inside the body tag in a div with a CSS class, named “container”. This is the main container that keeps your layout centered and responsive in the browser. Bootstrap uses a Grid System to build layouts. You can learn more about the Grid System here. Now you are ready to use any bootstrap controls in your web page. First, I’m going to use the grid system to create the basic layout for my login form template. Add the below mentioned code into your page.
<div class="container">
        <div class="row">
            <div class="col-md-6">

            </div>
        </div>
    </div>
I have chosen “col-md-6”, since I’m going to use 50% of the page size.
As we are going to build a Login Form you can refer to all the form controls and support given by bootstrap framework here.
Adding a bootstrap panel
Now, let’s create a box to put all the login controls using bootstrap panels. Bootstrap panels are very handy, when you want to group an area of your web page. We have seen how a login interface looks like. It comes with a nice box around it. So, let’s create the same. Here, I’m using a panel with header footer and body. Now your panel code will look as follows;
<div class="container">
        <div class="row">
            <div class="col-md-6">
                <div class="panel panel-default">
                    <div class="panel-heading">
                        <h4 class="panel-title">
                            Heading here</h4>
                    </div>
                    <div class="panel-body">
                    Login Controls here
                    </div>
                    <div class="panel-footer">
                        Footer here</div>
                </div>
            </div>
        </div>
    </div>
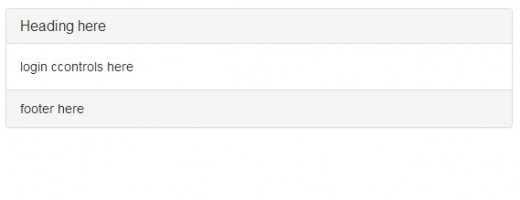
Save and refresh the page, you will get the bootstrap panel which you can see below;
Bootstrap empty panel
Adding bootstrap form control user name
Let’s add the form controls one by one. First, I’m going to add the user name field. The user name field can be added as follows;
<form class="form-horizontal" role="form">
   <div class="form-group">
      <label for="inputUsername" class="col-md-4 control-label">
                                User Name</label>
            <div class="col-md-8">
                <input type="text" class="form-control" id="inputUsername" placeholder="Enter user name...">
             </div>
         </div>
    </form>
Let’s see into the details of the code above. Any HTML form begins with a form tag. In this example our form controls will spread across horizontally, so we have to use the bootstrap CSS class “form-horizontal”
Bootstrap uses a div tag with a CSS class, called “form-group” to wrap the input controls and the labels. This is similar to grouping controls into a container and it manages the default padding which you can change any time by adding an overriding class. If you observe the label tag within the “form-group” div, it contains two CSS classes called “control-label” and “col-md-4”. These two classes control the label layout. The “control-label” CSS class is responsible for label styles and “col-md-04” responsible for size and padding.
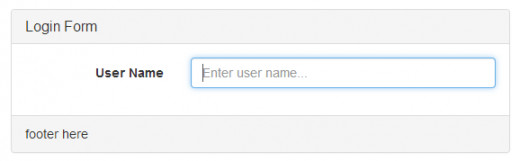
When we consider the user name input control it consists of only the CSS class called “form-control”. It controls all the styles of input text box, but the input control is wrapped in a div tag with a CSS class called “col-md-8”. This wrapping div control the size of the input control. According to the bootstrap grid system you can have maximum 12 columns in a row. So, you can use any combination to split sections in layout. Here, we use column 4 and column 8 to size the label and input text. Once you refresh you page, the resulting output will look like as follows;
Bootstrap Login from with user name
Now we can add the password section into the login form. For this, you can add the following code into your web page.
<div class="form-group">
       <label for="inputPassword3" class="col-md-4 control-label">
                                Password</label>
             <div class="col-md-8">
               <input type="password" class="form-control" id="inputPassword3" placeholder="Enter Password....">
              </div>
 </div>
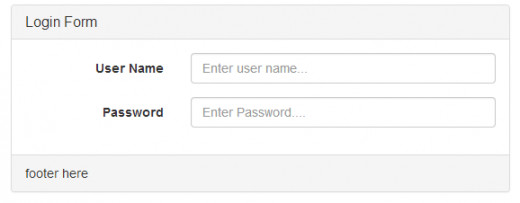
Adding bootstrap form control password
There is not much difference compared to user name control coding and password control coding in bootstrap. It is same as the above code, but you need to maintain the consistency with column CSS classes. Save the page and open it in the browser and you will the get following output;
Login form with user name and password
Adding Rember me
Now, we need to add a check box that says remember me. You can do this with the following code snippet;
<div class="form-group">
      <div class="col-md-offset-4 col-sm-8">
          <div class="checkbox">
              <label>
                   <input type="checkbox">
                         Remember me
                   </label>
          </div>
      </div>
 </div>
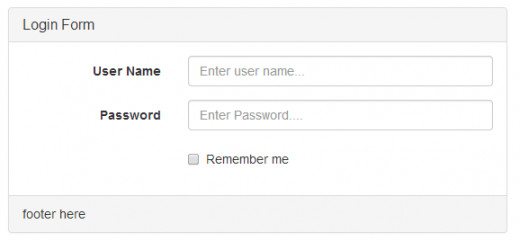
This form group has a difference. It does not have a text label in front of the input control, instead it only consists a radio button wrapped in a label control. Since, we don’t have a front label to make the gaps like the other controls above, I have used bootstrap offset class to create the relevant gap. Bootstrap offset classes are used to create gaps between html controls based on the width percentage value given to it. Our previous controls used “col-md-4” as the label control size, therefore to keep the same gap we use bootstrap CSS class “col-md-offset-4”. When you refresh the output it will look like as follows;
With remember me
Adding buttons
Now it is time to include login and cancel buttons. You can use the following code snippet to include buttons to your login form using bootstrap;
<div class="form-group">
      <div class="col-md-offset-4 col-md-8">
           <button type="submit" class="btn btn-default">Login</button>
           <button type="submit" class="btn btn-default">Cancel</button>
      </div>
</div>
If you carefully look at the code, you can notice that the button group control div uses the same offset CSS class (“col-md-offset-4”) to keep the left margins because there is no label property and the same CSS column class is used to keep the group size match with other rows.
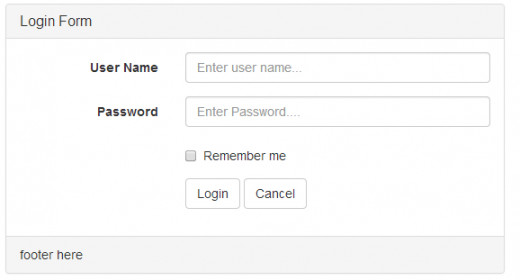
As you can see there are two new buttons which use two CSS classes. The bootstrap CSS class “btn” is the base CSS class and the other bootstrap CSS class “btn-default” gives the look and feel effects such as color, text border etc. Now save it and refresh the page and you will get the output as follows;
Adding forgot password link
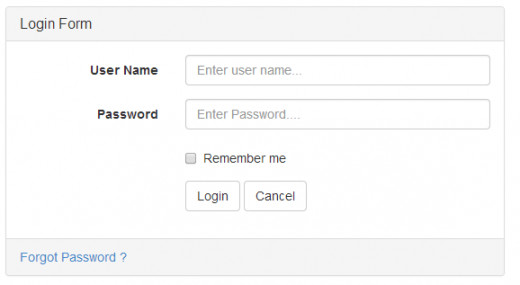
Now, the only missing part is forgot password link. We can place it in the footer section of the login box. You can add a stylish link just placing the following code in the footer section
<div class="panel-footer">
    <a href="#" title="Forgot Password ?">Forgot Password ?</a>
</div>
Here you can notice that we do not use any styles but bootstrap applies its default styles. If you want to change it, you can do it by adding a CSS class and overriding each style. So your code output will look like as follows;
Now you have complete responsive login form. You can take a look at the live version by clicking the below link
Bootstrap Responsive Login Form
© 2014 wecode


 for Website Building")
