DIY WiFi Range Extender using DD-WRT
Do-It-Yourself WiFi signal extender
In this How To article, we will discuss and instruct you in the process of using your old WiFi router (or a new one) to extend your wireless internet connection using the Linux based freeware DD-WRT.
What you will need:
- An extra wireless router
- An ethernet cable
- An internet connection
- The ability to follow instructions well :)
The folks over at www.dd-wrt.com have created Linux based firmware upgrades for many models of wireless routers that can be placed around your home or office to extend your WiFi connection beyond the range of your primary wireless base.
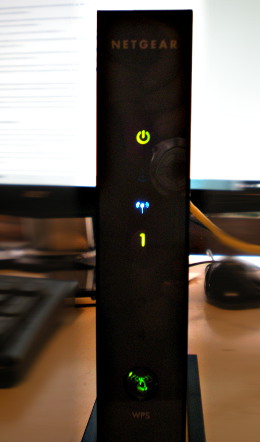
I will be using a Netgear WNR2000 v.3 for this How To.
WiFi Extender
Why Extend your WiFi Range?
There are many reasons you may want to extend your wireless connection range in your home or office.
Perhaps you've moved a computer to your back room, or upstairs, and do not wish to run cables all the way from your router, or perhaps your signal just isn't strong enough to reach your back yard or porch, and you'd love to look at pictures of kitties being cute while relaxing in those areas with your laptop.
The installation of a bunch of metal file cabinets or the rearranging of your office may have disrupted the wireless signal at your office.
Or maybe you just like to have as strong of a signal as you can wherever you are in your home or office.
Not only will this guide enable you to strengthen your Wi-Fi signal throughout the area in need, it will also allow ethernet cables to be connected directly between the DIY range extender and a computer that does not have wireless capabilities, so you could move a non Wi-Fi capable desktop to an area close to the new extender, but as far away as the new extender can get a reliable signal from first wireless access point.
Preempt Issues!
Research your Router!
Head on over to DD-WRT router database page and find if your router is supported.
The most important instruction to follow in this process is to do research on the router you want to turn into a range extender.
The second most important instruction to follow in this process is to do research on the router you want to turn into a range extender.
The third most important is.. you guessed it, research. RESEARCH!
I chose to use a Netgear WNR2000 v.3, which is listed as supported by the newest version, v24 Pre SP2 [Beta] Build: 21061.
However, a quick search on the WRT forums reveals that the flash file is too large to fit on the 4MB flash memory of the WNR-2000 v.3.
The person who discovered this then listed that version 18777 of the DD-WRT flash is the latest one that will work on the router, and supplied a link to that particular build.
The above scenario is the perfect example as to the importance of doing research on your particular router before performing the installation of DD-WRT on it.
Different router brands or different chipsets may require slightly different methods for installation of the software to your router, so browse the forums for your brand, model, and/or chipset and make sure you have a clear outline of the process involved.
Preparing to flash your Router
Once you've established that your router is supported, and you've found and solved any discrepancies between what is listed as 'officially' supported and what is actually supported, it's time to get your software and hardware together to flash and configure your router into a Wi-Fi range extender.
First, I recommend that you have two computers available to you, one for flashing the router, the other to stay online to easily view instructions, troubleshooting, and keeping track of your process.
There are two versions of each original .img files, one will have the letters "NA" in it, the other "WW". NA denotes North American models, and WW denotes everywhere else in the world. Be sure to download the correct one.
There is only one version of the .bin file, however.
Remember, the computer you use to flash your router with should be completely offline, with Wi-Fi disabled, connected with an ethernet cable only to the router you are converting to an extender, with firewalls and antivirus programs disabled.
The checklist for the computer with which you are flashing the router:
- Has the flash files and needed installation software in an easy-to-get-to location
- Wi-Fi disabled
- Firewall disabled
- Antivirus disabled
- Connected by ethernet (CAT5 cable) to the router that is being flashed
And don't forget to have read and understood all the instructions, from start to finish, for flashing your router.
Reset to Factory Default
Flashing your Router with DD-WRT - Step One
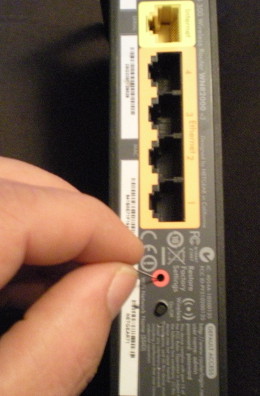
To begin, first reset the router to factory defaults.
There is a reset button on routers that often require a pin or other small object to push.
Some routers require the the power to be on for the reset, some require it to be off.
Consult the manual or manufacturers website to determine the correct way to reset your router to factory defaults.
Hold the button down for 30 seconds to reset the router.
After resetting the device, plug in the power (if required), turn on the device (if required), and connect the router to the computer with which you will be performing the conversion to DD-WRT with an ethernet cable between one of the ports on the router and your ethernet jack on the computer.
It is a good idea to recycle the power one more time before moving on to the next step. If your device has a power button, use it to turn off the router, if it does not, unplug the power cord. Wait a minute or two, then turn the router back on.
Do not connect to the port labeled "internet" or similar on the router. That is the port that would be connected to a modem or another router, not a workstation or laptop. It is usually by itself, or has a different color surrounding it, or some other indication that it is not one of the ports for normal workstation connection.
Flashing your router with DD-WRT - Step 2
With your router now on and connected to the computer, make sure that:
- Wi-Fi is disabled
- You have assigned a static IP to the ethernet connection that follows the subnet scheme of your router (i.e., if your routers I.P. address is 192.168.1.1, assign the address of your controller to 192.168.1.9 or similar.)
- You have disabled your firewall and antivirus
- Your files for flashing to DD-WRT are available to you on that computer
Log on to your router by opening a browser (DD-WRT recommends Internet Explorer, but many have used Firefox, Chrome and Safari without issue) and type the routers I.P. address into the address bar. In my case, the I.P. address for the router is 192.168.1.1.
You should be greeted with a login dialogue box. Since you've reset the router, the device has reverted back to factory default user name and password. Consult your manual or the manufacturers website to determine the default username and password. For my router, the username was "admin" and the password was, simply, "password".
After entering the username and password, you will be taken to a webpage that is the control panel for your router.
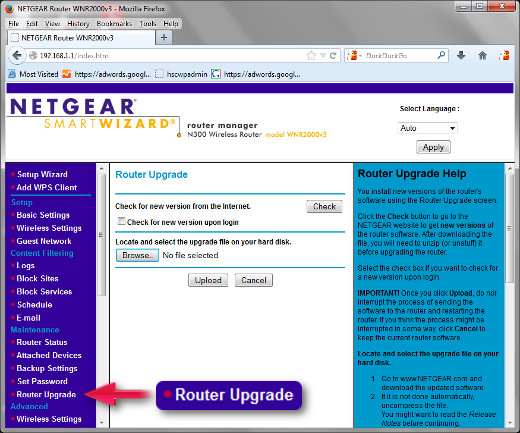
Stock Netgear Control Panel
Flashing your Router with DD-WRT - Step 3
Depending on your router model and it's firmware version, the location of the firmware upgrade labeling and location may be in various places.
For me, it was on the left hand side labeled "Router Upgrade".
Clicking on that brought me to a section where I choose the first file to flash this router with.
I simply clicked the "browse" button, located the .img file, selected it and then clicked the "upload" button.
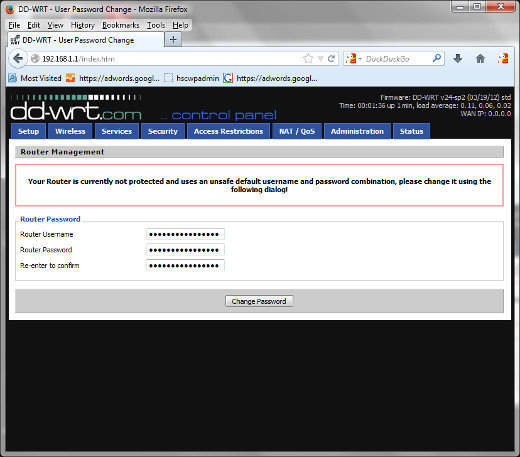
In a few minutes, the first step was finished and I was greeted with the DD-WRT (build 18777) control panel screen.
Your first page upon the router restarting itself after the first firmware installation will ask you to change the default username and password.
It is very important that the upgrade process is not interrupted. Do not turn off either the computer or the router while the process is happening. Do not unplug the cable between the devices while the process is underway. Do nothing to interrupt the upgrade process.
Now that we've got the initial firmware installed, we're almost ready to move onto the next step.
Do NOT skip the 30/30/30 hard reset outlined at the beginning of the next step.
After the first Firmware Update
Flashing your Router with DD-WRT - Step 4
With the first flash sequence finished, it's now time to do what is called a 30/30/30 reset.
Please refer to the Wiki for the proper execution of the 30/30/30 reset.
After you've done the 30/30/30 reset, cycle the power (turn off, then back on) your router.
Now is the time to do the final flash. You've already flashed once with the .img file, now it's time to flash with the .bin file you downloaded at the same time.
Log back into your router using the routers I.P. address in your browsers address bar.
You will be asked again to change the default username and password to ones of your choosing.
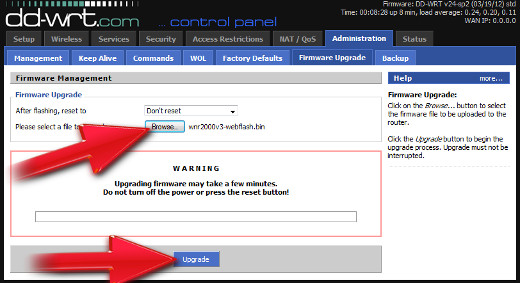
Complete this, then in the new control panel, click the "Administration" tab. Enter the username and password you just created, then click on the "Firmware Upgrade" tab that appears directly beneath that.
Click the "Browse" button and navigate to the .bin file that you downloaded from the dd-wrt site.
Once it's selected, click the "Upgrade" button, and let the router upgrade to the new firmware.
See the 3 images below for location of the buttons.
Upgrading the Firmware to it's Final Flash

Continuing to install the 2nd Firmware Update

The Final Steps to Updating the Firmware
Client Mode or Repeater?
Will you be using a DD-WRT modified router as a Wireless Repeater or in Client Mode?
The Final Flash is Done
To reiterate:
It is very important that the upgrade process is not interrupted. Do not turn off either the computer or the router while the process is happening. Do not unplug the cable between the devices while the process is underway. Do nothing to interrupt the upgrade process.
Allow the upgrade to complete, and wait a few minutes after it's done just to be on the safe side.
If the router did not reset itself after this period of time, go ahead and power cycle the now-updated router.
After the router is back up, reconnect to the router, at which time you will be required to enter a username and password once again.
Now it's time to setup the router as either a client or repeater.
From the website:
"Repeater Bridge
A wireless bridge connects two LAN segments with a wireless link. The two segments are in the same subnet and look like two ethernet switches connected by a cable to all computers on the subnet. Since the computers are on the same subnet, broadcasts reach all machines. DHCP clients in one segment can get their addresses from a DHCP server in the other segment."
"Client Mode
A router in Client Mode connects to another wireless Access Point (the host router). It uses its wireless connection as the WAN interface, and shares the internet connection only to the LAN ports. It is not seen as an access point by laptops or other computers scanning for AP's and does not accept wireless connections from client devices. The AP is not required to be running DD-WRT firmware."
My requirements are for "Client Mode." It's up to you to decide which mode best suits your needs.
Rather than copy and paste the instructions for configuring your router in Client Mode, head on over to the official webpage and follow the instructions implicitly.
If you'd like to set up your newly empowered router as a repeater, head over to the official webpage with those instructions.
I should note that the instructions for repeater mode are for Broadcom and Linksys routers. I do not know if other router support this mode, though I may attempt it on this Netgear and report back.
Results and Final Thoughts
After setting up my 'new' router in client mode, I ran a few speed tests on two of my computers, a laptop with intel Wi-Fi and an intel NIC, and a workstation with a Netgear USB Wi-Fi dongle and a Broadcom NIC.
Latency (the amount of time it takes for a signal to go somewhere and then return) was unchanged on both machines, whether plugged into the ethernet cable to the the new router, or connected wirelessly to the main wireless cable modem/router.
Oddly, download speeds increased some 15% over both the Netgear USB dongle and the intel Wi-fi adapter when attached to the DD-WRT equipped Netgear router with an ethernet cable.
I ran the tests numerous times just to make sure it wasn't an anomaly, but the results were consistently higher using the new setup for download speeds.
I must reiterate, that should you decide to flash a router with DD-WRT, to do complete and thorough research on your model before attempting this, as it is quite easy to ruin the router in question if everything is not done just so.

