Designing a Home Theater - Step 2 - Choosing a Projector Screen

During the design of my movie theater there was a whole lotta research and many choices that needed to be made.
Now that I had chosen my projector, the second choice in my movie theater design was the projector screen.
If you missed the first article on choosing the projector, here it is:
Choosing A Projector
- Designing A Home Theater Step 1 - Choosing A Projector
I recently took on the project of designing and building my home theater and discovered that it took a lot of research to do. I decided to share what I did in the hopes of helping others.

What I Was Looking For In A Projector Screen
Honestly, The projector screen in my head wasn't as important initially.
After doing a little research I soon realized that the projector screen has a lot to do with how crisp the picture is going to be. Like I mentioned in the article about the projector, the crispness is something I was really looking for.
My impression of projectors has always been a very washed out image that was hard to see unless the room was completely dark. I really wanted to minimize that effect as much as possible with my setup.
Since my movie theater has windows ambient light was going to be some sort of factor, and I expected that I would sometimes want to watch TV with the lights on.
Little did I know that choosing the right projector screen would have a big inpact in crispness.
The Different Types Of Projector Screens
If you've done any sort of research in projector screens, then you know there are a ton of choices when it comes to projector screens.
Aspect Ratio
There are two basic aspect ratios for screens 4:3 and 16:9. The easy way to think about it is that 4:3 is an old TV format (more like a square) and 16:9 is the new flat screen TV format (a long rectangular shape).
No brainer for me, I wanted 16:9 since that is kind of the new standard in our days.
Retractable or Fixed Frame
There are projector screens that you can pull down, similar to what you find in school. The other option is a fixed frame projector screen. In my case the room is a dedicated movie theater so there was no need for my screen to retract.
They say the picture quality is better on a fixed frame because there is much less movement.
The Screen Color - White, Gray Or Black
This was something I never thought of or heard about. I've always seen Projector screens in white, apparently they come in gray and black too.
I didn't understand the differences at first but after a little research it made perfect sense.
the projector can not project black so by having a darker screen you essentially increase the contrast ratio (the difference between the whitest whites and the blackest blacks on the screen).
Front Lit Or Back Lit Screens
If you have the space you can have a back lit screen, meaning that the projector is behind the screen.
In my case I wanted to use all the real estate I had for the movie theater so I stuck to a front lit screen.
Edged or Edgeless
There are screens with a border around it giving it a more traditional look, or there are screens that are edgeless - meaning the picture can go all the way to the edge of the screen.
When I started looking at screens this wasn't much of a concern for me. I had seen edged and edgeless screens that looked great.
Acoustic Projection Screen or Not?
Now this is something I may have chosen if I had more space to put speakers behind the screen. The acoustic screen allows sound to pass through it, that way the center speaker and left and right surround sound speakers can be placed behind the screen.
It would have made for a really nice look, but since ambient light was more of a concern for me than placing the speakers behind the screen I decided to focus on a screen that would work will with ambient light.
What Screen Size?
This was a bit of a tough one. I wanted the biggest screen I could fit on my wall, so I was limited in screen width by the width of the wall minus the width of the left and right surround sound speakers.
I was limited in height by the height of the wall minus space on top for the infrared repeater, minus the height required to see the bottom of the screen from the back row.
Since I had already figured out what my projector was going to be I could figure out the screen size using this amazingly helpful calculation tool.
Screen Size Calculator
- Projector Calculator - Screen Size Calculator - Distance Calculator
Optimize your next projecting project with ProjectorScreen viewing distance, projector and screen size calculators. Contact us for advanced help!
Since I knew the model projector it helped not only determine the size of my screen, it also helped me figure out where on the ceiling my projector should be mounted.
Using the tool I was able to decide on the 135" screen and that the projector was going to be 178" away from the screen wall.
The Best Looking Projector Screen
The first non-white screen I came across was the Black Diamond screens. Holy cow it looked sexy!
Basically when the projector is off you have a black screen on your wall, like a huge flat screen. This is definitely the screen I would have gone with if price was no object - for me though it was.
The black diamond screen would have cost me more than the Epson 5040UB. Way too much for me to spend.
Now I Looked For The Best For My Money
Since the black diamond did not fit into my budget at all, I needed to find something close to it that fit into my budget.
I really didn't want to spend more than $1000 for my screen, so that was the limit I set for myself.
I came across the Elite screens and it seemed to be a reputable screen manufacturer. They screens they had also fit my budget.
I ended up deciding that Elite screens was the brand I was going to buy and looking at the different types of screens they offered to see which was best for me.
The screen I ended up choosing was the Aeon 135" 16:9 ambient light rejecting ALR Fixed Frame Edge Free Projection screen, model # AR135DHD3
The Edgeless Screen


Why I Chose This Screen
I chose this screen because it got great reviews and it was specifically designed for rooms with ambient light. The specs also mentioned that it would work with 3D movies, which I was planning on using.
The screen is a edge-less screen which means you can project the image all the way to the edge of the screen for a really impressive display. Having a edge-less screen gives it the feel off a gigantic flat screen TV.
They also send you felt tape that you can put around the edge to give it more of a TV feel but I liked having an image that takes the entirety of the screen.
Assembling The Screen
Assembling the screen was a little tricky. I read reviews on it that said to be careful of the sharp metal edges on the frame, and I can see why.
It takes quite some doing to get the screen material to stretch to the point where it will cover the frame. Once you work with the screen material a little you'll realize that it does have a good amount of give... you just want to take your time with it.
We basically started from the short side first, connecting the screen to the very edge of the Velcro on the frame. That was the hardest part.
Once we had one small section connected on both ends it was a matter of working your way around the frame. As you make your way around it gets easier and easier to get the Velcro to connect.
Optional Back-Light Kit
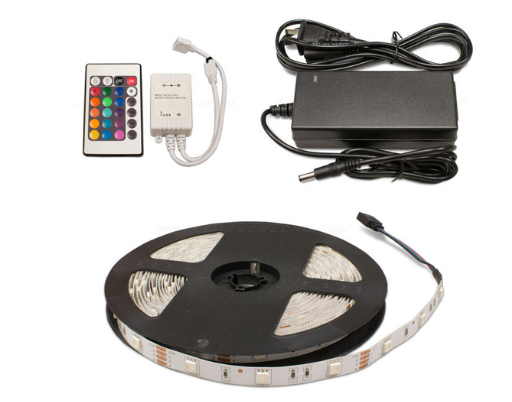
A Nice Touch... Back-light
The screen also has this Optional LED back-light kit, which made for an incredibly sexy look.
I purchased the kit straight from Elite screens since they didn't have the 135" model available on Amazon.
Installing The Optional LED Back-light Kit
The back-light kit model number for the 135" screens is ZLED135H1.
Installing the back-light was pretty straight forward. Start by figuring out where you want the power plug for the lights to be, that will be your starting point.
Put the screen face down on the floor, starting where you want the power plug to be remove the sticky tape covering and stick the lights to the angled back part of the screen.
You'll have a little extra once you go around the screen, just cut the strip on the indicator lines they have every couple of inches.
One thing to be aware of is that the light strip is pretty sensitive to bending. Be gentle and careful not to kink the strip and when doing the corners try to round the corner - avoid sharp angles.
The backlight was worth it, it gives a great finish to the screen. My favorite light setting is on low light with white light.
Previous Articles
- Designing a Home Theater Step 1 - Choosing a Project...
I recently took on the project of designing and building my home theater and discovered that it took a lot of research to do. I decided to share what I did in the hopes of helping others.
The Next Article
- Designing A Home Theater - Step 3 - Choosing An Ampl...
Now that the projector and projector screen have both been chosen, it's time to figure out what to use for the surround sound.


 Resolutions - What Does Resolution, Aspect Ratio, ppi Mean For Your Smartphone, Tablet, TV, or Monitor")

