- HubPages»
- Technology»
- Computers & Software»
- Computer Science & Programming
ECLIPSE IDE - A Walk Through Creating the "Hello World!" Tutorial Application

Prerequisites for the "Hello World!" JAVA Tutorial
You may have heard about ECLIPSE IDE and that is its a great tool for breaking into programming but know little else. There are a number of sources for obtaining information. I have written an article "Eclipse IDE (Integrated Development Environment) Tutorials - Extremely Useful for Java & Android Programming." which would be a quick read.
Essentially, you will need to have a version of the ECLIPSE IDE for JAVA downloaded and an appropriate version of JDK (the Java Development KIt). JDK download are available at the Oracle Corporation website and ECLIPSE downloads are available at the Eclipse Foundation website.
Once you have downloaded and successfully installed these products you are pretty much ready to go. I have another useful hub article "ECLIPSE IDE Tutorial - Looking at the ECLIPSE IDE Directory Structure" which will familiarize the components of the ECLIPSE release.
With that said, you should now be ready to start working on getting the "Hello World!" program built.
Step 1: Starting ECLIPSE
The first thing wyou will want to do is go to the directory where ECLIPSE is installed and click on the ECLIPSE program icon.
Invoke ECLIPSE from the Install Directory

Step 2: Reply to "Run" and Select Workspace
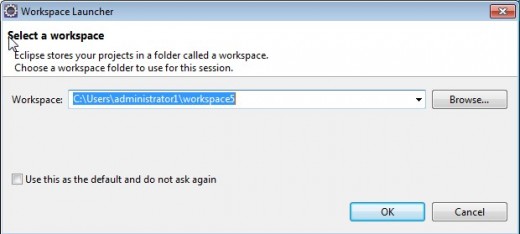
A screen will appear asking you if you wish to run the application. .Click on run. The next screen which appears will ask you to specify a workspace. This location is where Eclipse will create your source files. If it is acceptable, click on OK.
The first time you run ECLIPSE, or if you indicate a new workspace, the welcome screen will appear.
The following two illustrations show the workspace selection screen and the welcome screen.
Workspace Selection
The ECLIPSE Welcome Screen

Step 3: Looking at the ECLIPSE Workbench
For reason which will become apparent, just close the welcome window for now. We will reinvoke it momentarily.
After closing the welcome window, you now see the ECLIPSE workbench. Its consists of a toolbar (File, Edit, Navigate, .......) a secondary line with a number of icons, and four main panels referred to as views. There are arranged 3 abreast starting initially with "Project Explorer" on the left and a fourth view below which is initially "Markers'. These views may be closed, rearranged, minimized or maximized, and restored to their initial configuration. This can be quite confusing for the newcomer.
The next step is really the "life raft", that is "I got here and have no idea as to get back to what I wanted to see.
The Workbench at Startup

Step 4: Resetting the Perspective and Welcome Page
At this point in would be advantageous to try manipulating the and looking at the toolbar definitions.
OK, now if you screen is "messed up", how do you get back to an initial state? From the tool bar, go to Window > Reset Perspective. "Perspective" is the name used for the "composite views". In our examples we are looking at a JAVA perspective.
Now, let's go back to see if we can get that welcome screen back. Again, this may not be obvious, but all you have to do is go to Help > Welcome on the toolbar.
Reset the Perspective

Getting Back to the Welcome Screen

The Eclipse Window in Tutorial Mode

Working Through the "Hello World!" Tutorial
Now that we have returned to the welcome page. We will work through the "Hello World!" tutorial.
First, click on "Create the Hello World Application. The next screen which appears shows the 4 views which referred to previously as well as a sidebar for the tutorial text. The text is rather self-explanatory.
Click on "click to Begin" in the tutorial window.
New text indicates what action is to be performed.. In this first step is indicates that you should go to the tool bar and select Window > New Perspective > Java. Optionally, (and if you get confused) you can click on "Click to perform". In either case the next action you want to perform is indicate that the step is complete by clicking "Click when complete" . The text for the next action to be performed is now indicated and the process is repeated.
The steps which follow:
- Create a new Java project. In the case of my installation the text is a little misleading. It says to perform the action "click on the new Java project button in the main toolbar".. It's there but not obvious to a new user. It happens to be the first icon on the second line of the screen. In this case I might rely on the "Click to perform" text. You might explore and find that you could choose File > New > Java Project from the screens first line. I then enter "HelloWorld" as the project name, click on "FINISH". My screen is now update in the far left hand panel, the "Package Explorer" panel, with the new project "HelloWorld".
- Create a new Java class. Again, for a new user it may be hard to identify exactly how to do this, but you can do File > New > Java Class from the first toolbar line, or in the second line there is a green circle with the letter C. Enter the name HelloWorld and enter FINISH. You might notice that a yellow triangular warning message appears regarding default packages. Don't worry about this now. We will discuss packages in the next tutorial. The following screen shot show you the structure of your project thus far. Note that the JRE (Java Runtime Environment) installed on your system is associated with your project.
The "HelloWorld!" Tutorial at this Point

Finishing the Hello World! Tutorial
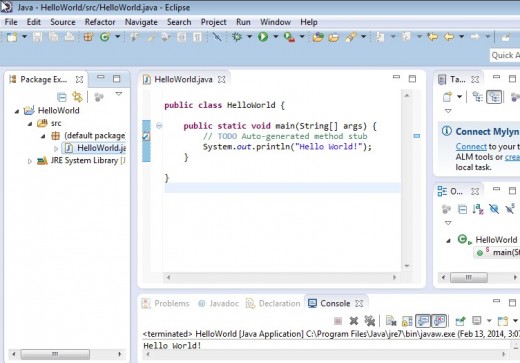
We are now going to work with the editor view and insert a print statement. You add this statement after the line beginning with "// TODO...." which is a comment line in Java. As you type notice that the editor is "watching your actions" Future tutorial will discuss how the editor can help with suggesting code alternatives and help with syntax errors.
The final set is to run the application. You click on the class name in the Package Explorer view, and select Java application. The output is displayed on the console view on the bottom. This is illustrated below.
Window Snapshot after "Hello World!" Execution