- HubPages»
- Technology»
- Computers & Software»
- Computer Software
Techie Corner: Easy Steps to PowerPoint- It Only Looks Scary!

It's Not as Difficult as You May Think!!

Beginning PowerPoint

What is PowerPoint?
Schools, businesses and individuals use PowerPoint to create slideshows which can look quite professional as graphics, logos, charts and text are included.
It looks a lot more intimidating than it is, so here are some basics to get you started.
Conventions Used:
In these instructions, if you see this symbol '>' it simply means more to the next step. So, File>New, means go to File then click New.
Saving Your Work:
What I always suggest with ANY project is to save your work. I can't stress this enough. You may just be practicing, but then you find you actually like what you've created just as your dog lays on your keyboard and clicks the delete button. If you saved your work, you wouldn't lose anything! (And yes! My dog has done that- I speak from experience)!!
Saving the Presentation
Always save your work! If you are working on this as a presentation file, save it as a PowerPoint presentation. If you only want to save it as slideshow (which means no changes can be made for the actual show), click the Microsoft Office Button>Save As and choose ‘PowerPoint Show’ as the ‘Save as Type.’ This will only be viewable as a show. If you need to make changes, you’ll need to open the actual PowerPoint file, make changes and then resave it as a show.
Create a Presentation
The big meeting is scheduled for next week and you need a way to convince your potential client why they should be doing business with you.
Good news! PowerPoint can help you prepare.
When you first open PowerPoint, you'll be greeted by welcome screen. See, it's friendly already!!
You can choose to manually design your slides or click on the office button>New to see available pre-defined templates.
Use the search button if you have something specific in mind…or you can look online as well. It is all a matter of personal preference and once you get accustomed to using PowerPoint, you'll know what works for you and what doesn't.
If you choose design template, you’ll notice that there are multiple types of designs to choose from. These designs will act as the backdrop for your presentation.
You can then choose a design and add your text. The first slide is usually your page title, so you can make its format different than the rest and put in your presenter’s name or company name, however you would like it to appear.
If you find that you need to change the design, select Design from the main menu. You will see the available designs and options. Experiment with these to see which one looks best for the presentation you are going to create.
Once you have chosen your design, you can right click on the design and select options for which this design should be applied.
You'll then have the option to change fonts, text color and formatting. To make changes that apply to ALL slides, click on View >Slide Master.
From this screen, you can highlight each section for each slide. For each section, choose the font name, style, color, etc. You can add bullets, pictures, movies, sounds, organization charts, etc.
Once you have made all of your changes, click ‘Close Master View.’
You’ll note on the left there are two tabs- one for outline and one for slides. You can click on each slide to maximize it in the main screen and make changes.
Headers and Footers
As with all Microsoft Office programs, you can insert Headers and Footers on your presentation. This will come in handy as you may need to add the date or slide number.
PowerPoint has made this easy. To use and manage headers and footers, click on Insert>Header & Footer from the main menu.
You will then have the option to choose the date and time stamp and select whether to have it update automatically or if it is only used for one specific event, do not choose to update manually (Choose ‘Fixed’ and add the date).
If you do not want the header/footer to be on the main title slide (the first slide), check the box that says [Don't Show on Title Slide].
If you want this header/footer to show on the handouts as well, select the handouts tab. This page follows the same conventions.
Slide Sorter
Views
Under the View Tab on the main menu, there are several viewing options.
The first one-Normal- is how you start off viewing the slides.
The Slide Sorter is similar; however, it lays out all of the slides across then down.
The Notes page is helpful if you are doing a project and instead of an oral presentation, you are just sending this to someone to read, or if you will require notes about the page, here is a good place to enter them.
The slide show is used for giving a presentation. It will encompass the entire screen.
Bullet Points
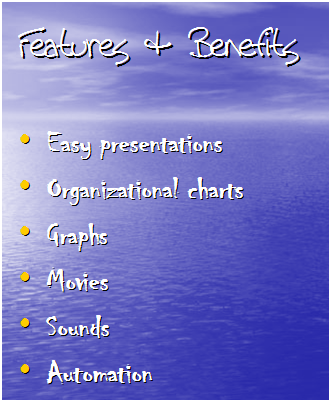
Organizational Charts
Charts
Fill Effects

Insert Pictures, Clip Art, Word Art, Charts...and More!
This is the fun part! Are you excited?!
Here you have the ability to insert pictures or creative, advanced lettering into a document. Take a regular document and turn it into a piece of art. (Just be sure not to publish any document that has Word Art included without permission from Microsoft). To insert an image into Word, select ‘Insert’ from the main menu. Choose ‘Picture.’ You will then be brought to a dialog box from which to choose your picture.
Clip Art is a built in feature of most (if not all) of Microsoft Office’s products. It enables you to choose from hundreds of pictures incorporated into the PowerPoint program as well as be brought to a link on the Internet with thousands of available pictures in multiple topics. If ClipArt does not have the pictures you need, there are stock photo websites, such as Alamy.com and Shutterstock.com which allows you to purchase pictures to use.
To use Clip Art, Select Insert>Clip Art from the main menu. In the Search field, type the keywords for the type of picture you are looking for and then specify where to search. Then press ‘Go.’ Once you find the picture you are seeking, click ‘insert’ or ‘copy’ and it will be brought into your document.
Another fun feature of PowerPoint is inserting movies and/or sounds. If you have recorded a movie with your camera and it is in the correct format of either AVI or Quicktime, you can then easily insert it into PowerPoint. If you want to insert any media, such as video or sound, click on Insert and under the media group, choose video or sound.
If you choose to create a new drawing or shapes, you can choose from the toolbar usually located on the bottom of the screen many different options, such as caption balloons, colors, shading, shadows, highlighting, arrows, block arrows, text boxes, line shapes, sizes and much more. Don’t be afraid to experiment with these tools. Have fun with it…the potential for excitement is endless!
To complement your newly designed document, add some flair by utilizing Word Art. This is also accessed by choosing Insert >Word Art. Experiment with the different styles of Word Art, type in your text, font, font size and color and you’re on your way!
Modify Graphics Within a Document
Now that you have inserted your picture, how do you modify its size and properties? To do so, just click on the picture until the four corners are highlighted with black squares on the corners. If you hover your mouse over it, an arrow will appear enabling you to ‘drag’ the picture diagonally to evenly position it, or drag it upward, or sideways to make it a bit larger.
In addition, if you right click on the picture, a menu will appear with a few different options. From there, you can modify colors, lines, layout and web alternate text. Since web browsers cannot ‘read’ pictures, you can add text in place of the picture. For example, if a user has chosen not to display images on their web browser an X will appear in the place of a picture. If you fill out the alternate text field, your text will appear for them instead of an X.
If you really want to get creative you can insert a picture inside of an autoshape. Click on Insert>Shape. Insert the autoshape of your choice and drag it onto your document. Right click on the shape and click on ‘Format Autoshape.’
Click on the Colors and Lines Tab and then in the ‘Fill’ section, click on the down arrow by color and choose ‘Fill Effects.’
Go to the picture tab and choose ‘Insert Picture.’ Browse to the picture you wish to insert by choosing ‘Select Picture.’ You now have your picture inserted in the shape you desire!
Organizational Charts
One of the more common tools used in PowerPoint is an organizational chart (or org chart). These are fairly simple to insert into PowerPoint.
Click on Insert>SmartArt and choose from the various shapes. You can type in each of them to make a broad display.
To insert one, click on Insert>Smart Art and choose the one that closely matches an organizational chart.
Once the chart is inserted, click on the boxes where it says ‘Text.’
If you highlight the whole chart, you will notice there is a toolbar above it.
Here you alter the shapes, colors, direction of the boxes. If you want more options to modify, just click on the drop down arrow by the boxes.
You can also right click on the Shape for more options.
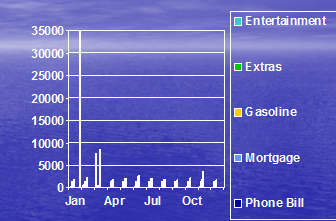
Along those same lines, you can also insert many different types of charts.
Inserting charts into a PowerPoint presentation is an easy way to create an at-a-glance view of how the particular data is either increasing or decreasing. Many companies use charts to measure how profitable their company has been over the course of the past year, or if you are creating a budget, you can measure how your expenditures have varied. There’s no limit to the way you can utilize charts. They are easy to implement and modify.
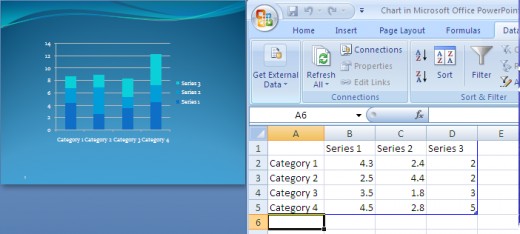
From the main menu, click on Insert>Chart.
If you do not have previously entered data from an Excel spreadsheet, Excel will appear enabling you to enter data in the cells provided.
If you already have a predefined Excel spreadsheet with data you can simply copy and paste the data into the spreadsheet that appears. You can also edit the data right on the spreadsheet along with the column names.
In addition, if you do not already have a previously created chart, you can create one here.
You can edit your column and row labels and they will then appear on the chart.
To change the type of chart, click on the chart tools design tab and click ‘Change Chart Type.’ Here you'll be able to edit the data and change the layout from this tab.
One thing to take note of is that on the right hand side, there is a layout tab that exists. You can choose from the different slide layouts for the charts, such as show data table, grid lines, axis, etc. This can also be customized to your liking.
Add Bullets and Numbering
Adding bullets and numbers to a presentation is a common practice and is inserted with the click of a button.
If you are just beginning your slide, click on Home> Bullets or Numbering icon.
Click on Bullets and Numbering for more choices of bullets and number formats.
The appearance of bullets can also be modified.
From the above screen, click on any bullet format, except ‘None,’ and click customize.
Move your cursor around the screen to select the bullet of your choice. For additional options, click on the down arrow in the Font screen.
Once you have decided on the perfect bullet, click ‘OK.’ Then Click ‘OK’ again to return to your document.
For the numbers tab, Click on the Number Style that you wish.
Start at- You can determine what letter or number you want to start at. On this screen, you can also change the color in the bottom left.
Click ‘Ok’ and then click ‘Ok’ again to return to your document.
Add a New Slide
If you have ‘run out of slides’ and need to add a new one, just click on Home>Insert Slide. Choose either ‘New Slide’ or ‘Duplicate Selected Slides’ (located on the bottom of the screen). A new slide that is inserted will appear with the same font and design as all of the others. A duplicate will be exactly the same as the previous slide, including the text and any graphics previously added.
Add a Text Box
The previously created templates mostly have text boxes on them, but there may be instances when you want to create your own text box. To do this, click on Insert>Text Box.
A crosshair pointer will appear. With your mouse, simply draw the size of your text box and it will appear on the slide.
You can then type some text directly inside of it.
If you ever want to resize it, just position your pointer on the box so it is highlighted, and then position your mouse on one of the dots and drag to your desired height or width.
Apply Fills
If you'd like to drastically change the appearance of your slides, add some color fills to them.
Using the previous example of adding a text box, click on the text box so that it is highlighted. Right click on it and select ‘Format Shape.
Using the following screen you can format the line that surrounds your text box or fill it with the color fills. Click on the choices and select the parameter that works for you.
Create and Enhance a Slide Show
Now that you have mastered entering all of the data, pictures, charts and graphs onto your slideshow, you can begin to have some fun with it.
On the toolbar is a menu item called ‘Slide Show.’ Here you'll find many of the tools necessary to enhance your show.
The ‘From Beginning’ brings the show to screen and you'll be able to view how it appears.
The ‘From Current Slide’ starts the show from the slide you are currently viewing.
Custom Shows- You may want to use only some slides for certain situations without having to create the same slide show all over again. For this, you can create custom shows by clicking on Custom Shows from the Slide Show menu. You will be prompted to choose which slides you want in this show.
From the screen that appears, type in a name and then highlight the slide you wish to include, then click on the button on the right that says Add>>.
If you choose to remove that slide, highlight the slide and then click the ‘Remove’ button.
‘Set up Slide Show’ brings up the next dialog box. For the show type, select whether it should take up the entire screen (without showing any Window’s desktop features), or just a window (like any other program), or similar to how it would look if it were going to be always on display at a kiosk without user interruption. Choose if you want to show all slides or just a range of them.
You can choose if you want it to keep repeating itself (looping), play without narration or animation.
Finishing Touches
Rehearse Timings allows you to give a ‘test’ presentation and PowerPoint will record how long it took you to do so. Suppose you were to give an hour presentation and it only took you fifteen minutes. This feature alleviates finding out last minute that your presentation was way too short!
Record Narration- You can also pre-record narration for this. For instance, at a tradeshow, you can make this presentation to run automatically at a kiosk so you won’t need to have a live person keep repeating themselves. It will play on its own like a movie.
Action Buttons
When you running the slideshow, you can right click on the screen and a menu will appear enabling you to move forward, previous, end the show, etc. There is an easier way, however. You can add action buttons to the presentation so you just need to click on one of those to perform your command.
Under Insert>Illustrations>Shapes>Action buttons, you will notice different options. Similar to a text box, just highlight one and then position it on your slide. Once you position it on the slide, another screen will appear if you want to change the pre-set command for this button. Again, if you want it to appear on all slides, first go to slide master and place the buttons on there. It makes life a lot easier when you have dozens of slides.
Add Animations
When you are giving a presentation, it can easily get a little on the boring side (similar to instructions for PowerPoint)! You can spice up your slides by changing the direction of their first appearance for each slide. One can show up in a wavy fashion, another can stagger in. One can show as credits in a movie. Experiment with these to see which ones you like best. You can make each one run differently. Select ‘Animation’ to begin adding animations. You'll notice there are many different options.
Slide Transition
In addition to slide animation, you also have the slide transition tool located on the Animation tab. This adds some pizzazz to how the slides look as well.
Again, practice with these to see how you want it to look.
Proofing Tools
When you have completed your slideshow, you are going to want to make sure you do not have any spelling or grammatical errors. There is nothing worse than working diligently on a slideshow, only to present it with tons of errors.
To check your spelling and grammar, highlight the first slide and then select Review>Spelling. Make any necessary changes and this time and be sure to save your work.
Another thing you definitely want to check for is accuracy of the data you are presenting. Take the time to make sure it is all correct.
Lastly, make sure that your slides work in the way they should. Turn off any virus protection scans or Windows Updates as you don’t want them to run and possibly reboot your computer while you are making your presentation!
Print the Presentation Handouts
To print the presentation, select ‘Print’ from the Microsoft Office button. Under ‘Print What’ choose if you want to print slides, handouts, notes pages, or outlines. If you choose handouts, choose how many slides per page and if you want them to print horizontally or vertically. You can also choose if you want them to print in color or grayscale.
If you want to only print handouts for the custom show, select the radio button for ‘Custom Show’ under ‘Print Range.’
To print notes, you will need to go to View>Notes Page and then type your notes there. When you go to print, under ‘Print What’ choose ‘Notes Page.’
Using Help
Lastly, if you have any issues using PowerPoint and need some clarification on how to do something, choose ‘?’ from the top right hand side and type what it is that you are seeking in the search line. These instructions should be just enough to get you started, but of course, there are many more features. Practice and experiment!
Do a test run and make sure it flows smoothly and flawlessly.
Then relax!


")


