- HubPages»
- Technology»
- Computers & Software»
- Computer Science & Programming»
- Programming Languages
Get started with Visual Basic for Applications (VBA): an introductory tutorial

What is VBA? VBA stands for “Visual Basic for Applications”, a programming language/tool based on/in Visual Basic. One could purchase and download the full Visual Basic suite; or, to get familiar with many aspects of the language, simply access and utilize it within Microsoft Office. One of the most common ways is within Microsoft Excel. Here we will use Excel 2010.
When learning to use VBA, I found that perhaps the easiest way to get started was as follows:
First, become aware of the developer tab within Excel. The developer tab enables one to program in Visual Basic from within Excel. In order to display the developer tab, refer to this hub:
http://lucabrasi.hubpages.com/hub/How-To-Display-Developer-Tab-in-Excel-2010
Once the developer tab is activated, all the programming tabs/tools are visible. Next, open a new Excel workbook and display/activate the developer tab. See diagram 1 below.
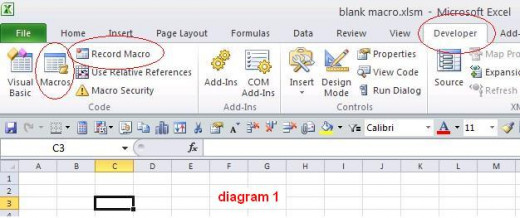
We will be working with the circled areas:
1. Developer tab, which has been put in place and selected.
2. Record macro tab, which is traditionally used to translate a series of keystrokes into code such that it can be run whenever desired. That is the classical macro methodology: record a commonly used series of multiple keystrokes into code, so they can be run with only one keystroke. Hence, the sequence is automated. We will actually record an empty or blank macro. Why? So we have a convenient template into which we can place programming code. And, the code can then be executed from within Excel with a simple keystroke. It follows that many Excel based functions can be programmed and executed to process spreadsheet data: order it, sort it, perform calculations and graphing ……. etc.
3. Macro tab. Once we create the blank macro, this tab will be used to bring it up in edit mode. We will have a blank subroutine into which our code is placed; i.e. we can write a program.
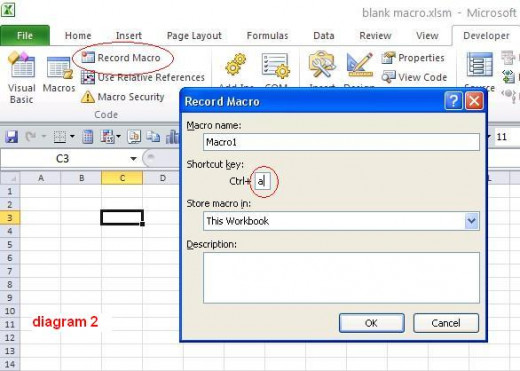
Refer to diagram 2. Here we will create our blank macro. Hit the Record macro tab and the window will pop up. Place “a” in the shortcut key window. When we later run the program, “ctrl a” will make it run. See the macro has been given a default name “Macro1”. That can be left as is or renamed if desired. Hit the OK button, and immediately click the “stop recording” button in diagram 3. I say immediately because a macro is being recorded. It is waiting for keystrokes, for which it will enter corresponding commands. But, since we only desire to create a blank template, we hit “stop recording”.

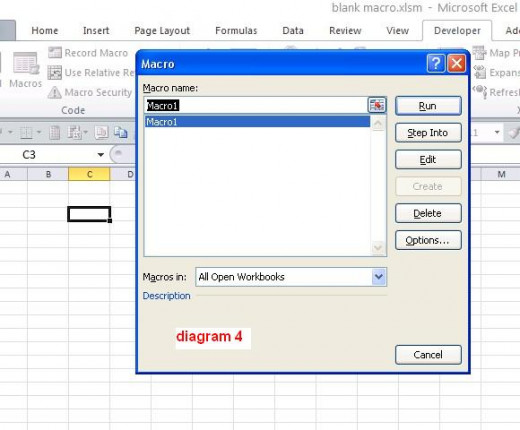
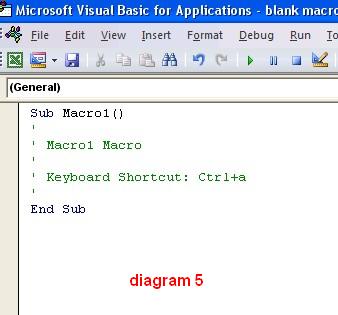
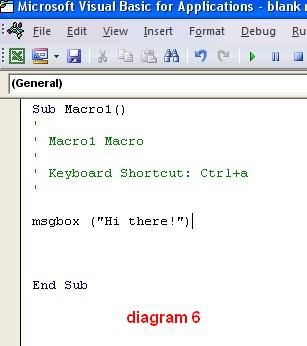
Our blank macro has been set up. It can now be edited, in that lines of code can be placed within. Click on the Macros tab and a window for our presently blank macro will pop up. See diagram 4. Hit the Edit button, and refer to diagram 5. This is our blank macro, or code template. It is the framework for a subroutine named “Macro1”. We see the top line calling out the subroutine name, and the bottom line signifying the end of the routine. Green text contains comments for informational purposes. Anytime we start a line with the ‘ character, it is interpreted as a comment. We can comment our code in that way, so it is communicated what we were doing with each line.
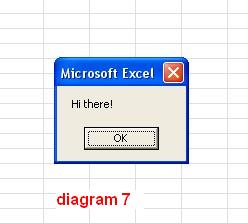
Let’s write a very simple program. Refer to diagram 6. See we have entered/placed one simple line which will display a message box. Close the code window, and save the workbook under whatever name you wish. Use the “.xlsm” option, as .xlsm is for a “macro enabled workbook”. You are probably now viewing sheet1, which is fine. When you type “ctrl a”, our simple program will run as shown in diagram 7.
So we now have a way to construct a template within Excel, which can be used as a starting point for programming.
Related

Creating a Speedometer, Dial or Gauge chart in Excel 2007 and Excel 2010

Programming in Java Netbeans - A Step by Step Tutorial for Beginners

How to create a thematic or Choropleth map in Excel 2007 and Excel 2010

What Are Smart Contracts in Blockchain in Simple Words: Examples, Use

The Four Types of Computer Software