Getting started with Raspberry Pi
Welcome to the world of Raspberry Pi!
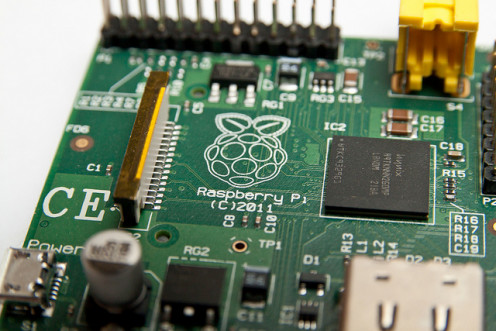
The Raspberry Pi is a cheap (generally under $50), credit-card sized, fully functional computer. It can browse the web, perform tasks like word processing and spreadsheet calculations, act as a web server and host webpages, be a media center PC for your TV, interface with your home and other technologies, and much, much more. What you do with a Raspberry Pi is completely up to you, but no matter what you use a Raspberry Pi for, your journey starts with the first boot-up. This tutorial will guide you through the setup and installation process for Raspbian, a Linux Debian-based operating system for the Raspberry Pi, including purchasing the components, downloading the necessary files, putting it all together, and starting it up for the first time. Let's begin!
Raspberry Pi, credit-card sized computing
The gear you'll need
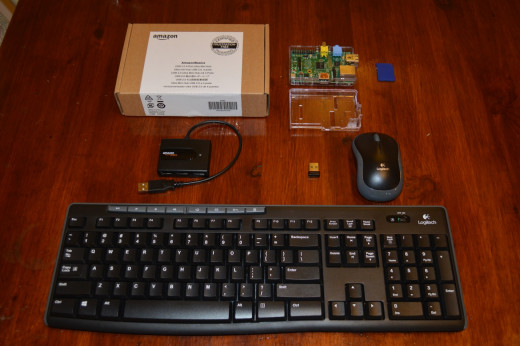
Even without going completely bare-bones, we put together a Raspberry Pi based system for under $75. Here's what we'll be using:
- The
Raspberry Pi itself, ($36.50 from Amazon.com)
- A case for the Raspberry Pi, ($6.49). This clear plastic case is similar and no frills. It allows you to handle the Raspberry Pi without the fear of somehow damaging the circuit board itself.
- An SD card to serve as the "hard drive" for the Raspberry Pi
- A basic 4-port USB hub to support future expansions to our setup
- A Logitech Wireless Mouse and Keyboard combo. This particular set was chosen because one USB receiver communicates with both the mouse and keyboard, which saves a USB slot on the Raspberry Pi and limits the amount of USB devices the Raspberry Pi has to power.
- An HDMI enabled TV (or HDMI enabled monitor) and HDMI cable. We used the TV and HDMI cable in the family entertainment center.
- An Ethernet cable, which we had on hand.
- A Windows computer to assemble files for the Raspberry Pi on.
Everything together totals $73.07 at the time of purchase.
Everything ready to go
Preparing files for your Raspberry Pi
Every computer needs an operating system. The operating systems most familiar to the world are Windows systems (like Windows 8) or Mac operating systems (like OS X Mavericks.) Both Windows and Mac are paid systems. However, Linux is a popular free operating system. The Raspberry Pi has multiple operating systems to choose from, and they are almost all based on Linux. We choose Raspbian as the operating system for our Raspberry Pi. Raspbian is based on Debian Linux. You can download the Rasbian operating system image (.img) file here.
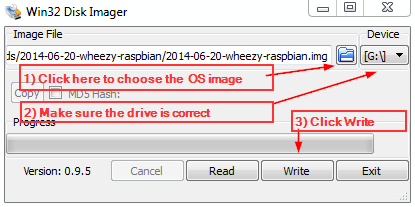
Every computer also needs storage space, commonly in the form of a hard drive. The Raspberry Pi uses an SD card as it's primary hard drive. This is where the operating system will live. Since the SD card we bought was empty, we have to load Raspbian onto it. To do this you'll need the downloaded /img file for Raspbian and a Windows utility called Win32 Disk Imager. Win32 Disk Imager can be downloaded here.
Once Win32 Disk Imager is downloaded, we can put Raspbian onto the SD Card by following these steps:
- Plug the SD Card into the Windows PC or laptop you're using to prepare files for the Raspberry Pi.
- Open "My Computer" and note the drive letter associated with the SD Card. In our case the drive letter is G.
- Run Win32 Disk Imager by double clicking on the .exe file.
- Choose your disk image. Make sure the disk to write to is correct, and then click write.
- The next dialog asks again if you're sure. This is because the write process will erase anything on the drive specified. Make certain you choose the correct drive (in our case G), and click yes.
- When the write is complete, you're ready to assemble your Raspberry Pi!
Preparing the SD Card

You can do anything you want to!
What will you do with your Raspberry Pi?
Booting up for the first time
You are ready to assemble your Raspberry Pi and boot up. First let's plug everything in.
- Load the SD card into the Raspberry Pi. It will only fit one way.
- Connect the HDMI cable to the Raspberry Pi and the TV or monitor you'll be using. Tune the TV or monitor to the correct HDMI channel.
- Connect the USB mouse and keyboard dongle to a USB slot in the Raspberry Pi.
- Last, connect the power cable to the Raspberry Pi.
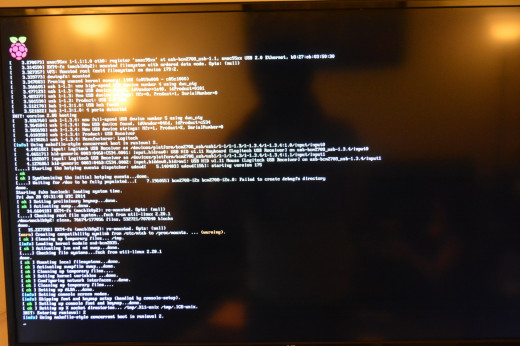
Once the power cable is plugged in, the Raspberry Pi will automatically boot up. Your screen will look like the photo below, with a Raspberry icon and white text scrolling up. If everything is plugged in securely and the setup was correct, there will be no errors.
The first screen you'll see is a configuration screen. Lets walk through all the options.
- Expand Filesystem - You're going to want to select this one and execute it. This makes sure that the Raspberry Pi has access to all the space on the SD card.
- Change User Password - If your Raspberry Pi is ever going to be connected to the internet, you must change the password. The default settings are public, so everyone will know your username and password if you do not change it.
- Enable Boot to Desktop/Scratch - The default setting is to boot to the command line. Windows and Mac users might feel more comfortable booting into the Desktop environment because it looks very similar to Windows. Ignore the Scratch option for now.
- Internationalization - Use this option is you need to customize your Raspberry Pi to a different language.
- Enable Camera - We don't have a camera in this tutorial, so we're skipping this option.
- Add to Rastrack - Rastrack is an online map of the location of all Raspberry Pis that have selected this option. If you want your Raspberry Pi on the map, use this menu to add it.
- Overclock - We're going to leave this one alone for now. This has options to increase the speed of your Raspberry Pi but at the cost of power consumption and stability.
- Advanced Options - There are plenty of options , so the next section will go through these options in-depth.
- About - This option shows information about this utility.


Almost there! Advanced Configuration Menu
Let's go over the Advanced Options menu.
- Overscan - This is a monitor setting. Enable Overscan if the Raspberry Pi screen doesn't seem to take up the whole monitor.
- Hostname - You should change this to be something memorable to you. The Hostname is a great shortcut for finding and connecting to your Raspberry Pi from another computer. Picking a memorable one will help you find it later.
- SSH - By default, this is enabled. SSH is Secure SHell, which is the primary way to communicate with your Raspberry Pi from another computer. Even though it's enabled by default, it doesn't hurt to go in and enable it here.
- SPI - This is a library of code that helps with serial communication. If you don't know what this means and you're not connecting additional things to your Raspberry Pi (such as temperature sensors or camera), then you don't need to enable this. We won't be enabling it in this tutorial.
- Audio - This allows you to force the Raspberry Pi to feed audio output through the 3.5mm audio jack or through the HDMI. The default setting is auto, which automatically determines where to send the audio. We'll leave this on auto.
- Update - This allows you to update this configuration utility. Since you just downloaded the Raspbian operating system, there is no need to update this tool.
Now your Raspberry Pi is fully configured! Hit the right arrow to select "Finish" and hit Enter. This will restart your Raspberry Pi.
Up and running!
After your Raspberry Pi reboots, it will either go into Desktop mode or the command line, depending on what choice you made in the configuration. It will ask for the login username and password. The default user is "pi" and the default password (if you didn't change the password during configuration) is "raspberry".
If you've logged into the command line, you're now ready to start entering commands. If you want to start the Desktop environment, type "startx" without the quotes, and hit Enter.
In the Desktop environment, you'll see a familiar layout, with desktop icons and a "Start Menu"-like tool in the bottom left. The Internet browser for Raspberry Pi is Midori. Go ahead and start browsing! You'll find that the Raspberry Pi is a capable little computer.
Hello World!
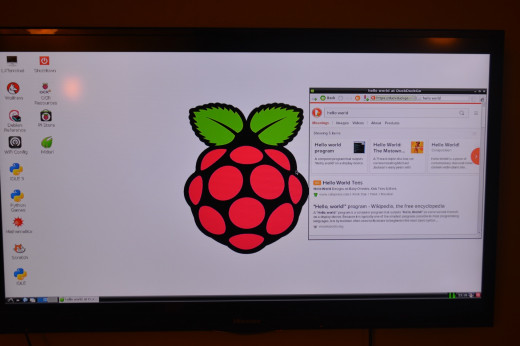
You did it!
Congratulations! You've made it through the first few hours and the first couple boots of your Raspberry Pi! Whatever you plan on doing with the Raspberry Pi, you're on your way there.
Was this tutorial helpful? Is any step confusing? Is a random error ruining your night? Drop a comment below and let us know!
Happy computing!
© 2014 John Himics


