- HubPages»
- Technology»
- Computers & Software»
- Computer Software»
- Utilities Software
How To Backup, Copy, or Clone Your Entire Hard Drive Using EaseUS Disk Copy: A First Hand Review

A Hard Drive Dilemma
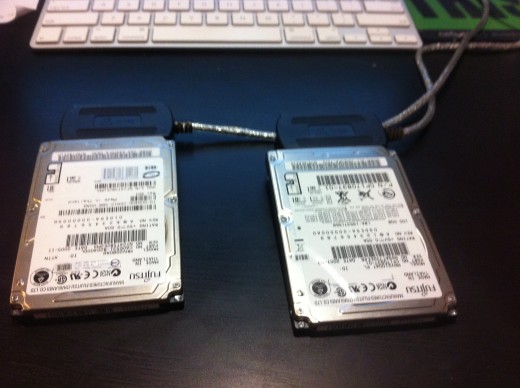
When it comes to technology, my Dad has always been content with hand me down laptops, PCs, and just about any other piece of computer technology that my sister and I have managed to give him over the years. Unfortunately since I have switched to being a Mac goy, the constant annual flow of computer hand me downs and swapping out has pretty much stopped. He's alright with this as he hardly enjoys change at any level. One major downfall of this has been a hardware failure with his laptop hard drive. He's currently running Windows XP SP3, and he starting getting odd "Blue Screens of Death" and various other windows error that just weren't explainable. After running a pretty thorough scan disk, it turns out he is the victim of premature hard drive failure. That's right, his hard drive was ready to go to the big technology pasteur in the sky. Too bad he wasn't quite ready to let go of it. Being the son that I am, I tried to convince him to leave the dark side and join the crows of Mac enthusiasts, but pricing was a major factor. We were left with the option of simply replacing his hard drive. Since Windows XP is also starting to head to the great technology afterlife, I wanted to make sure that I copied over all the nicely hidden partitions and pre loaded Dell software that was initially on his drive. After a bit of research, it turns out this was much easier than I had thought. I purchased a new hard drive on eBay for him as well as two USB IDE/STAT drive cables. It was all cheap enough, and cost less than $100.
- Easeus.com Disk Copy Software
A Freeware Drive Clone Utility That is Operating System Independent
Downloading & Installation
After quite a bit of research, I finally found an awesome drive utility within my price range: FREE. At first, I was skeptical, but as it turns out data recovery wouldn't be that bad with this utility. EaseUS Disk Copy is available free from charge, and was able to handle all of my needs. (Now I'll admit, I had to wind up buying two hard drives on ebay.. It was my mistake though, I bought one too small to replace the original. I tried the software, and I ultimately received errors, because the target disk i was copying to was too small to hold all my dad's data.) At first I was searching for a program similar to Partition Magic, that I had used many years ago to prep hard drives for new installs, but didn't come across anything that was free and worth some time looking into. My ultimate goal was to install an app on my mac, and bam, clone the hard drive, but my search really came up with nothing that would be useful with NTFS or windows based partitions. EaseUS Disk copy though had a unique solution. When downloaded, you get a window that prompts you to create a self booting CD or DVD, so you can bypass whatever operating system your currently using. It sounds scary, but it was actually pretty easy. Other options include extracting the .iso image for advanced users, or extracting to a USB thumb drive to make a bootable flash disk. I just stuck with the CD/DVD option since I had a stack of CDrs readily available. I just popped in a CDR and I was off to the races. Now I'm going to go super geek here for any advanced users, but remember I'm a Mac guy OK. A negative side of using this software is that in order to make the bootable CD you must be running windows. I wish they would make the .iso image itself available online for download so MAC guys can use it too, but unfortunately all I could come up with was a windows downloadable installer. I have another windows based machine so it wasn't a big deal, but still, for such an awesome utility, they ought to open it up to Mac folks since it does boot on fine on my iMac. Ok so I'm off my soapbox now.


Running The Self Bootable CD
Like I said before I'm a Mac guy now, so once the bootable CD was made, I plugged in my USB drives, popped in the CD and rebooted... And nothing happened... Great, what a flop I though, but it turns out if you're running a mac, you need to Press "C" to boot from your optical drive while restarting.. Once I figured this out, I was greeted with the application running just fine! A word of advice though, is that if you are using the standard Bluetooth Mac Mouse, you'll need a USB connected mouse to use the pointer, but the Bluetooth keyboard works just fine, and you can use the arrow keys, enter, and tab to navigate no problem.
At this point, it was actually pretty simple, a guided wizard pretty much took me through the entire process. I was prompted to select if I wanted to copy an entire drive or just a single partition. I selected the entire drive and quickly received an error message that the target drive was too small. Gasp! What have I done! After panic was set aside, I realized I didn't make a mistake, but that the new drive I purchased on ebay was smaller than the one I started out with. I only went by the overall space that windows was reporting, not the actual space total on the drive. Remember I said my dad was using a Dell laptop? Well all the repair partition stuff took up quite a few gigabytes, and that isn't available to windows. My mistake, at least now dad will have a nice external back drive. So long story short, I tried it anyway, and it didn't work because the disk copy software copies everything over bit by bit, sector by sector, so it make an exact clone. It's not actually copying over files or anything, instead it's copying over 1s and 0s, not paying any attention to what they actually mean or do. It makes an EXACT duplicate of the drive being copied.
This bring us to round two about a week later when I got the new drive in the mail. I did everything all over again and the this time received no errors about disk space. I did however run into a problem that I wanted to let you know about it case it happens to you. When the drive started copying, the data transfer seemed very fast! As it progressed through the drive sectors though, it started to slow down. And slow down more, and finally come to a crawl. I was "stuck" at 27 percent roughly 6 hours into the drive imaging. Yes I said six hours.. My mac was at the mercy of this process for what seemed like an eternity. I was impatient, and decided to abort the entire process. I had other work that needed to be done and quite honestly, I thought I was about to throw both drive out the window.
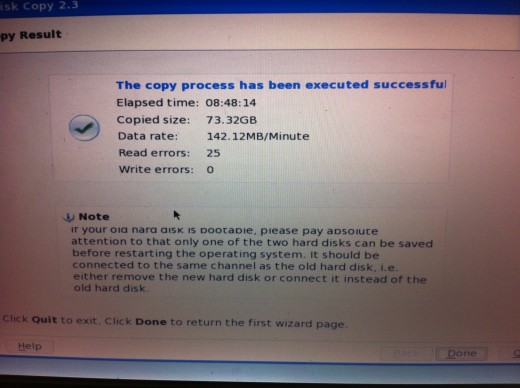
Round three! Later that evening I decided that I would setup my Dad;s laptop and make it do all the work. I plugged in both drives, popped in the bootable CD and decided to just let the program run its course. The next morning, I awoke to a message stating that I had bad sectors and the software inquired what I wanted to do with them. Ignore or quit? Well the entire purpose of running the software in the first place was to replace a failing drive, so I ignored them. Here's the kicker though, it gave this message about 6 hours and 15 minutes into the process. Once I accepted the ignore option, it was only another half hour and it was done. I wish I had been more patient with round two, as it would have saved me a lot of trouble. I also discovered through the software manufacturer's forum, that during the wizard I should have just clicked "Quite Mode" when copying the drive. It would have automatically ignored any disk errors that it had found. Apparently the drive wasn't too bad off and only had a few bad sectors. A side note though, that the more bad sectors that you have, the longer the cloning process will take. There was one question posted online regarding a copy time of over 53 hours! Many users of the software were complaining about the time it takes to clone a drive, but unless you have drive error it's smooth sailing.
Final Results
Although, this process took me much longer than it should, with having to purchase another drive and all, in the end it worked out very well! The software was free, my dad now has an extra USB backup drive, and I get to destroy the old hard drive! Not too bad for a few hours of tinkering. It saved me from having to buy a new computer just to give my iMac away as a hand me down, which would have taken much, much more time between the training, backup, restoring and setup. So for less than $100 total, his laptop is brand new, speed has been improved since there are no more disk errors, and I was able to achieve two very important goals: 1 - The dive still has all the fancy Dell Stuff on it for restoring in the future and 2 - the drive was detected right off the bat, no need to go into BIOS or anything, or change anything in the windows registry, the Computer didn't realize it had been cloned! One final thought though is that now this drive has an extra 20 GB or so of unused space, when I get the time and energy, I'll stretch the partition to give windows access to it, but for now, did didn't fill up the free space he had, so he'll be alright. And besides, later on it's like an instant space upgrade!