How To Hide Your Most Private File Behind Images

Hiding Data behind Images
Ever wanted to hide your most private file on a hidden place where nobody sees it but only you?
If your answer is yes…then this article is mainly for you.
Here I am going to show you how you can easily hide your most private file behind images where no one can suspect your hidden private files.
Hiding data behind image is known as steganography. Thus steganography is the art and mechanism of hiding different types of data’s like messages, videos, images, documents and the likes behind images, in such a way that nobody rather than the sender and the receiver, suspects or thinks the existence of data behind that specific image.
Using this method you can hide whatever data (which may be videos, images or anything) behind any image of your choice without reducing the quality of the data or the image.
No more bluffing… Let’s get right to work. Follow the steps below and you should be able to hide your private file anywhere you want like a pro. Plus you don’t need any-third party program to do this. Okay, let’s get started:
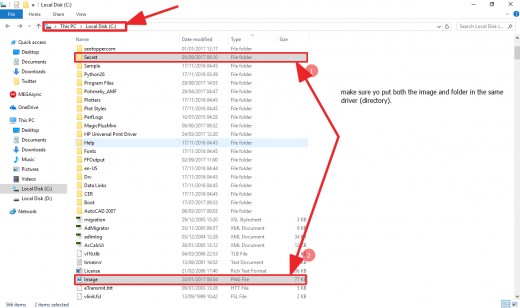
- First thing you need to do is organize the files that are most private to you. Then, all you need to do is create a folder in your C: drive and name it whatever you want, for this example we’re going to use the name “secret”. Remember you can also use other drive instead of C: drive but using the root directory (i.e. the hard drive where you installed your OS or Operating System) makes it a bit easier.
- Now go ahead and put everything (text, files, images, documents, music, videos…) you want to hide in the folder you created on step 1, for our case it was “secret”. Also make sure to put the image you want to use for hiding you files in the same directory. Meaning that, if you created the folder on step1 (the “secret” folder) in the “C:\” driver then you need to copy your image on that particular driver. Once you do this, change the name of the image to “image.jpg”
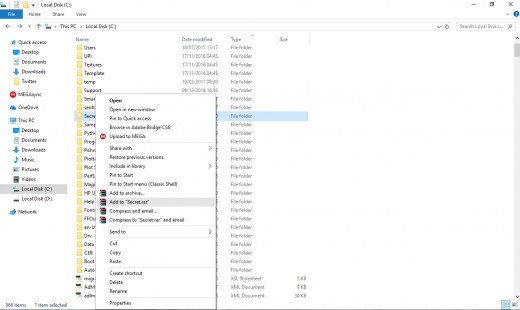
3. After you put everything that you want to hide in the “secret” folder, right click on it and click “Add to archive” or “Add to Secret.rar”. Here our point is to create a .rar (an archive) file for our secret folder we created on step 1.
After you successfully do this, you are going to see a “secret.rar” file in the same directory or place that you created the folder.
4. You are almost finished. Just go to the “Start Menu” and search for command prompt and change the default working directory to the current directory (the place where you created both the folder and .rar file)…..or in other words just simply type the following commands and you are good to go.
Type in “cd..” twice and you should be in the C:\ drive. You can also do this from one command just type in “C:\\” (remember to spell the C: letter in capital). Then all you have to do is type in the command “copy /b image.jpg + secret.rar output.jpg” Here are the simple commands again (as a summary);
- Cd..
- Cd..
Copy /b image.jpg + secret.rar output.jpg
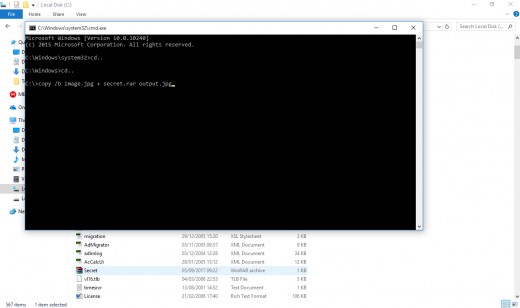
In the command above the “image.jpg” is the image behind which you want to hide the .rar file and “secret.rar” is the archive file containing the files to be hidden. Output.jpg is the output file that contains the hidden files but looks like an image.
Remember that the image type needs to be in jpg format, sometimes some other image types don’t work, in case of .png format. Make sure to change the image type from “.png” to “.jpg” before proceeding the commands.
If the command is successfully executed then you will see additional image called output.jpg in the same folder where we created the secret.rar file. Note the size of the image is similar to the secret.rar file plus the size of image.jpg.
After successfully executing the commands, you can delete all the other files except for the output.jpg. if you double click the file, it opens a normal image. You can see the hidden files whenever you want by right clicking on it and selecting open with WinRAR.
That is it! Now you can save this image on a specific drive or folder or send this image to specific recipients, what others see is just a regular image but the recipient can access the secret files/data that you have sent for them privately.
Recommendation: Keep the files as small as possible since it wouldn’t suit an image for big size. For example if you hide programs or files (data’s) greater than 10 MB people will be suspicious.
How-To- Fix: sometimes you will get an error message like this “Access Denied (0) files copied”.
To fix this all you have to do is run cmd (command prompt) as administer by right clicking and tapping on “run as administrator”.
")


