How To Overclock A Video Card

Overclocking
With all the new 2018 games hitting the markets, your video card may be slacking on the FPS (Frames-Per-Second) side of things. I'm sure you've all heard the word overclocking. If you haven't, don't worry, I'll explain what it means.
Overclocking is the process where you put more power to a component of a computer (e.g. CPU, RAM, GPU) to get better performance. In this tutorial, you'll be learning how to specifically overclock your video card.
* I HOLD NO RESPONSIBILY FOR DAMAGED COMPONENTS DURING THIS PROCESS. CONTINUTE AT YOUR OWN RISK *
MSI Afterburner
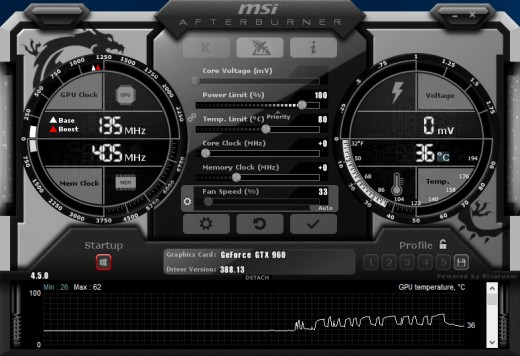
If you're up for the challenge, you're going to want to download MSI Afterburner. This program allows you to overclock you're video card with ease and includes many other cool features that we will not be using for this tutorial. Once you have it installed, open the program.
Core Clock
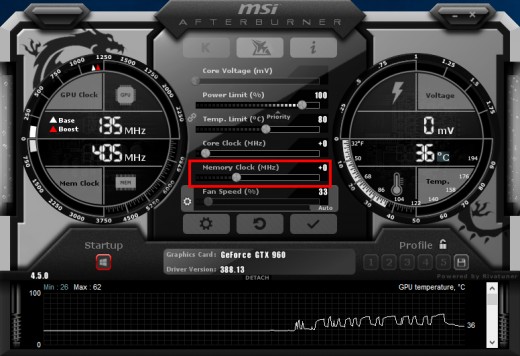
Now that were in the program, you'll see all these confusing images, sliders and graphs. Don't worry, we'll only be using Core Clock, and Memory Clock for this tutorial!
Now we must check if your video card can be overclocked. To do so, try to move the slider in the Core Clock and Memory Clock. If the sliders move, press the reset image by the gear in the middle of the page. If either Core Clock or Memory Clock cannot slide to a higher value, then unfortunately you cannot continue with this tutorial as your video card does not support overclocking. Farewell.
The first setting you're going to want to concentrate on is the Core Clock. To use this slider, only increase it by increments of 15. You may click on the zero to the very right of the slider to manually type in a value!
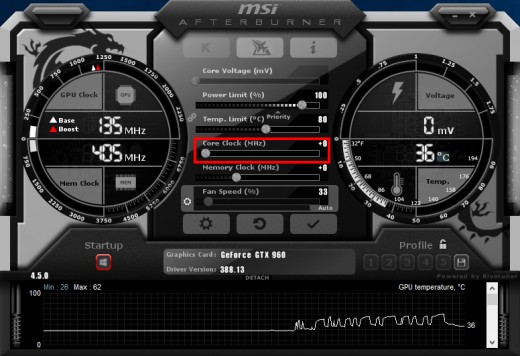
Keep increasing the Core Clock by 15 until you notice some glitches on the screen. This can include colorful or black spots appearing, or your screen going completely black. No matter the case, one you encounter this, restart your computer remembering the value you got highest to. Once your computer is up and running again, you shouldn't see these screen errors anymore. If all is okay, start MSI Afterburner again and this time, take the value you got highest to last time and decrease it by 20 while plugging it in to the Core Clock.
* DO NOT CLICK THE WINDOWS LOGO UNDER THE WORD 'Startup'! *
MSI Kombustor
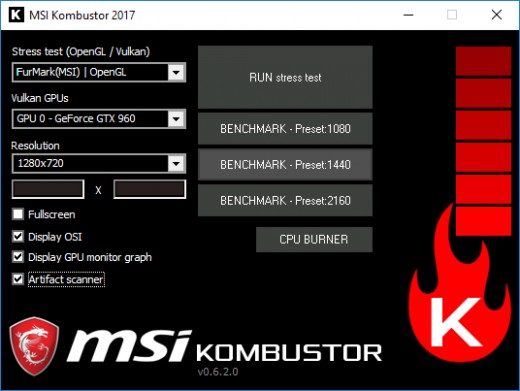
Now that you have followed the directions above and you aren't getting any screen glitches, here we are going to find your max Core Clock. To do this, install the program MSI Kombustor, then proceed.
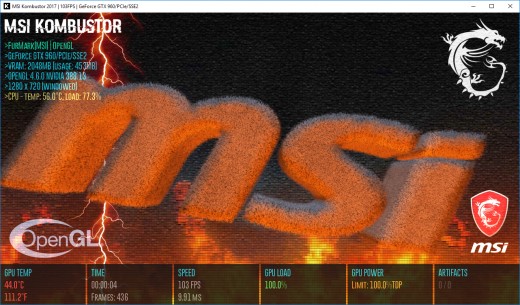
If you have MSI Kombustor installed, open it and make sure to check the boxes Display OSI, Display GPU Monitor Graph, and Artifact Scanner. Once all are checked, click on 'RUN stress test'. In the bottom right corner you'll see a box that says Artifact Scanner. If one or more artifacts appear, lower your video card Core Clock by one each time until you can run the test for five minutes without any artifacts showing up.
Max Memory Clock
Now that you have found your max Core Clock, now you need to find your max Memory Clock. To do this, it's very similar to finding your max Core Clock. Instead of increasing the Memory Clock by 20, you're going to increase it by 50. Generally, the Memory Clock can go a massive amount higher than the Core Clock. Keep incrementing the Memory Clock by 50 until your computer screen glitches out. When the screen glitches, restart your computer (remembering your max Core Clock value that we just found), and plug in the max Memory Clock value minus 50. Here, run MSI Kombustor again, and increase/decrease you Memory Clock value as needed until you have no artifacts on the screen after running the test for another five or more minutes.
* DO NOT CLICK THE WINDOWS LOGO UNDER THE WORD 'Startup'! *
Max Overclock
Now that you have found your max Core and Memory Clock. Plug both of the values into MSI Afterburner, click the checkmark and run MSI Kombustor again. If you get any artifacts, lower both values by one until none show up. If none show up then your golden! You have finished you max overclock!
* Click the Windows logo under the word 'Startup' to have your overclock start when you log onto Windows automatically!

Finished?
Well done for making it to the end of the tutorial! No more scary glitching monitors, that is, unless you want to take a step up into the danger zone. The danger zone is for extreme overclockers and puts your video card at more of a risk of breaking than it already is now. In the danger zone, we will adjust the voltage the video card is receiving to achieve a higher overclock. If you are interested in walking into this new area, I'll have a tutorial on it within a week of this posting.
Thank you all for reading and learning about overclocking. Tell us how your overclocking experience went! It's been a pleasure having you here!
© 2018 Camden Pina


