ArtsAutosBooksBusinessEducationEntertainmentFamilyFashionFoodGamesGenderHealthHolidaysHomeHubPagesPersonal FinancePetsPoliticsReligionSportsTechnologyTravel

How to Add a Check Box in a Microsoft Word Document

Updated on June 11, 2013

What is a Microsoft Word Check Box?

A check box is a box you can either tick off or put a big X inside.

It is absolutely perfect for questionnaires and surveys or for completing e-forms.

A check box is a sign of jobs done (and not done!) but can also be useful as a simple tick off box for a list of things on your To Do list.

Microsoft Word provides users with the opportunity to add a check box in 2 or 3 different ways and I will cover them in this article.

Microsoft Word also offers you the opportunity to add 2 different types of check box

  • Check box lists that you want to print
  • Check box lists that you want to complete on the computer and save to the computer.

Whatever your check box needs, Microsoft Word can help you to add them with ease.

This article will show you how to do it. For this article, I used Microsoft Word 2007.
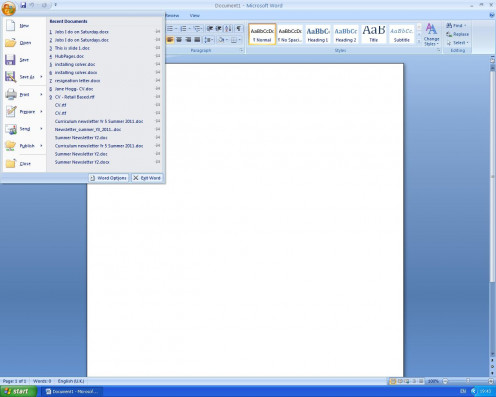
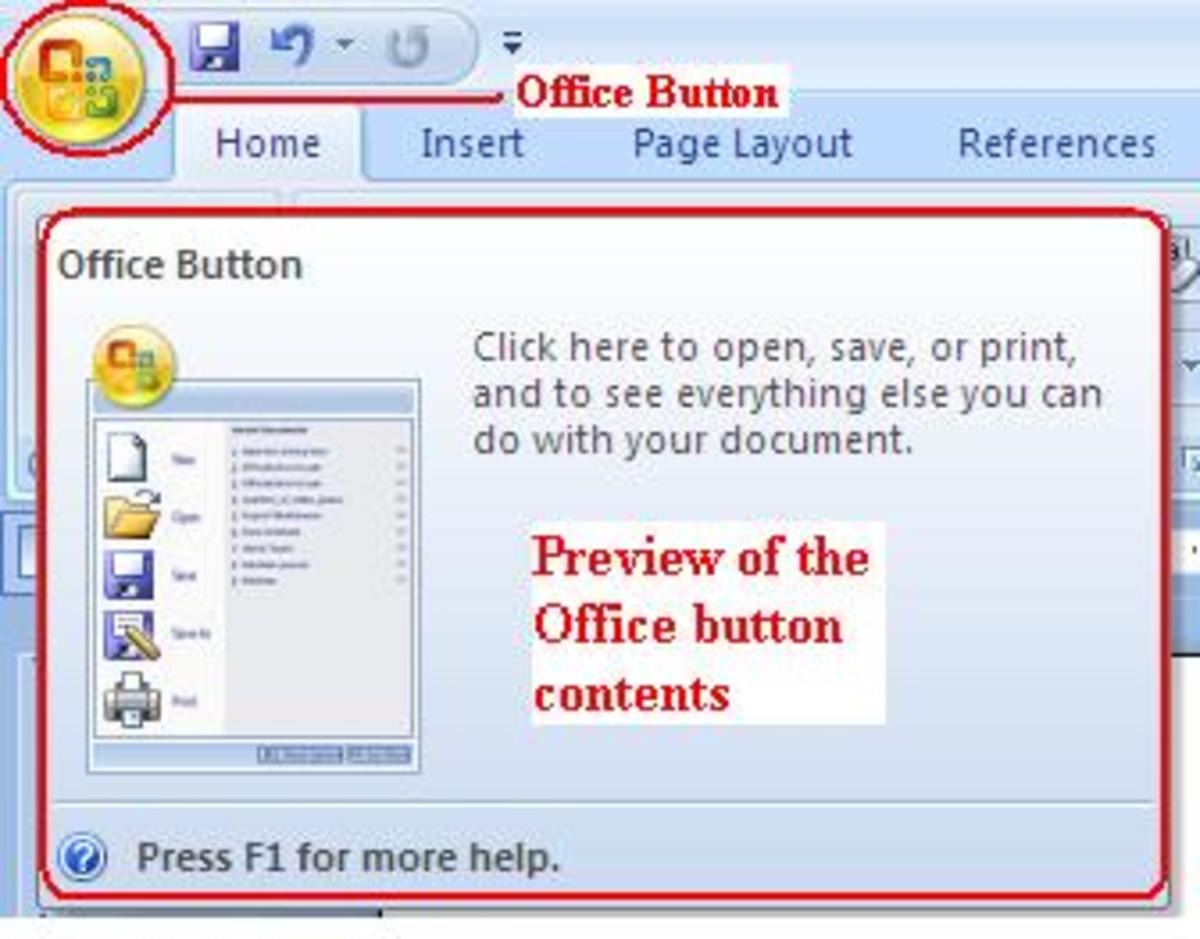
Figure 1 - Office button drop down menu, select Word Options
Figure 1 - Office button drop down menu, select Word Options | Source
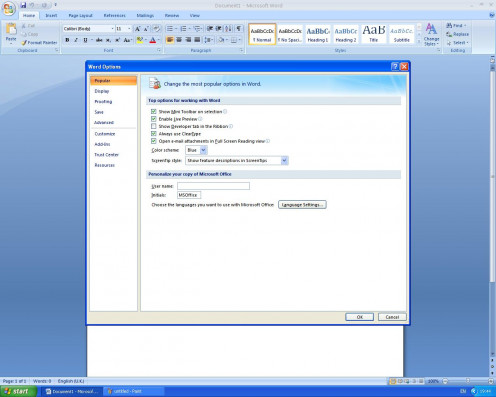
Figure 2 - Select Popular from drop down menu.  Choose Developer add-in.
Figure 2 - Select Popular from drop down menu. Choose Developer add-in. | Source

Microsoft Word - Adding the Developer Tab for Check Box Creation

If you want to create a list with check boxes to carry in your purse when you go for those last minute jobs then this is the easiest way to do it.

  • Open Microsoft Word
  • You will need to access the DEVELOPER page and it is not installed with Microsoft Word, you have to add it.
  • Click on the Office Button (Figure 1)
  • Select Word Options at the bottom of the menu.
  • Select POPULAR.
  • Select the option to add the DEVELOPER tab.
  • Click OK.(Figure 2)

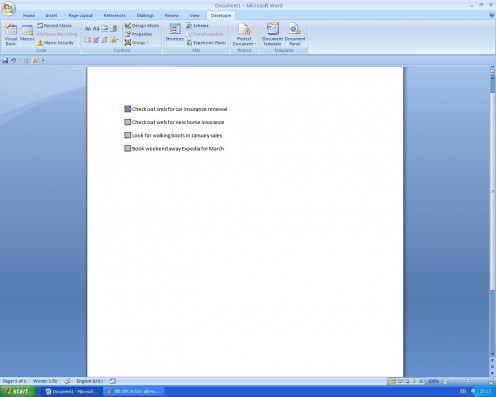
When you return to your normal Microsoft Word page, you will notice there is a new tab along the top of the ribbon called DEVELOPER.
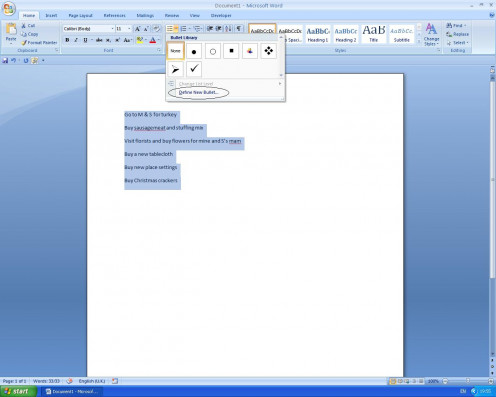
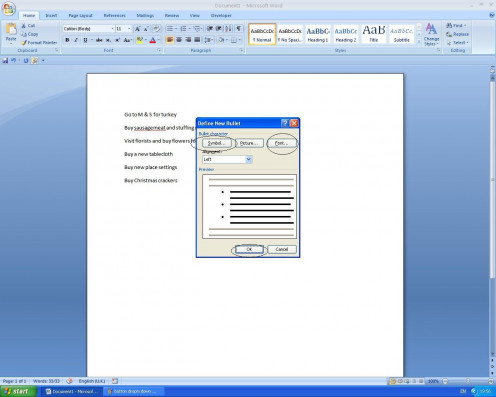
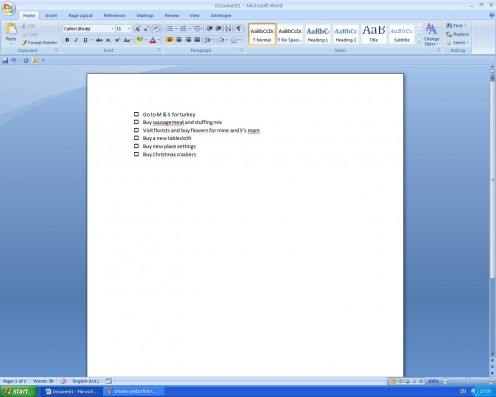
Figure 3 - select Symbol and define your Wingdings font
Figure 3 - select Symbol and define your Wingdings font | Source
Figure 4 - drop down for the symbol box
Figure 4 - drop down for the symbol box | Source
Figure 5 - the check boxes next to my last minute Christmas list
Figure 5 - the check boxes next to my last minute Christmas list | Source

Microsoft Word Check box - For Lists You Want to Print

For the example here, I have created a list of the jobs I will need to do 'last minute'.

  • Either open your list or create a list on your Word document.
  • Highlight your entire list.
  • Click in the HOME tab
  • From the Paragraph group, click on the drop down arrow in the Bullets box.
  • At the bottom of the drop down menu box, select Define New Button (Figure 3).
  • When the box opens, click Symbol and then from the drop down Font box, select Wingdings (Figure 4).


(There may be other fonts which have a nicely shaped box but I know that Wingdings little box is a good size for most size 12 fonts so I use that one for the check box.)


  • Scroll through the Wingdings font symbols until you see the little square box.
  • Click in the box and then click OK.
  • Your boxes will appear next to the individual list items.
  • Usually the boxes are shaded. If you want to print off empty, unshaded boxes, select the Legacy Tools tab on the Developer page and then click in SHADING. This will remove the dark shading inside of the check box (Figure 5).
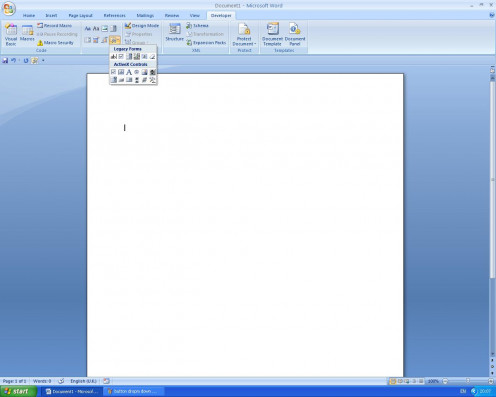
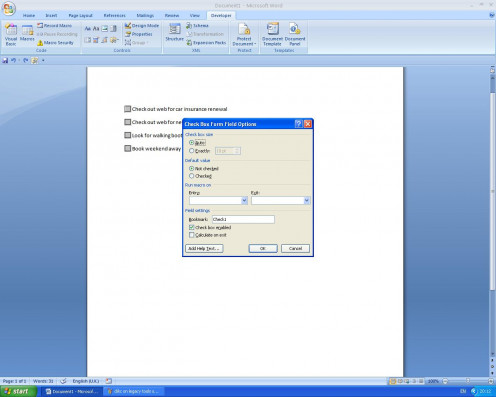
Figure 6 - Check box controls
Figure 6 - Check box controls | Source
Figure 7 - Check box drop down in which you can select the X option to check the box.
Figure 7 - Check box drop down in which you can select the X option to check the box. | Source
Figure 8 - the checked first box
Figure 8 - the checked first box | Source

Microsoft Word Add A Check Box - For Lists You Want to Save On Your Computer

For my example, I have created a list of things I need to do in January but the list could really be anything you would most likely complete and save to your computer.

It might be that you work in an office and need a check box attached to some regular tasks that you then have to email to your boss.

This way of adding a check box is ideal for Word documents that you save on your computer, though you could also print them off once completed.

This type of list is different because you control the content which means it will require you to give it some conditions to complete itself but it is still fairly straightforward.

Open your Microsoft Word document.

Place your cursor where you want the first check box to be inserted.

Click in the DEVELOPER tab again.

From the Controls group, click on Check box Content Control (Figure 6).

Clicking in the inserted check box will reveal a drop down menu which has the default for the check box as 'unchecked'. To check the box, click on the circle below and then click OK (Figure 7).

Your check box will now have a X in it.

Again, if you would prefer your boxes unshaded, go to Legacy Tools and click in Shading. This will turn your check box white (Figure 8).
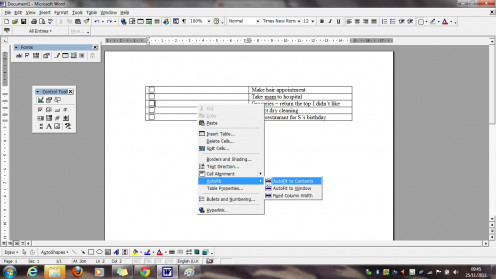
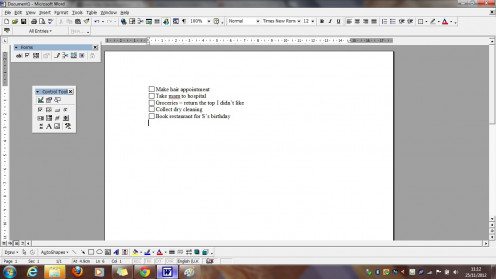
Figure  9
Figure 9 | Source
Figure 10
Figure 10 | Source

Using The Table Command to Add A Check Box

Open Microsoft Word

Click on TABLE

INSERT table

Select 2 columns and add as many rows as you think you will need for your list.

Write your list in either column depending on your own preference. This leaves the other column free for the check box.

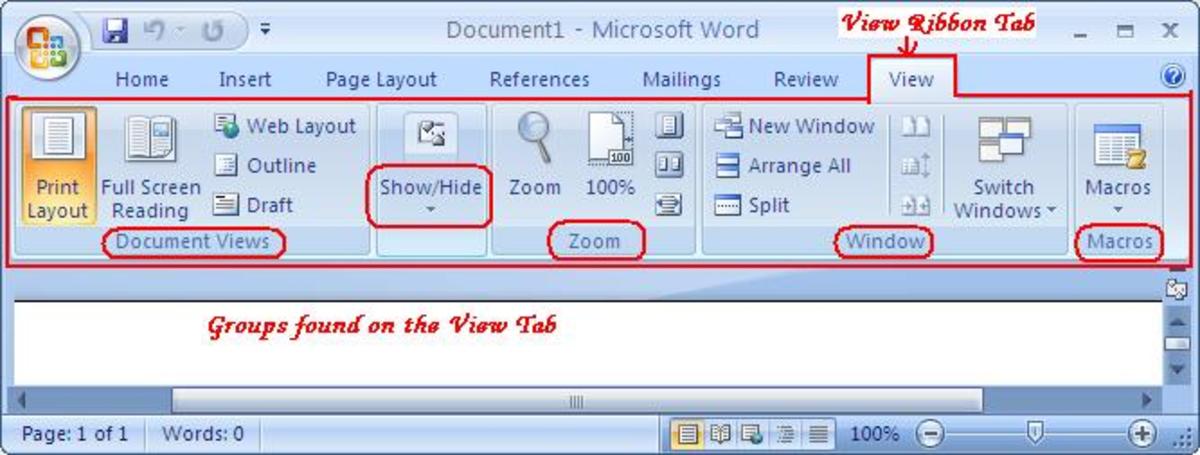
Click VIEW and from the drop down menu, select FORMS.

Click FORM FIELD. If you want to take out the shading click once on the SHADING icon in the FORMS Menu.


The check box is inserted in the first field you selected. Highlight it and CTL+C, then highlight the fields below it and CTL+V to paste the additional check boxes.

Right click the table and select AUTOFIT - Autofit to Contents (Figure 9).

Right click the table again and select TABLE PROPERTIES.

Click on OPTIONS.

Change the dimension of the default margin size to Left:0.02, Right 0.02 then click OK.

Click in the Borders & Shading and select NONE at the top of the page, then click OK (Figure 10).

You will see that all of the table lines and borders are now gone and you are left with a list of your tasks plus and accompanying check box.

This method is a little more long-winded but might suit users who have confidence using Tables.

Tick Checkbox
Tick Checkbox | Source

Microsoft Word Check Box - Great For Organisation

So that's how you can add a Microsoft Word check box. There are 3 different ways and you will find a way that suits you.

A check box can be a good edition to many forms and lists you might use in the office. It can be especially useful for creating survey forms and also questionnaires.

A check box is a useful asset to add to any list and is especially useful if you need to create an e-form which has lots of boxes to check off. So go on, give it a try!

I hope you found this article useful.

Many thanks for reading.

working

This website uses cookies

As a user in the EEA, your approval is needed on a few things. To provide a better website experience, hubpages.com uses cookies (and other similar technologies) and may collect, process, and share personal data. Please choose which areas of our service you consent to our doing so.

For more information on managing or withdrawing consents and how we handle data, visit our Privacy Policy at: https://corp.maven.io/privacy-policy

Show Details
Necessary
HubPages Device IDThis is used to identify particular browsers or devices when the access the service, and is used for security reasons.
LoginThis is necessary to sign in to the HubPages Service.
Google RecaptchaThis is used to prevent bots and spam. (Privacy Policy)
AkismetThis is used to detect comment spam. (Privacy Policy)
HubPages Google AnalyticsThis is used to provide data on traffic to our website, all personally identifyable data is anonymized. (Privacy Policy)
HubPages Traffic PixelThis is used to collect data on traffic to articles and other pages on our site. Unless you are signed in to a HubPages account, all personally identifiable information is anonymized.
Amazon Web ServicesThis is a cloud services platform that we used to host our service. (Privacy Policy)
CloudflareThis is a cloud CDN service that we use to efficiently deliver files required for our service to operate such as javascript, cascading style sheets, images, and videos. (Privacy Policy)
Google Hosted LibrariesJavascript software libraries such as jQuery are loaded at endpoints on the googleapis.com or gstatic.com domains, for performance and efficiency reasons. (Privacy Policy)
Features
Google Custom SearchThis is feature allows you to search the site. (Privacy Policy)
Google MapsSome articles have Google Maps embedded in them. (Privacy Policy)
Google ChartsThis is used to display charts and graphs on articles and the author center. (Privacy Policy)
Google AdSense Host APIThis service allows you to sign up for or associate a Google AdSense account with HubPages, so that you can earn money from ads on your articles. No data is shared unless you engage with this feature. (Privacy Policy)
Google YouTubeSome articles have YouTube videos embedded in them. (Privacy Policy)
VimeoSome articles have Vimeo videos embedded in them. (Privacy Policy)
PaypalThis is used for a registered author who enrolls in the HubPages Earnings program and requests to be paid via PayPal. No data is shared with Paypal unless you engage with this feature. (Privacy Policy)
Facebook LoginYou can use this to streamline signing up for, or signing in to your Hubpages account. No data is shared with Facebook unless you engage with this feature. (Privacy Policy)
MavenThis supports the Maven widget and search functionality. (Privacy Policy)
Marketing
Google AdSenseThis is an ad network. (Privacy Policy)
Google DoubleClickGoogle provides ad serving technology and runs an ad network. (Privacy Policy)
Index ExchangeThis is an ad network. (Privacy Policy)
SovrnThis is an ad network. (Privacy Policy)
Facebook AdsThis is an ad network. (Privacy Policy)
Amazon Unified Ad MarketplaceThis is an ad network. (Privacy Policy)
AppNexusThis is an ad network. (Privacy Policy)
OpenxThis is an ad network. (Privacy Policy)
Rubicon ProjectThis is an ad network. (Privacy Policy)
TripleLiftThis is an ad network. (Privacy Policy)
Say MediaWe partner with Say Media to deliver ad campaigns on our sites. (Privacy Policy)
Remarketing PixelsWe may use remarketing pixels from advertising networks such as Google AdWords, Bing Ads, and Facebook in order to advertise the HubPages Service to people that have visited our sites.
Conversion Tracking PixelsWe may use conversion tracking pixels from advertising networks such as Google AdWords, Bing Ads, and Facebook in order to identify when an advertisement has successfully resulted in the desired action, such as signing up for the HubPages Service or publishing an article on the HubPages Service.
Statistics
Author Google AnalyticsThis is used to provide traffic data and reports to the authors of articles on the HubPages Service. (Privacy Policy)
ComscoreComScore is a media measurement and analytics company providing marketing data and analytics to enterprises, media and advertising agencies, and publishers. Non-consent will result in ComScore only processing obfuscated personal data. (Privacy Policy)
Amazon Tracking PixelSome articles display amazon products as part of the Amazon Affiliate program, this pixel provides traffic statistics for those products (Privacy Policy)
ClickscoThis is a data management platform studying reader behavior (Privacy Policy)