Electric Guitar Maintenance - How To Change Strings
If you are a novice who is hesitant to perform this essential maintenance task for the very first time, the reluctance is certainly understandable. However, as a seasoned, professional musician who has worked with some very high profile whammers and jammers, I can make the following promise with a generous degree of confidence and conviction. Once you take the initial, excruciatingly anxious plunge, I can assure you the severe anxiety attacks which usually accompany the first timer, will incrementally subside with the passing of each successive string set change. Hands on practice does indeed make perfect in this scenario. Keep in mind, the highest degree of "Danger" revolves around the potential to accidentally scratch the high gloss surface of the instrument or prick your finger, or even your eye with the sharp end of the metal strings. Caution is advised in this area to mitigate incident and protect the appearance of your prized music making possession along with your physical well being.
Once you get past the intimidation factor, changing guitar strings becomes a relatively easy task even for the novice. It's a routine maintenance chore every owner must perform on a regular basis to keep the instrument looking and sounding her absolute best. String replacement can be accomplished without the assistance of a professional on site, and even if you're the timid, cautious type who is hesitant at first to take on the responsibility, once you break the ice with that first self satisfying re-stringing, barring major incident which is almost an impossible occurrence, it only gets easier from that point on.
If you've owned an electric or acoustic guitar for an extended period of time, you're probably already well versed in the following fundamental instrument enhancement exercise. If not, please read on to find an illustrated step by step instructional page on how to remove the old grungy worn out and tattered strings, and easily replace them with a brilliant new squeaky clean set of music making wires.
Unwind Old Strings To Save For Backup
If the old strings are still playable and not worn down to the bone, it might be a good idea to save them in an accessible place to be ready as an extra backup set just in case a new one snaps. Even though they may sound a little dull and lack audio vibrancy in comparison to the new set, holding them in reserve as spares might come in handy for a "Quick Fix" and save you an unnecessary trip to the local music gear store to purchase a single solitary string. If your passion is the blues, or rock, or any other style of music which requires excessive or extreme bending as an important technique to achieve the desired sound, even the new pristine set of strings will be more prone or susceptible to a "Snap". So if you're changing them to perform an important gig or other function and the new six on the guitar is the only set you have, with no other reserves at the ready, it might be wise to save the old ones as a backup just in case - Just a thought.
- Simply unwind the strings manually by turning the tuning keys or engage with the assistance of a winder, carefully remove and store in the same sleeves as the new strings -
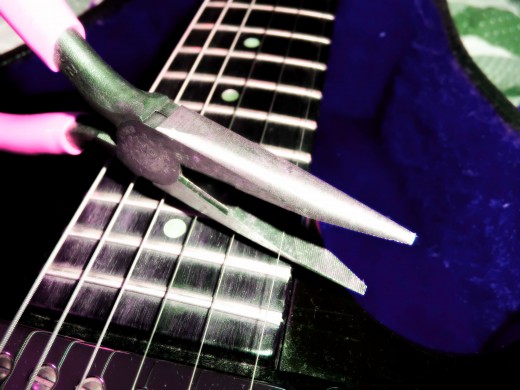
Remove Old Strings / Clip with Needle Nose Pliers and Discard
If the old set of strings currently on the guitar are all but expired, essentially spent to their very last note and salvaging them for spares is not a realistic option, just clip with applicable tool and discard after removal.
In this scenario, just loosen each individual string by turning the tuning key in the direction which lowers the pitch until the tension is significantly reduced. Then, hold each end of the string with one hand and take a needle nosed pliers with the other, and simply clip each individual string one at a time by placing the pliers toward the middle of the guitar. I usually clip a couple inches north from where the neck meets the first pickup. Grasp the string with thumb and fingers then clip while securing each end to avoid a possible "Whipping" motion that can and will scratch the guitar, your hands, or eyes. You can slightly modify or alter the clipping location and motion to suit your style, making the "cut" near the middle of the guitar is just my preference which seems to mitigate the odds of undesired, detrimental accident or incident when engaging.
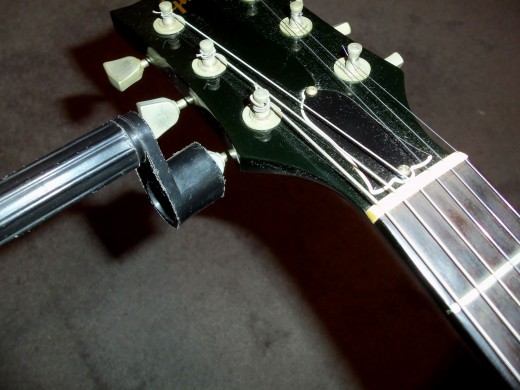
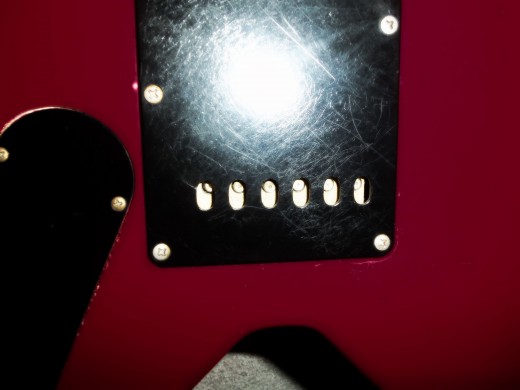

Stringing Guitar Via Back of Body Entry Point / Front Entry Point At Tailpiece
There are two main string entry points on an electric guitar, one version is strategically located on the back of the instrument either toward the middle or slightly lower toward the bottom, and the other design allows for front entry at the guitar tailpiece. When stringing a guitar with entry points on the back, after the old strings have been safely removed, follow these 6 easy steps:
- Feed the new string carefully through the entry point with one hand, and receive with the other hand as it slides through.
- Thread the string through the tuning key peg located on the guitar headstock.
- Measure and gauge the amount of string needed to get at least 3 wraps around the peg. Begin rotating the tuning key with the assistance of a winder for fast efficient adjustment, or manually by hand if you don't have one. While turning the tuning key, make sure to hold the other end of the string securely ( The end with the little metal nub ) with enough pressure so it doesn't unravel while your winding. Hold and rotate until the string is snug to the touch and will not unwind.
- Repeat until all strings are securely in place.
- Clip Excess string at the tuning peg to avoid eye injury from the sharp point.
- TUNE & PLAY
NOTE: On Les Paul Style Guitars the low "E" , "A", and "D" strings are wound "COUNTERCLOCKWISE". The "G", "B", and High "E" are wound "CLOCKWISE" -
NOTE: On Fender Stratocaster Style Guitars where all the tuning keys are on one side of the headstock, the winding motion is "COUNTER CLOCKWISE" -
The procedure is exactly the same for "Front" entry at the "Tailpiece" stringing. The entry point is essentially the only difference between the two. in this scenario, simply thread each string through the corresponding individual tailpiece entry points located on the top of the guitar right behind the bridge and last pickup, then guide them up to the tuning key pegs. There are only two ways to turn the tuning keys when replacing guitar strings, you can either use a string "Winder", a tool which will significantly reduce the time it takes to perform the task, or, you can make the adjustments manually which will inevitably take longer.
- String Winders are relatively inexpensive and can be purchased online or at your local music gear store. Well worth the small investment -


FINAL NOTE;
- Always use extreme care and caution when changing guitar strings to avoid potential damage to your prized music making possession or physical harm -
- Remove new strings from paper or plastic sleeves with caution. They are wound up in a tight little compact circle at the factory and when manipulated or removed from this cocoon, they have a tendency to uncoil rapidly which can cause injury resulting from the whipping motion if you're not careful. One sure way to avoid this potential situation is to locate, hold, and secure the sharp pointy end first, and then unwind slowly using the opposite end containing the metal anchor.
- Always use caution when threading a string through the entry point and winding it around the tuning peg, the sharp pointy end can scratch the body surface and headstock if not handled carefully.
- Always use caution if you "Clip" the old strings while they are still on the guitar. Make sure you turn the tuning keys in the appropriate direction to release enough tension so they don't "Snap" violently after cutting with a pliers.
- Make sure the new string is wrapped at least 3 times around the tuning key.
- Although there are many different techniques used for this one relatively simple task, I would advise and recommend to the beginner a "One String at a Time" strategy to avoid hardware issues. If you remove all the strings at once, the tailpiece on some models have a tendency to become dislodged and can actually fall off which may cause a novice to panic. Changing one string at a time ensures constant tension on all adjustable working parts which keeps them secure and in proper place during the entire process.
Final Note Part II: Once the guitar becomes the satisfied recipient of a brand new set of brilliantly shiny strings, if you haven't already done so, clip the excess wire down to the tuning peg on each string to avoid possible eye injury and or damage to the instruments glossy finish. I'm a musician myself, and I realize you think it might look pretty cool to let the strings hang out 6 or 7 inches like your favorite rock star, but trust me on this one, it wont be so cool when you accidentally get poked square in the eye by a spastic undulating runaway wire while performing a gig at the arena. Use some common sense and remove the excess.
NOW IT'S TIME TO -
Tune er' Up - Warm er' Up & JAM!


Read, Explore, & Experience More:
- How to Tune a Piano: Tips and Tools Needed
"It's a BIG and strenuous job, but someones gotta do it". And that's the truth. Before we begin I feel it incumbent upon myself to briefly explain how tedious, time consuming, and potentially difficult tuning... - How to Build an Affordable Multi Track Home Recording Studio
There are hundreds of online sites that offer volumes upon volumes of valuable tips and ideas related to designing and assembling the necessary equipment to build a self contained user friendly home recording...


Written - Designed - Created By Alternative Prime / Custom Images By Alternative Prime
|
|---|

