How to Change a Button Name in CSS
CSS stands for Cascading Style Sheets. CSS defines the way how a html element should appear on the webpage.
HTML fonts supports the text attributes like size, color etc. Imagine if you decide to just define the different attributes in html font tag for each page, which has at least 10 tags and you need to code 100's of pages. It will for sure become cumbersome and a huge redundant effort to put in the same attributes at each page.
CSS solves this huge problem by defining classes that can be applied across all the tags which need to look similar. Thus, It came in as a great boon for web designers, saving them lot of effort and time.
There are lot of magical and wonderful things that you can do with CSS. Making your webpage look really awesome. Now lets see how we can change the button name in CSS.
Change Button Text Using CSS
Changing the name of a button or any text field is a tricky part in CSS. In general you would define button in HTML as:
<button>Button</button>
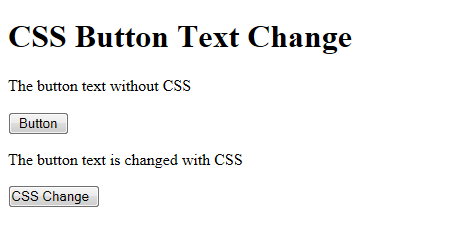
Which would result in the display of button with text as Button as shown in Image1.
Now to change the name using CSS, we would need to hide the current name and then add in the new content of our choice as follows:
button.changeText{text-indent:-46px;} // hides the current text by pushing it off screen
button.changeText:after{content:"CSS Change";} //Put is new text
In the above CSS the first line hides the current text using a negative value for text-indent and then we add in the new content using the after content CSS attribute.
So now you can see the button name changed with the help of above CSS in Image1.
You can also copy the entire code using the code block given below.
<!DOCTYPE html>
<html>
<head>
<style>
button.changeText{text-indent:-46px;}
button.changeText:after{content:"CSS Change";}
</style>
</head>

<body>
<h1>CSS Button Text Change</h1>

<p>The button text without CSS</p>
<button>Button</button>
<p>The button text is changed with CSS</p>
<button  class="changeText">Button</button>

</body>
</html>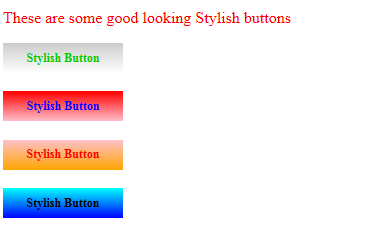
Add Gradient Style to button using CSS
Now Let us add some funky style to the buttons using gradient function given as:
filter:progid:DXImageTransform.Microsoft.Gradient(GradientType=0,StartColorStr=cyan,EndColorStr=blue);
As you can see the Image2 shows four different colored gradient buttons which surely would enhance the look and feel of a page.
You can use the code below to apply style to your buttons and change the value of colors to make it look appropriate with your webapge.
<!DOCTYPE html>
<html>
<head>
<style>
.stylishButton

{

   font-size:12px;

   font-family:Times New Roman,serif;

   font-weight:bold;

   color:#00CC00;

   width:120px;

   height:30px;

   float:center;

   background-color:#EEEEEE;

   filter:progid:DXImageTransform.Microsoft.Gradient(GradientType=0,StartColorStr='#ffCCCCCC',EndColorStr='#ffFFFFFF');

   border-style:none;

}
.stylishButton1

{

   font-size:12px;

   font-family:Times New Roman,serif;

   font-weight:bold;

   color:Blue;

   width:120px;

   height:30px;

   float:center;

   background-color:black;

   filter:progid:DXImageTransform.Microsoft.Gradient(GradientType=0,StartColorStr=red,EndColorStr=pink);

   border-style:none;

}
.stylishButton2{

   font-size:12px;

   font-family:Times New Roman,serif;

   font-weight:bold;

   color:red;

   width:120px;

   height:30px;

   float:center;

   background-color:yellow;

   filter:progid:DXImageTransform.Microsoft.Gradient(GradientType=0,StartColorStr=pink,EndColorStr=orange);

   border-style:none;

}
.stylishButton3

{

   font-size:12px;

   font-family:Times New Roman,serif;

   font-weight:bold;

   color:black;

   width:120px;

   height:30px;

   float:center;

   background-color:white;

   filter:progid:DXImageTransform.Microsoft.Gradient(GradientType=0,StartColorStr=cyan,EndColorStr=blue);

   border-style:none;

}

</style>
</head>

<body>
<p ><font color=red> These are some good looking Stylish buttons</font><p>
<button class="stylishButton">Stylish Button </button> <br><br>

<button class="stylishButton1">Stylish Button </button> <br><br>


<button class="stylishButton2">Stylish Button </button> <br><br>


<button class="stylishButton3">Stylish Button </button> <br><br>


</body>
</html>
© 2012 mr-veg

