How to Compress Videos for YouTube
If you're looking for a way to save time uploading to YouTube or a good way to compress your video files, here's two different workflows, one for Sony Vegas and one for Adobe's Media Encoder (Premiere or After Effects).
What You Should Know Before Compressing
If you're not too familiar with compressing, there's a few important things you should know.
Compressing a file reduces the size and also reduces the quality. For the best archiving methods, you should keep a copy of your file in lossless format and one that is compressed. That way you have the original in full quality if you ever need to covert it or send a high quality file. You don't want to convert an already compressed file, as the compression will lost more information and lose quality more quickly.
Compressing actually reduces the color nuances of the video, the difference of light and any information and detail that can be removed. Depending if you use a two-pass or one pass compressor, the differences can vary between frames or can be applied to the video as a whole.
Different compression formats and codecs will compress files differently. The one that is most preferred is h.264 for sending files over the internet or to streaming websites.
What file container do you prefer?
Containers vs. Codecs
Video files can be transmitted and saved in a number of formats. The container of file or file extension (.avi/.mov/.mp4) can be used with multiple codecs or compressors (h.264/Xvid/ProRes).
The codec that you use is more important than the specific container you use, but every website, festival and person has their own preference when it comes to favorite container and codec type.
Sony Vegas Workflow
Rendering "Exporting" from Sony Vegas
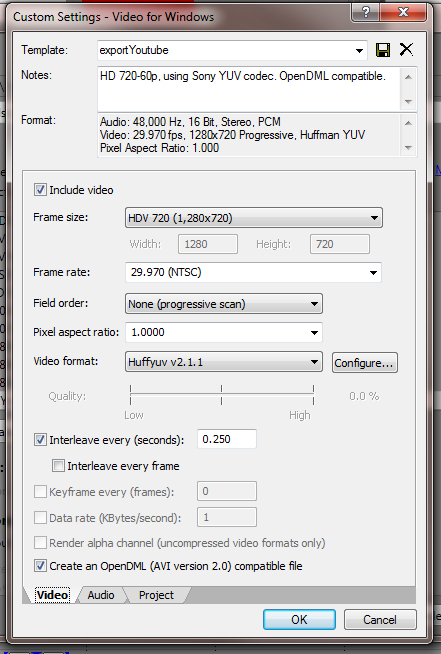
I like to render a lossless copy of my video out of Vegas and then use another program to compress it to h.264. I find that the rendering capabilities of Vegas are slower than using another program, and I also like to keep a copy of my video file in a lossless state in case I ever need to re-compress it into a different format.
Since I'm working on a windows machine, I render my video as an AVI with the codec Huffy (which is a lossless codec). The file size does end up being giant, but before I upload it to YouTube, I'll compress it down.
As far as specific settings, it doesn't really matter. I like to keep my full resolution and export as a good quality audio file format (PCM 16-bit Uncompressed).
Compressing the Uncompressed File to H.264
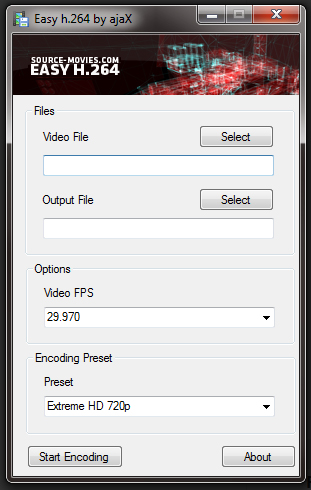
For this step, I have found a handy and very easy program called "Easy h.264" It was created by Tweevo and works like a charm. It is a freeware and you can download it from here.
As I said before, this program is super easy. All you need to do is click on the select button under video file, select your file. Then click on the select button under output, type in where you want to save your file and the name. Make sure the frame rate is correct and choose from any of the presets.
Then just hit Start Converting and you're all set!
Note: If you're using 1080p footage, you can select Extreme+720p and it'll output as a compressed 1080p file.
Uploading to YouTube
The final step is just to uplaod your compressed .mp4 you got from using Easy h.264. That's it!
Premiere or After Effects (Media Encoder) Workflow
For your Adobe products, you'll be using the built in media encoder from Adobe.
First off, I usually will render out an uncompressed file so that I had a high quality file of my video in lossless format. After I have that, I'll render out a MPEG-4 (.mp4) for YouTube.
Rendering in Media Encoder
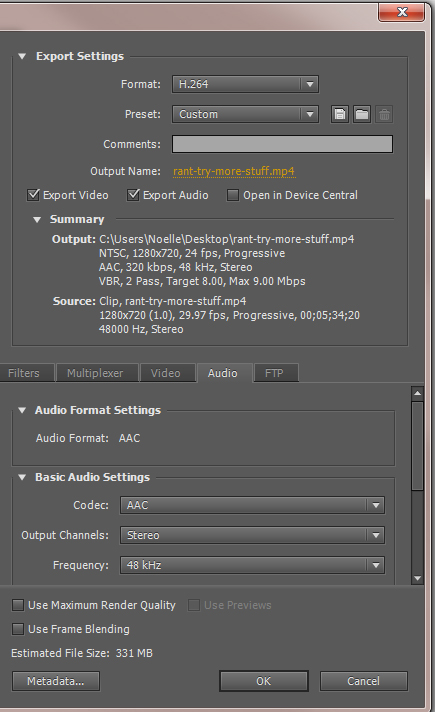
- After you've finished your video, from the drop down menu under "Format" select h.264. This will set you video to render with the h.264 codec into a .mp4 container.
- From the presets select the "YouTube Widescreen HD" or if you have a standard definition video file, select the SD version.
- This should set up your project, we just need to change a couple of audio settings. Under the Audio tab, change the Frequency to 48K and bitrate settings to 320.
- Check the preview of your video file to make sure the resolution is right and the frame rate is okay. After checking, hit render.
Upload to YouTube
After your video is done rendering you're ready to upload to YouTube!
YouTube Help Center
You can find YouTube's recommended Settings from YouTube's Help Center here.


Improving Render Quality
Rendering different kinds of video (such as animation vs. life action) will yield different results. If you're unhappy with your rendering and how it's turning out, try increasing the bit rate in your render settings.
Render Quality Tips
It's better to upload a larger file since YouTube will recompress with their own compressor when you upload.
Do a few different tests playing around with the bitrate and quality settings. Find the balance for your videos between size and upload time.
To read more about rendering tests, you can reference the sections in this article I wrote the talks about quality tests here: Improving Quality by Testing Render Settings


