- HubPages»
- Technology»
- Internet & the Web»
- Web Page & Web Site Development
How to Create Your Own Template for Joomla
Joomla is a powerful open-source content management system that can handle a magnitude of sites. I have personally created a variety of sites that range from simple 5 page websites to full e-commerce websites. Although there are several options for free Joomla template downloads as well as many outstanding paid templates; sometimes it’s easier to create a template from your own thoughts.
There are a few prerequisites to be able to successfully create and upload your own template. The first is that you need to know how to create a page utilizing HTML and CSS. You can choose to download a CSS based template and make changes from there, however you must have enough understanding to be able to know where your <div> tags are and what the purpose is of those tags. You do not need to complete the website, you just need to have one page that will be used as the template. Joomla has a specific file management system as well as file naming that you must adhere to when creating the template.
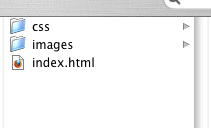
As far as file management, you will need to make sure you have within your main folder a subfolder labeled “css” where your style sheet will be saved, and a subfolder for “images” where all of your images for the template will be saved. Your HTML file will be saved in your main folder at the same level as your two subfolders. Your main style sheet must be named “default.css”. It is easier when you are creating the HTML CSS template to set your file management up this way before you begin creating. If you are using a downloaded template, I recommend changing your file structure and paths before getting started on changes in the code.

Remember, accessible website design is the separation between content and cosmetic, meaning that a logo can be in the HTML with an alt tag because it is relevant information to a viewer but background images should really be included through your style sheets.
To reformat your HTML document for Joomla we must make it a .php file and replace some of the code. First, make a copy of the folder that you have created for your file management. It is always good to have the original file to fall back on in case you need to try again. Preview your HTML file in your browser and take a screenshot. Rename that screen shot “template_thumbnail” and save it on the same level as your HTML file.
To change your HTML document to work as a successful PHP document do the following:
- Open your html file in your text editing software and save as “index.php.
- Replace the everything from the top to </head> with this:
<html xmlns="http://www.w3.org/1999/xhtml">
<?php defined('_JEXEC') or die ('Restricted access'); ?>
<!DOCTYPE html PUBLIC "-//W3C//DTD XHTML 1.0 Transitional//EN" "http://www.w3.org/TR/xhtml1/DTD/xhtml1-transitional.dtd">
<html xmlns="http://www.w3.org/1999/xhtml" xml:lang="<?php echo $this->language; ?>" lang="<?php echo $this->language; ?>" >
<head>
<jdoc:include type="head" />
<link href="<?php echo $this->baseurl; ?>/templates/system/css/general.css" rel="stylesheet" type="text/css" />
<link href="templates/<?php echo $this->template; ?>/css/default.css" rel="stylesheet" type="text/css" />
</head>
- All of the content within your div tags will need to be deleted and replace with a piece of PHP code to change it to be a modular position in Joomla. This will be similar to this: <jdoc:include type="modules" name="header" style="xhtml" /> Now the header of your template, most likely where your logo and banner are, will be a position in Joomla. This is convenient if you want to put a search component in your “header” position.
- From there continue through your code and delete everything except for your divs and replace that with the Jdoc command. Make sure to change the “name” in your jdoc command for each position.
- If you have a part in your template that is specifically for text, to show text in Joomla in a modular position you need to put this code instead:
<jdoc:include type="message" />
<jdoc:include type="component" />
- Next you need to create an .XML install component to include with your template package. Below is the template that you can fill in the information. Make sure to name this templateDetails.xml
<?xml version="1.0" encoding="utf-8"?>
<install type="template" version="1.5">
<name>???</name>
<version>???</version>
<creationDate>???</creationDate>
<author>???</author>
<authorEmail>???</authorEmail>
<authorUrl>www.dappledesignsonline.com</authorUrl>
<copyright>(c) ???</copyright>
<license>GNU/GPL</license>
<description>???</description>
<files>
<filename>favicon.ico</filename>
<filename>index.html</filename>
<filename>index.php</filename>
<filename>templateDetails.xml</filename>
<filename>template_thumbnail.png</filename>
<filename>css/default.css</filename>
<filename>css/index.html</filename>
<filename>images/index.html</filename>
<filename>images/img01.jpg???</filename>
</files>
<positions>
<position>header???</position>
<position>content???</position>
<position>menu???</position>
<position>sidebar???</position>
<position>footer???</position>
</positions>
</install>
Although it is not required, you can add a favicon in your template which will show up in the URL when you load your website. If you chose not to include this you will need to delete <filename>favicon.ico</filename> from your template details. You can create a favicon easily at www.favicon.cc. Also, you will notice that there is an HTML file in all folders… this is important for security reasons. Create an HTML file that consists only of a white background and include these files in each folder: template folder, CSS and image folder. When someone tries to view your files, only a white screen will greet them.
Now that you have all of the components in your folder, you need to compress your folder so that you can upload it to your website. Once you have your zip file you are ready to upload: sign into the back end of your Joomla site and go to Install/Uninstall. Choose your zip file and upload it. You will receive a message stating that there was a successful upload. From there assign your template in your template manager and your template will successfully be created, uploaded and assigned to your website.
Although there are several options for commercial templates, as well as free templates, it is important to know how to create and successfully upload your own. This opens the opportunity for future projects without being confined to someone else’s vision.

