How to Make an Animated Timer

This exercise will require PhotoShop and ImageReady, which came with my copy of PhotoShop back in the Dark Ages. You can use other programs if you wish. ImageReady is an animation program. It doesn't do 3D modeling, but it can do many nice animations.
First, you open a 3-inch by 3-inch window, or whichever size you wish. Next, you fill the background with a dark color. On a new level, fill the area with white. Next, make that level 50% transparent. You do this so you can see the white circles that you will make next. It's important to make the circles the same color as the background, because "cutting" out the circles will be involved, and when that happens, you'll get outlines if they're a different color than the background. Now, get a new layer and make a circle an eighth of an inch from the top with a circular marquee, then fill it with white.


Duplicate that circle and pull it straight down to the bottom of the screen constraining it so it doesn't wander horizontally. Give it the same margin you gave the one on top. You should now have two circles, one at the top, and one at the bottom as in Figure 1. If, in duplicating the circle, you created a new layer, merge the two layers together.
Now, do a "copy layer" and rotate, at 60 degrees. Merge the new circles together in one layer (see Fig. 2). Do another copy layer, rotate 60 degrees, then merge again. You should have six circles in a circle as in Fig. 3. Now, highlight all the circles, do a copy, then do a rotation of 30 degrees, and merge again. Now you have twelve circles. Highlight the circles, and save the selection, in case you need it again. Keep the marquee that defines the 12 circles, and go to the white layer, the one you left at 50% opacity. Turn off the layer with the white circles. With the highlighted circles, do a delete. This gives you a piece of "paper" with 12 holes in it, as in Fig. 4. Now put the opacity to 100% so that the paper is now white. Fig. 5 shows the result. I put a shadow under the white piece of paper to show that it has holes in it.


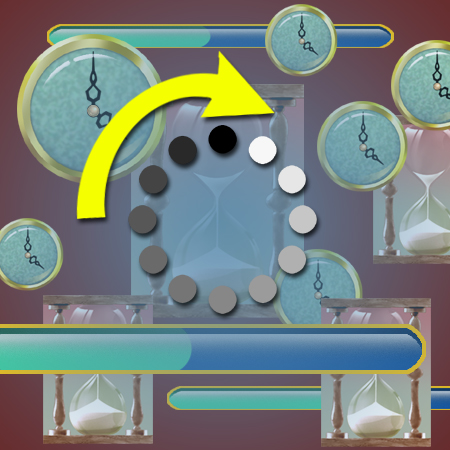
Now it's time to paint over the holes. Make a new layer, and paint a black blob over the top hole, overlapping the hole comfortably. Next, choose a gray shade halfway between the black you painted and white. Paint a blob of that over the hole at the bottom. Choose another shade halfway between those two and paint a blob over the one at the left. See Fig. 6 to show how I did the first four circles. Keep doing this until you have even gradations of shades sitting in a circle on top of your holes (see Fig. 7). Now, move the layer with the paint blobs under the layer with the holes, and you'll have something that looks like Fig. 8. Remove the shading, if you put it in (or leave it in for effect) and it will look like Fig. 9.
Copy the paint blobs layer. Do a rotation of 30 degrees. The blackest circle should now be in the one o'clock position. Copy this new layer, and do another 30-degree rotation. In PhotoShop, after you copy each new layer, you can do a shift/command/T and the layer will rotate the same distance as the last time, thus helping you to move faster.
After you have the twelfth layer of circles (with the blackest circle in the 11 o'clock position), save the file and bring it into ImageReady. In ImageReady, Turn off all the blob-painted layers except the bottom one. In the first animating frame (Fig. 10), give the duration time you wish. I used 0.05 seconds (I snapped a picture of this first frame before I put in the 0.05-second time delay; for this reason, it still shows "0 sec." If you do the timing task first, then this will be automatically copied for the remaining frames that you add. The first frame should show the first layer of blobs, masked by the circled windows in the upper-most visible layer, labeled "Layer 1" in Fig. 11.
Now, create a new frame, using the square icon with the bottom-left corner turned up in Fig. 10. Go to the layers palette and turn off the first, or lowest layer that has the painted blobs, and turn on the one above it. You now have a shift in values in your second frame. For each new frame, turn off the layer with the current blobs, and turn on the one above it, until you reach the top blob-painted layer.
You're finished with the animation. Test it by pushing the arrow shown in Fig. 10. When you're happy with it, save the file as an optimized gif, and you're done. When you open a browser, Just go to "Open File" and open your gif. You can relax while watching your creation, or notice any bugs to work out. When you put this gif into a web page, it will animate automatically. Programming the code to let it work while the computer is doing a task involves another type of computer programming which will not be covered in this hub.
Instead of making circles, you can make pictures, letters, or whatever comes to mind. And you can use colors, instead of shades. In subsequent hubs, I'll do other animations using these same two programs. Until then, enjoy!
![Adobe Photoshop Elements 2018 [Old Version]](https://m.media-amazon.com/images/I/51AQ4wl7eOL._SL160_.jpg)