How to Manage Wordpress Blog Categories

WordPress uses Categories to organise blog posts. It is good to group together posts which are about a similar topic. For example, books or games or movies.
Readers can then click on the Category to read more posts that are on the same subject.
The Categories which are assigned to a particular post are usually displayed at the bottom of a post in a blog. A list of some or all the Categories is often displayed in the sidebar of a blog.
Manage Categories
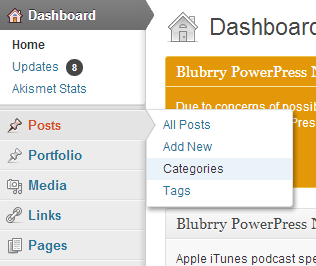
Managing the Categories for a blog is fairly straightforward. When you are logged into WordPress, move the cursor over Posts and then click on the Categories tab on the left side of the Administration Dashboard.
You will then see a screen where you can create new categories, edit or delete existing Categories.
If you have just started a new blog, you might like to create some Categories before you start writing any posts. If you prefer though, you can always create each Category individually whenever you add a new post.
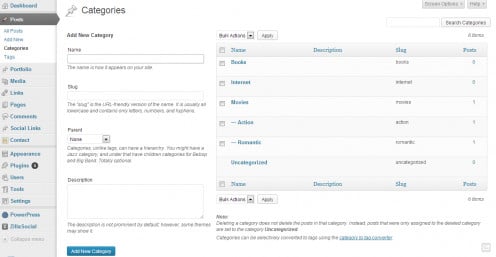
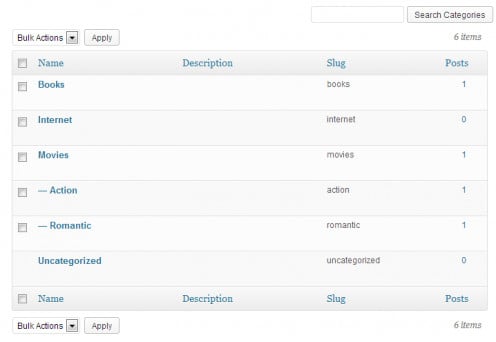
Table of Categories
On the right hand side of the Categories section of the Administration dashboard is a table. This table lists all of your categories.
Categories are shown hierarchically and alphabetically. Sub-categories are shown underneath parents with dashes in front of them.
The table of categories has the following columns:
- [ ] - When the checkbox is selected, that Category will be deleted when delete is clicked.
- Name - Click on the Category Name to edit it.
- Description - If you want, you can give Categories a description. This is optional. If a Category has a description, this will be shown when blog visitors hover over a Category link.
- Posts - The number of posts which use each Category.
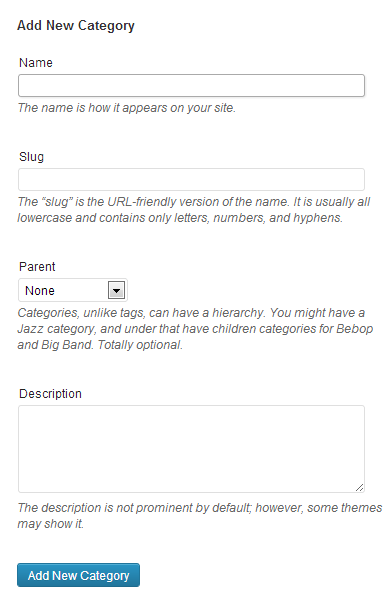
Add Category
On the left hand side of the Categories section of the Administration dashboard are some text fields used for adding new Categories.
When you add a new Category, you can enter four pieces of information.
1. Category Name
The Category Name has to be unique.
2. Category Slug
This must be unique too. This is what is used in the URL. For example, a Category Name of "Books" and a category slug of "books" would show all the "Books with a URL like this: yourblog.com/books/.
3. Category Parent
With this drop-down, you can make this Category a sub-Category. If you want to make this Category a sub-Category you need to select the Parent Category from the drop down.
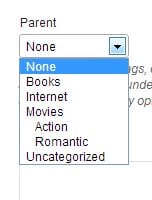
For example, if you already have a Category called 'Movies', you might want to make a new sub-Category called 'Romantic' or one called 'Action.'
If you are adding 'Romantic' as a sub-Category, you would select 'Movies' from this drop-down.
Sub-Categories show up on your blog Categories list. They will be nested under the Parent Categories list though.
When somebody clicks 'Movies' all posts in the Movies Categories will show up, including all the sub-Categories.
If they click 'Action', only the Action posts will show.
4. Description
Again, this is optional. You don't need to enter anything here.

Edit Category
To edit a Category that you have already created:
- Hover over the Category Name on the Category Table.
- Some options will then appear under the Category Name.
- These include: Edit | Quick Edit | Delete | View
- Click on Edit.
- You can then edit the Category Name, Category Slug, Category Parent or Description.
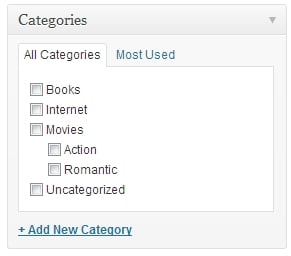
Adding or Editing a Post
If you are adding or editing a post, you will see a list of categories to choose from on the right hand side of your post.
- Select one of the Categories available or you can click on the link Add New Category.
- This will open a little text box underneath for you to enter the Category Name.
- If this new Category is going to be a Sub-Category, you can select the Parent Category which it belongs to.


