How to Move Your Operating System onto a SSD (A Complete Walkthrough)

A solid state drive, or SSD, is a new technology that enables your computer to access information quicker than normal optical drives.
This is a complete guide, put together by someone who doesn't know too much about the guts of a computer. Moving over my operating system to a SSD and installing a secondary drive was the first experience I had with installing anything myself, so don't be discouraged when starting if you're a bit lost. Sometimes it just takes a little tinkering around to get a feel for what you need to do.
How computer savvy do you consider yourself?
Precautions and Warnings
This guide is written for Windows 8, however, it should work fine with Windows 7. The information could also be adapted for a Mac platform if you choose. I'm no computer expert, however, so follow these instructions at your own risk.
It's a good idea to read this all the way through to know what you're getting into and then decide if it's something you feel comfortable doing yourself or troubleshooting if you run into problems. It's hard to write a specific guide since there are so many computers (different motherboards, computer setups, software, etc) that instead of following this guide fully, the process outlined should help give you an idea for what you need to look up to install your SSD if you're using different software or have a different motherboard.
The Setup and How it Works
The main idea behind moving your operating system to a SSD is to make your system run faster. You'll then use another drive for storing your files. Since SSD are a bit pricy and are just becoming available, this set up takes your budget into consideration.
If you have the money and are doing video work such as editing, you can buy a bigger hard drive and use the leftover space as a "sandbox". This means that you can have your footage and media you're editing on your SSD so it'll read quicker and then once your project is finished you can move your project file over to your storage drive. This allows you to benefit from the speed of SSD, and it's also cheaper and more practical as your storage drives don't really need the speed.
What You'll Need
- SSD with enough space to fit all of your programs ( + extra space, optional)
- 2.5" to 3.5" hard drive bay to fit your SSD inside your computer case
- eSATA cord and/or power cable (depends on your motherboard)
- Screws and small screwdriver
- Cloning software if your SSD didn't come with it.
How to Choose the Right SSD
First and foremost you're going to want to decide on how much space you're going to need. If you're just installing the operating system and your programs you'll need less space than if you want to install the operating system, programs and have some room to transfer video files to and from your primary storage drive.
You're also going to want to know what space and connections you have in your computer. Depending on your motherboard, your computer case and how many drives you already have installed you may need to purchase adapter brackets to adapt the smaller SSD to a regular hard drive bay. The best way to know what you'll need is to consult your manual, or if you're comfortable with just opening your computer up, you can just open it and see what you have to work with (just be sure that your computer is powered down, unplugged from power and that you allow it to cool down if it's been on for a while).
More often than not, you're going to need an adapter to be able to fit your SSD into your computer case. This adapter is a piece of metal that you can screw the SSD into and then slide the adapter into a normal hard drive spot in your case.
I don't have too much experience with different SSD myself, but the one that was recommended to me was the Samsung 830 Series. I've been using it for a couple a little over a month and I haven't had any problems. It even came with its' own cloning software that made the transfer easy and painless.
How to Pick a 2.5" to 3.5" SSD Bay
I bought a simple 2.5" to 3.5" hard drive bay that came with some screws so I wouldn't have to worry about finding the right size. I did have to purchase an eSATA cable to plug into my motherboard, but my computer already had a spare power cable that I could use to power my SSD with. Any eSATA to eSATA cable should work, but if you're unsure, it's always a good idea to ask someone at your local geek squad or local computer parts shop for advice.
Again, you'll probably need to open up your computer to see what cables are available for you to use.
Backing up Your Files and Preparing Your System
Before you proceed further, it's vital to backup your files. This is just a precaution and will prevent heartache if something does wrong. This also is a good time to organize your files and delete any junk that is lying around.
You're going to use cloning software which will take your entire disk image, all your files and folders and clone them onto your new drive, but it's still a good idea to back up all of your important documents, pictures and files that you wouldn't want to lose.
This will give you peace of mind when you're moving over your operating system and reformatting your secondary drive later on.


Fitting Your SSD into Your Computer
Once you've bought all of the supplies you're going to need and have made backups of your files, it's time to install the SSD in your computer.
Attaching the SSD to the 3.5" Drive Bay
This is a pretty easy step, depending on what brand and model you bought you may need to buy some screws, but all you need to do is screw your SSD onto the metal or plastic plate. That's it! Be sure to tighten down the screws all the way.
Installing the Drive into Your Computer Case
Again, this step will vary depending on your computer case and model, but you should be able to find your other hard drive and then easily see where you can install your SSD.
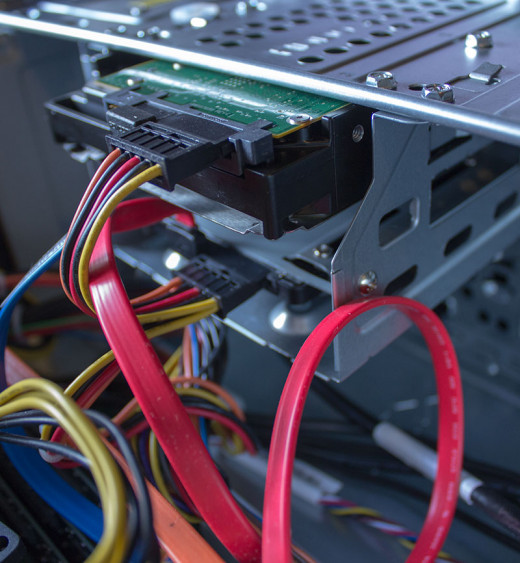
You may have to remove the other hard drive to be able to get the SSD drive into an open hard drive bay. If you're unsure of how to connect your cables, take a picture before you start removing anything. This will help you put your machine back together.
It's not too difficult. Just be sure that your SSD and hard drive are secure and screwed into place and that both have eSATA cables running from the motherboard to the hard drives and be sure that there is power for both drives.
Connecting the Power Cable and eSATA Cables
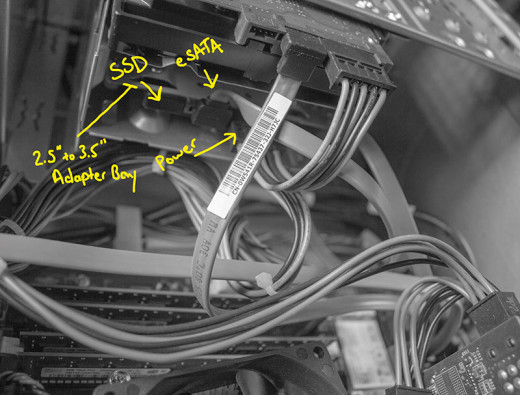
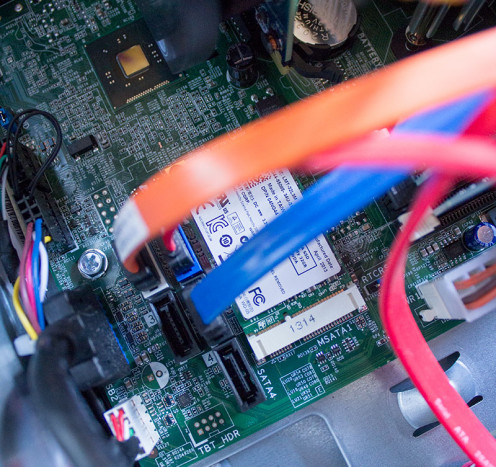
The eSATA cables come in a variety of sizes and colors. Some have right angles to better fit your machine while others are straight. This is the smaller cord that you see in the picture above (see labels).
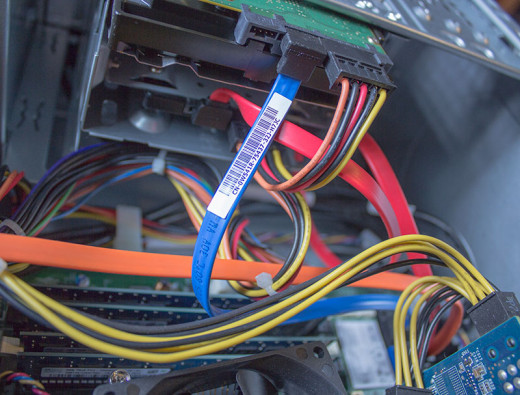
To plug it into the motherboard, simply insert it into an open eSATA cord slot (see picture to the right).
The power for my SSD is actually a cable that runs from the other hard drive. You can see it in the above photo (its the one with lots of little cords stuck together).
Moving the Operating System to the SSD
If your SSD came with cloning software, you're all ready to proceed. If it did not, you're going to want to either buy a cloning software or search for a free program such as Clonezilla to move over your operating system. Alternatively, you can also reinstall your operating system and then reload all programs and files onto your drives.
Disk Cloning Software
A List of Disk Cloning software can be found on this Wikipedia page.
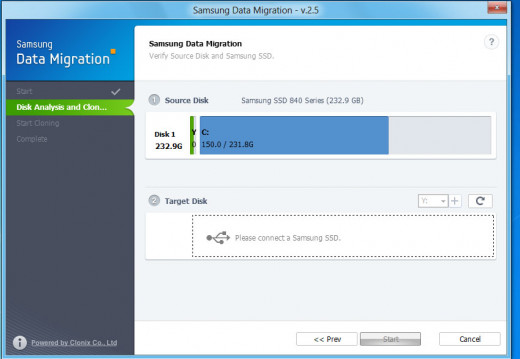
Cloning Your Operating System
This part will vary depending on what program you're using to clone your hard drive. I'm going to be using the Samsung cloning software that actually came with my SSD. If your SSD didn't come with specific software you'll need to look up a specific guide on your cloning software.
- Install the software that came with your SSD, or alternatively download a freeware or purchase another disk cloning software such as Clonezilla.
- Depending on your software you should see something like "Clone" and you'll be able to select which hard drive to clone to what drive.
- Once you have selected your OS drive and selected your SSD, hit start.
- The program will automatically transfer your data and OS.
Making the SSD the Primary Drive and Reformatting Your Old Drive
Once your system has finished cloning your files onto your SSD, you're going to have to unlinked your old drive and then reformat your old C drive so you can use it for storage. Depending on your motherboard, you may need to go through your BIOS to set your SSD and the primary hard drive and your other drive as the slave drive OR you may have to plug the eSATA cable from your SSD into a specific spot on your motherboard that will automatically make it read as your primary drive.
In order to figure this out, you'll need to consult the manual for your motherboard. If you don't have the manual on hand, you should be able to look up the manual online.
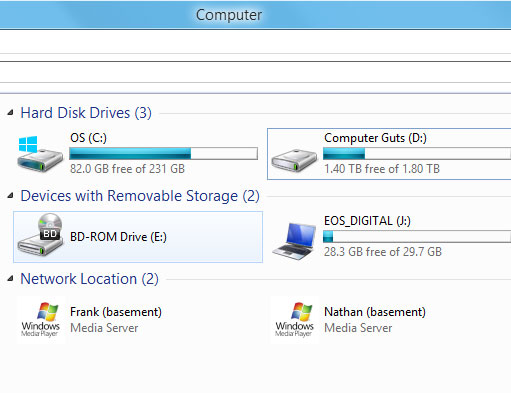
For my computer specifically, all I had to do was open up my computer, unplug the hard drive that used to be operating system, close the computer up, start windows and it automatically read it as my C drive. Then I shut down the computer, opened it back up and plugged my drive back in. After closing my computer and restarting windows, I now had my SSD as my C drive and the other hard drive as my D drive.
One way to make sure what drive is reading as what is to right click on it and see the size of it. My SSD was a 256GB and it was reading as my C drive. Which is exactly what I wanted and since I had already booted my computer with just the SSD plugged in, I already knew that all my files and programs were installed and working.

How to Reformat Your Old Drive
Once you know that your drive is reading correctly, it's time to reformat your old hard drive. You can do this multiple ways, but the easiest is to right click on the drive and simply select "format". Be sure that you're selecting your old hard drive with the operating system and not the SSD drive. It's a bit of a scary step, but if you backed up your files, you should have nothing to worry about.
You can also use the disk manager if you want to create different partitions for your drive instead of selecting format from the drop down menu.
How to Link Your My Documents Folder to Another Location
After you've got your hard drives reading correctly and everything's all set up. You're probably going to want to link your my documents, my pictures and desktop to your secondary hard drive. This process is very easy and is a lot easier than trying to move the Users folder to the other drive.
A word of caution. Do NOT delete your User folder as you will have to restore the operating system and start the whole process all over again. The method below is a much easier way to change the shortcuts.
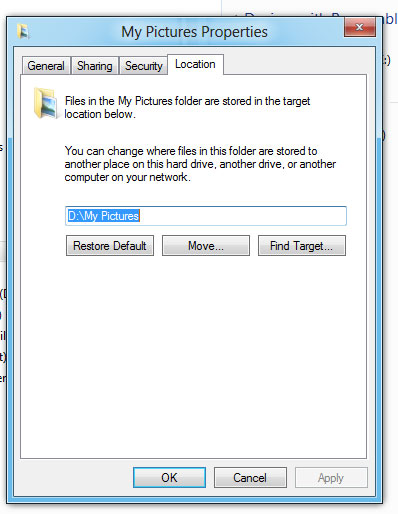
Step-by-Step Instructions for Changing the Location of your My Documents Folder
- Open my computer and right click on the folder named "My Documents" off to the side and select properties.
- You'll see the tab named "Location", click on that.
- At the bottom you'll see the default location for your drive. It'll start with C:\. To change the location simply type in the letter of your secondary drive (or another drive if you have multiple drives).
- Hit okay and you're done. It should automatically create the My Documents folder on your other drive.
- Click on My documents again and you should see that it brings you to your secondary drive instead of your C drive.
- Repeat the above steps for any of the folders you want to change the location of.
Closing Thoughts and Troubleshooting and Advice
Everything should now be working smoothly and your computer will now be running from the SSD with all of the folders linked to the correct places.
Troubleshooting Tips
- You may notice that you get an warning stating that ACHI mode is better than running in RAID. However if your original hard drive was formatted as RAID, I've found that it won't read if you're running in ACHI mode.
- Be cautious of following guides where you have to delete folders or files. A good example is a walkthrough that I read that told be to delete the Users folder and recreate it on my other drive. It's very easy to skip steps, so be sure to follow and read everything before proceeding. I ended up having to reinstall windows, removing my SSD and doing the whole process all over again.
© 2013 Noelle

