- HubPages»
- Technology»
- Computers & Software»
- Computer How-Tos & Tutorials
How to Replace a SATA Hard Drive in a Personal Computer

Differences in SATA and IDE Hard Drives
Note: In order to perform these instructions, your computer must have SATA connectors in the motherboard. If you don’t know whether it has the SATA interface or not, refer to the manufacturer’s documentation (user’s guide or manual). Another way to determine if a SATA device is present, look at the cables connected from the storage drive to the motherboard. The SATA connectors are 1/2 inch wide while the Integrated Drive Electronics (IDE) connectors are 2 inches wide. That is a big difference.
Have your Windows operating system (XP, Vista, 7, or 10) install disk or a computer recovery disk handy. You will need it after you have installed the SATA hard drive.
The IDE is a standard interface and bus for data communications between an electronics device (such as a hard disk drive) and a personal computer. It is easily identifiable with a gray cable ribbon about 2 inches in width. Similar interfaces that are used are Advanced Technology Attachment (ATA) or Parallel Advanced Technology Attachment (PATA). Wide gray cables are also used in PATA.
The Serial Advanced Technology Attachment (SATA) is easily identifiable with a smaller width cable about 7.8 mm in width with a smaller connector. Red or black are typical cable colors and the connectors are normally black. However, there is no standard colors.
The difference between SATA and IDE is in performance and support. The SATA cable and connector does not get in the way as much inside a computer and more air can be circulated as oppose to the fat IDE ribbons that block airflow. With SATA, it is also easier to upgrade and access components inside a computer when doing a repair. If making computer repairs, the wide PATA/ATA cables may require removal of these fat cables, which can be difficult to disconnect in tight areas inside computers.
The bottom line is that SATA is faster than IDE, ATA, or PATA, especially with the newer SATA specifications such as SATA 2.0 and SATA 3.0. As of 2018, virtually all new computers come with SATA devices instead of IDE.
In this instruction, the Dell computer model Dimension 4700C will be used as an example for replacing a SATA hard drive. Replacing the SATA drive on a compact computer is not difficult but it is different than replacing a IDE hard drive in standard size PC machines. Below are instructions on how to replace the SATA hard drive.
Opening the Computer Case
Shown is a Dell Dimension 4700C computer. The “C” designates that it is compact and there will be virtually no open spaces like the standard Personal Computers with mini-tower, mid-tower, or larger cases. Disconnect all the cables attached to the computer case.
There are buttons that you press simultaneously on the top and on the bottom. This will unhook the latches inside. If you don’t have a Dell 4700C, find a way to open your computer. If there are no instruction with the computer, locate it through the PC manufacturer’s website, in the support section.
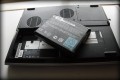
Open the Dell case like a book. (See Fig 1). The bottom of the computer will be difficult but it will take a little more force to open. For basic personal computers, an outer case will need to be separated from the chassis with components. Typically, a few screws will hold the case together.
Disconnect the Cables
Once the case is open, the hard drive will be on the right if you are looking from behind the opened 4700C computer. In most cases, the hard drive will be visible on any opened computer.
Ground yourself by touching the unpainted metal frame of the computer. This will prevent electrostatic discharge from damaging electronic components.
Carefully unhook the power and data cables connected to the SATA hard drive.
Squeeze the two green tabs on the SATA hard drive and pull the drive out to the right. This will free the hard drive. (See Fig 2). Other hard drives may only be attached with screws. Unscrew the drives and remove any other hardware brackets.
Pull the upper part of the hard drive towards you and it should be free from the bracket. In the Dell computer, lift the SATA drive out while being careful not to hit the brown ribbon cable that’s in the way. (See Fig 3).
There are two green guides on both sides of the drive. (See Fig 4). Unscrew both guides and place them on the new SATA drive.
To install another SATA hard drive reverse the directions: Reinstall the green guides; Place the drive onto the lower edge of the bracket; push the drive in the bracket flat; slide the drive to the left of the bracket until it locks; and connect the cables.
For all other computers, just reverse the process of how you removed the hard drive.
Close the case, connect the monitor, keyboard, and mouse. Connect the power cord and turn on the computer to test if the drive is recognized during boot up. If there is a problem, a DOS error message will appear telling you that a drive is not recognized.
In most cases, the new drive will be blank and not have a Windows operating systems. Follow directions for installing a new operating system or restoring a previous hard drive backup on the new SATA hard drive.
Install the Hard Drive
To install a SATA hard drive reverse these directions: Reinstall the green guides; Place the drive onto the lower edge of the bracket; push the drive in the bracket flat; slide the drive to the left of the bracket until it locks; and connect the cables.
For all other computers, just reverse the process of how you removed the hard drive.
Close the case, connect the monitor, keyboard, and mouse. Connect the power cord and turn on the computer to test if the drive is recognized during boot up. If there is a problem, a DOS error message will appear telling you that a drive is not recognized.
Remove the Hard Drive
Squeeze the two green tabs on the SATA hard drive and pull the drive out to the right. This will free the hard drive. (See Fig 2). Other hard drives may only be attached with screws. Unscrew the drives and remove any other hardware brackets.
Pull the upper part of the hard drive towards you and it should be free from the bracket. In the Dell computer, lift the SATA drive out while being careful not to hit the brown ribbon cable that’s in the way. (See Fig 3).
There are two green guides on both sides of the drive. (See Fig 4). Unscrew both guides and place them on the new SATA drive.
Install the Operating System
In most cases, the new drive will be blank and not have a Windows operating systems. Follow directions for installing a new operating system or restoring a previous hard drive backup on the new SATA hard drive.


© 2012 Romian1
Related

How to Extend Notebook Battery Life

How to Build an Awesome 386 Computer - Part 2: The Software

Surplus Auctions - How To Get A Cheap Used Laptop For Personal Use Or Re-Selling

Computer History: Classification of Generations of Computers
")
Fixing an IBM T43 Thinkpad which Hangs at Start-up and 2010 Error during Rebuild (In Vancouver)